Badge Construction
A new section, so please bear with us as its built out.
WW1 brought about an explosion of local metal Army insignia manufacturing in New Zealand.
Prior to WW1, distance to the United Kingdom, had not been a issue.
Most metal insignia (not all, there were some NZ makers of badges and of course of cloth bullion insignia) were ordered via agents, who represented British firms in New Zealand. The agent would place the order, and after a number of months, the insignia arrived via sea to the regimental stores in New Zealand.
But with the huge expansion of the New Zealand Army during WW1, existing stocks of badges in these stores were depleted quickly, as fresh drafts of soldiers were called up and left to join the 1st NZEF overseas.
As the war progressed, overseas New Zealand regiments, stationed in France and to a lesser extent, the Middle East, sourced their badges directly from the UK makers.
But a hole in the market was left with the supply to Home Service men, units which were not sent overseas and of course the Reinforcements or men training at the time in camps in New Zealand.
This is where local jewelers and manufacturers stepped in and saw an opportunity.
Sadly, the process of making a Cap or Collar badge by "Embossing" (stamping thin sheet metal between two dies) was never fully recorded at the time.
Much of this I imagine was due to protecting their trade secrets, and ensuring that no other rival took their business.
This also means that the following is somewhat of a educated guess! So if I have made mistakes, please point them out to me.
- Die Making
The process started with a sketch of the proposed design.
Not a simple as it sounds, as in 1911, with the formation of the new Territorial Regiments and some Corps, the New Zealand Army High Command ordered that all units sketch or draw what they were wearing as a Cap badge now, and add any newly proposed designs.
The G.O.C (General Officer Commanding), General Alexander Godley then personally vetted the designs, and approved or changed where he thought it was necessary.
Some designs took months and even years to be agreed on, while some unit commanders also lamented that they had no artists within their ranks to produce such drawings!
Once the design sketch was approved, either a tender was called, or in the cast of the New Zealand Army, the preferred supplier contacted, that being J R Gaunt & Sons Limited of London and Birmingham, who had a Christchurch (NZ) agent prior to WW1.
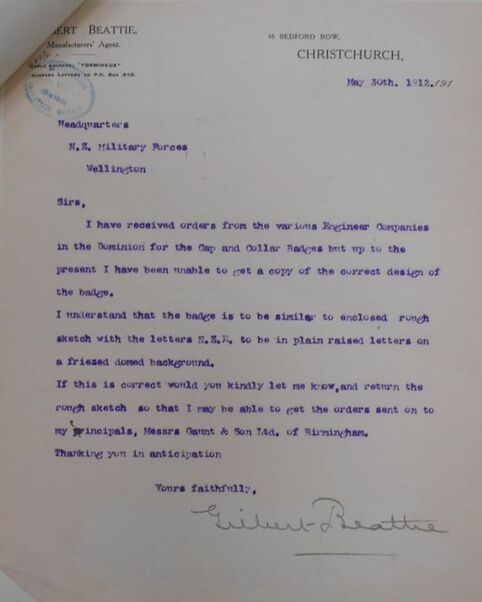
- Opposite: A memo to the Headquarters of the New Zealand Military Forces in Wellington, dated the 30th of May, 1912 from a Gilbert Beattie, 16 Bedford Row, Christchurch concerning the New Zealand Engineer Regiment.
"Sirs,
I have received orders from the various Engineer Companies in the Dominion for the Cap and Collar Badges but up to the present I have been unable to get a copy of the correct design of the badge.
I understand that the badge is to be similar to enclose rough sketch with the letters N.Z.E. to be in plain raised letters on a friezed domed background.
If this is correct would you kindly let me know, and return the rough sketch so that I may be able to get the orders sent on to my principle, Messrs Gaunt & Sons Ltd, Birmingham.
Thanking you in anticipation
Yours Faithfully
Gilbert Beattie"
(Badges - Regimental - Territorial Force, R23534556 AD1 AAYS 13-13 Archives NZ).
Sadly the "attached" rough sketch, has long gone from the letter, though the below exists in Archives NZ
Not a simple as it sounds, as in 1911, with the formation of the new Territorial Regiments and some Corps, the New Zealand Army High Command ordered that all units sketch or draw what they were wearing as a Cap badge now, and add any newly proposed designs.
The G.O.C (General Officer Commanding), General Alexander Godley then personally vetted the designs, and approved or changed where he thought it was necessary.
Some designs took months and even years to be agreed on, while some unit commanders also lamented that they had no artists within their ranks to produce such drawings!
Once the design sketch was approved, either a tender was called, or in the cast of the New Zealand Army, the preferred supplier contacted, that being J R Gaunt & Sons Limited of London and Birmingham, who had a Christchurch (NZ) agent prior to WW1.
- Opposite: A memo to the Headquarters of the New Zealand Military Forces in Wellington, dated the 30th of May, 1912 from a Gilbert Beattie, 16 Bedford Row, Christchurch concerning the New Zealand Engineer Regiment.
"Sirs,
I have received orders from the various Engineer Companies in the Dominion for the Cap and Collar Badges but up to the present I have been unable to get a copy of the correct design of the badge.
I understand that the badge is to be similar to enclose rough sketch with the letters N.Z.E. to be in plain raised letters on a friezed domed background.
If this is correct would you kindly let me know, and return the rough sketch so that I may be able to get the orders sent on to my principle, Messrs Gaunt & Sons Ltd, Birmingham.
Thanking you in anticipation
Yours Faithfully
Gilbert Beattie"
(Badges - Regimental - Territorial Force, R23534556 AD1 AAYS 13-13 Archives NZ).
Sadly the "attached" rough sketch, has long gone from the letter, though the below exists in Archives NZ
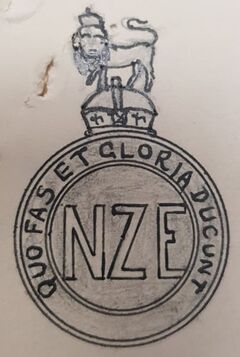
- Above: A depiction of the New Zealand Engineers Cap badge which was approved for wear on the 24th of April 1912 (Badges - Regimental - Territorial Force, R23534556 AD1 AAYS 13-13 Archives NZ).
|
- Above: An example of a front die, in hardened steel for the production of the New Zealand Rifles (N.Z.R) shoulder title. Note the white painted "22." to front, which must be a manufactures reference. The title in gilt brass, siting on top is for comparison purposes only. It is unlikely that this is the die that produced a "J R Gaunt" title, and the picture was taken in New Zealand, with the Gaunt's dies residing (possibly still) in the UK (image from the internet).
|
An artist called a Die Sinker, would then turn the paper design into a front die image in steel.
In the 1950's, the New Zealand Army sort a Cap badge for the New Zealand Regiment, and thankfully the process to make the badge has been left in a file with is with Archive NZ entitled "Badges & Buttons - New Zealand Regiment" R17187874. Its a lengthy file of Army memo's and notes from meetings, but it gives a insight into how they went about engaging with manufacturers.
It is noted that they attempted to maintained control over the design process, with a series of cast lead samples taken from the dies as the Die Sinker finished carving in the detail into the steel.
- Above: A rare lead sample of the 1st type, New Zealand Regiment Cap badge, which has been made by pouring the hot metal into the newly cut die.
|
- Above: A finished Gilt fired brass Cap badge to the New Zealand Regiment - 1st Type. Note there are some differences between the lead sample opposite and the final badge.
|
Once the Army was happy with the design, and it met their requirements, only then was the die hardened via a heat-treating process, which basically locked in the design.
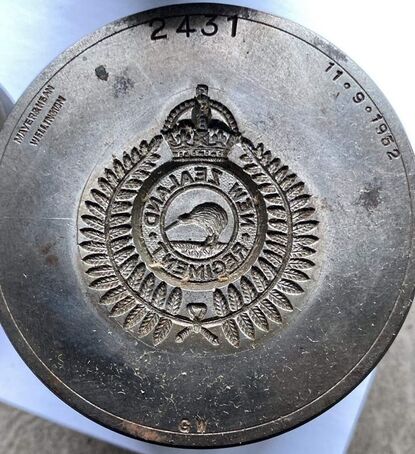
- Above: A extremely rare front die for the 2nd type, New Zealand Regiment Cap badge. Made by Mayer & Kean Ltd of Wellington (marked as such to top left), its is dated the 11th of Sept 1952. Note to bottom is the Die Sinkers initials of "GW" for George Whitehouse, who worked for the firm from the 1950's until his death in 1970 (B Jones collection).
|
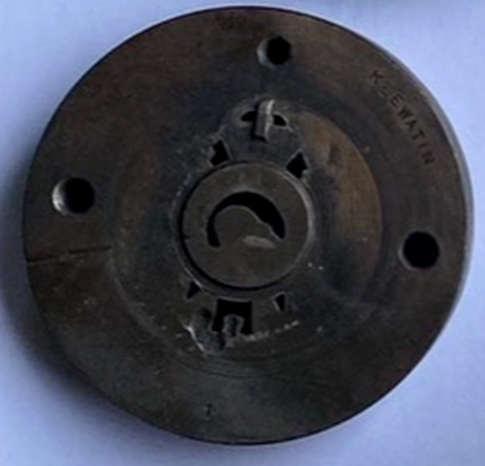
- Above: The back die or "force" for the opposite 2nd type New Zealand Regiment Cap badge, made by Mayer & Kean. Their maker mark can just be see in inverse detail at the bottom of the force, and would be in raised letters imprinted on the back of the badge when stamped. Note "KEEWATIN" stamped to upper right, which is the name of the steel used to make the die (B Jones collection).
|
Note, the above example of a 2nd Type New Zealand Regiment Cap badge has "KEEWATIN" stamped to the force or back die. This refers to the manufacturer of the steel, which was important to note, as all steels have different chemical compositions, and therefore react differently to heat treatment.
KEEWATIN is a O1 type tool steel, which is an oil hardening, cold work general purpose steel with easy machining properties and low hardening temperatures compared to other grades. O1 provides good wear resistance and toughness sufficient for standard tool and die applications making it a suitable choice for tooling with good tool life and economical production. Also referred to as Badger, Ketos, Truform, Keystone, Oilcraft, Presco, Colonial No. 6, Thyrodur 2510, Wando, Kiski, EXL-Die, BTR, Saratoga and Teenax.
Interesting to note, that the likes of C M Bay during WW1 used an English brand called Eagle & Globe to make his dies.
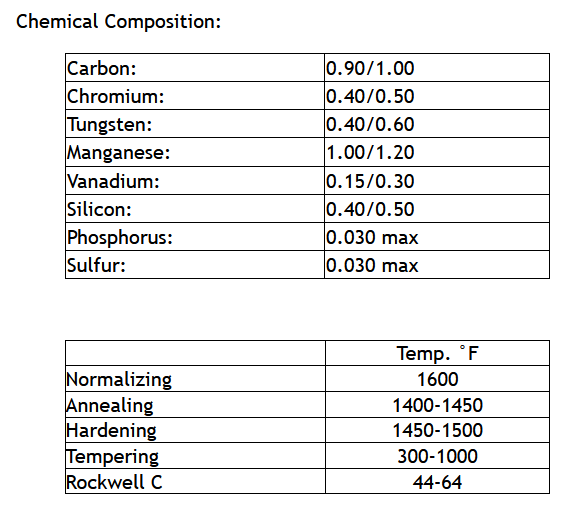
- Opposite: The chemical composition and properties of O1 Tool Steel.
Other main steel types include:
- A2 Tool Steel - also referred to as Air-True, Windsor, Airkool, AL4, Select B, Thyrodur 2363, Airque, Sagamore, Cromo-Loy, EZ-DIE and A-H5.
- D2 Tool Steel - also referred to as Ontario, Aristocrat, Superior No 3, High-Chrome, Olympic FM, Airdi 150, Ohio Die, Ultra Die 3, CCM, AL3, CNS-1, Atmodie, 610 and FNS.
- H13 Tool Steel - also referred to as Dievac, Viscount, Thyrotherm 2344, Cromo-High V, Firechrome 44, Hotform V, VAD13, Potomac M, Thermold H 13, VDC, Hot Form V, Dica B Vanadium, Nu-Die V, Firedie 13 and 883.
- M2 Tool Steel - also referred to as Mustang, Double Six, Vasco M2, REX M2, Micro-Melt M2, Speedstar, Thyrapid 3343, TRM-2, Cheyenne, Sixix, Molite 2, Motung 652, Braemow, 66 HS, DBL-2 and Molva-T.
- M43 Tool Steel
- S7 Tool Steel - also referred to as Bearcat, Supershock 7, Hi-Shock, Super 7 MQ, Simoch, Arapaho, Shock-Die and Cyclops ST.
- W1 Tool Steel - also referred to as Watercrat, 11 Special, H-9 Double Header, Lion, Ajax, Colonial No. 14, Washington, XXX, Pompon Special, Blue Label and Crescent Special.
- A6 Tool Steel - also referred to as Jess-Air, Diecrat, LO-AIR, VEGA, Apache and Orbit.
The back die or "force" was needed to "push" the design into the front die, and cause the design to be embossed in the brass, copper, bronze or silver.
It was created by placing the front die under the press and then resting a piece of red hot steel on top .
The two were then quickly pressed together.
The back die or "Force", could not be left for too long on the front die as its heat would anneal (soften) the front die, thus undoing its heat treatment, and making the front die soft. This would later lead to the consequence, with fracturing of the front die, or loss of detail from the badge being created.
The Force went through its own hardening via heat-treatment.
A friend mentioned that the die (which is a lump of steel) was often used more than once. If it was cylinder in shape, the other end of the cylinder could also have a impression of another badge. Sometimes it was done before the die was hardened or sometimes one image cut, die hardened, die annealed, another design added, die hardened again!
KEEWATIN is a O1 type tool steel, which is an oil hardening, cold work general purpose steel with easy machining properties and low hardening temperatures compared to other grades. O1 provides good wear resistance and toughness sufficient for standard tool and die applications making it a suitable choice for tooling with good tool life and economical production. Also referred to as Badger, Ketos, Truform, Keystone, Oilcraft, Presco, Colonial No. 6, Thyrodur 2510, Wando, Kiski, EXL-Die, BTR, Saratoga and Teenax.
Interesting to note, that the likes of C M Bay during WW1 used an English brand called Eagle & Globe to make his dies.
- Opposite: The chemical composition and properties of O1 Tool Steel.
Other main steel types include:
- A2 Tool Steel - also referred to as Air-True, Windsor, Airkool, AL4, Select B, Thyrodur 2363, Airque, Sagamore, Cromo-Loy, EZ-DIE and A-H5.
- D2 Tool Steel - also referred to as Ontario, Aristocrat, Superior No 3, High-Chrome, Olympic FM, Airdi 150, Ohio Die, Ultra Die 3, CCM, AL3, CNS-1, Atmodie, 610 and FNS.
- H13 Tool Steel - also referred to as Dievac, Viscount, Thyrotherm 2344, Cromo-High V, Firechrome 44, Hotform V, VAD13, Potomac M, Thermold H 13, VDC, Hot Form V, Dica B Vanadium, Nu-Die V, Firedie 13 and 883.
- M2 Tool Steel - also referred to as Mustang, Double Six, Vasco M2, REX M2, Micro-Melt M2, Speedstar, Thyrapid 3343, TRM-2, Cheyenne, Sixix, Molite 2, Motung 652, Braemow, 66 HS, DBL-2 and Molva-T.
- M43 Tool Steel
- S7 Tool Steel - also referred to as Bearcat, Supershock 7, Hi-Shock, Super 7 MQ, Simoch, Arapaho, Shock-Die and Cyclops ST.
- W1 Tool Steel - also referred to as Watercrat, 11 Special, H-9 Double Header, Lion, Ajax, Colonial No. 14, Washington, XXX, Pompon Special, Blue Label and Crescent Special.
- A6 Tool Steel - also referred to as Jess-Air, Diecrat, LO-AIR, VEGA, Apache and Orbit.
The back die or "force" was needed to "push" the design into the front die, and cause the design to be embossed in the brass, copper, bronze or silver.
It was created by placing the front die under the press and then resting a piece of red hot steel on top .
The two were then quickly pressed together.
The back die or "Force", could not be left for too long on the front die as its heat would anneal (soften) the front die, thus undoing its heat treatment, and making the front die soft. This would later lead to the consequence, with fracturing of the front die, or loss of detail from the badge being created.
The Force went through its own hardening via heat-treatment.
A friend mentioned that the die (which is a lump of steel) was often used more than once. If it was cylinder in shape, the other end of the cylinder could also have a impression of another badge. Sometimes it was done before the die was hardened or sometimes one image cut, die hardened, die annealed, another design added, die hardened again!
|
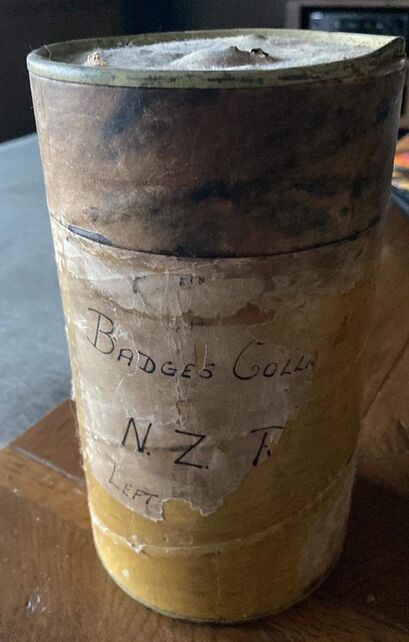
- Opposite & Above: The complete die set of Front Die, Force and associated cutters for the 2nd type Kings Crown Cap badge. Interesting that the cardboard storage cylinder which the above items are stored in says "Badges Collar, N.Z. R(egiment), Left" to front. This badge type was only made as a Cap badge, and not a Collar, but maybe there was another intention to do so in 1952 (B Jones collection).
|
The Force or back die was was stuck to the press hammer head with gutta percha.
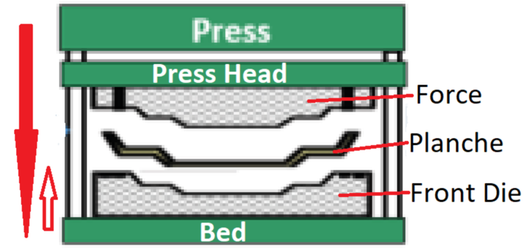
- Opposite: A very simplified diagram of a Metal Press and its components, but it shows how the two dies were sent up, opposing one another, and then the brass either in sheet or coiled form, fed in-between the two dies.
Common base metals such as brass or silver (never steel or iron), are malleable substances which respond well under pressure. The dies would have had pins, dents, or set in the bed of the press, which would allow proper line up of the obverse and reverse dies. With a single stroke, the die pairing would bring up the design, but crisper designs would be achieved by multiple strikes.
Common base metals such as brass or silver (never steel or iron), are malleable substances which respond well under pressure. The dies would have had pins, dents, or set in the bed of the press, which would allow proper line up of the obverse and reverse dies. With a single stroke, the die pairing would bring up the design, but crisper designs would be achieved by multiple strikes.
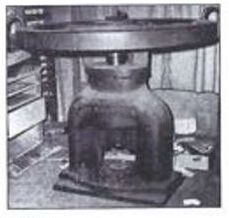
- Opposite: A small back and white photograph taken from the New Zealand Herald, 5th Aug 1964, of Adolph Kohn's metal press, which sat in his Auckland premises on Queens street, from 1903 to when this picture was taken (1964). It was apparently a 4 ton iron press, which was worked by two men. "A heavy column was raised and allowed to unwind quickly, forcing an impression of a die into the metal blank" (“Gold and Silversmithing in Nineteenth & Twentieth Century New Zealand” by Winsome Shepherd (1995) by Te Papa. The image also appeared on pages 120-121).
Items made by "A. Kohn" included Coronation medal of Edward VII in 1902, 1913-14 Auckland Industrial and Mining Exhibition medals in gold, silver and aluminium. He also made the 1913 Waterfront Strike N.Z.F.U. Auckland “Special Constabulary" badge in silver.
In 1964, the business closed, and the metal press made the headlines as it was too big to move, and was apparently "five feet above and below the floor level". I presume it was eventually broken up, and sold for scrap.
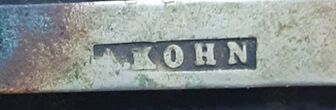
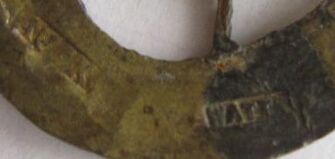
- Opposite: A slightly obliterated maker mark to Adolph Kohn or "A. Kohn" as he marked his items. This comes from the back of a Special Constabulary badge made for the 1913 Waterfront Strike in Auckland.
|
- Above: This shows a unfinished Cap badge to the 1st (Canterbury) Mounted Rifles. This is a Gaunt made example, just because the top of the "Y" is joined in "CYC". Locally made New Zealand examples have a gap in the "Y".
|
- Above: The reverse of the opposite badge. Note the mark, in the sheet brass, just off to the edge of the badge. I have marked some of them in red. This is the edge of the Force as it pressed itself into the front die with the sheet brass in-between.
|
- Opposite: A rare item, in that it has survived. A front die in harden steel to the 27th Reinforcements, left Collar (when worn). But due to the pressing process, it has developed cracks or faults in its surface. Three can be seen, one to top face, one to right side, and one at base. To "save" this front die, the jeweler has encased the die in a steel "banding", with the effect of trying to hold all parts together. All this effort shows to what high regard the die was held, and maybe the expense of trying to create a new one from scratch (image from the internet).
After the stamping was completed, the brass badge or Planche, was stamped again with a trimming die.
After the stamping was completed, the brass badge or Planche, was stamped again with a trimming die.

- Above: A front die and its trimming die for the Royal New Zealand Air Force Cap badge, with Kings crown. Note the "72" in white paint to front (image from the internet).
|
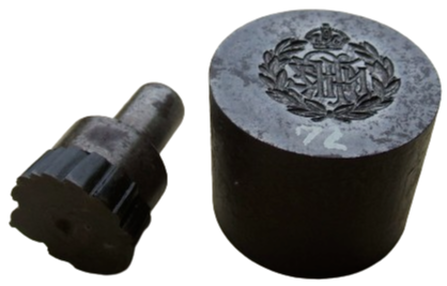
- Above: The same dies, but with a side view of both. Apparently they both weigh a combined 1.7kgs (image from the internet).
|
|
- Above: A unfinished ONWARDS Cap badge, which has had its trimming die applied, and the outside brass removed. Yet the inside has yet to be finished or pierced.
|
- Above: The same badge, note the thinning and lines around the non-void area of brass, which is ready to be removed/punched out.
|
The edges to the badges were then hand-finished, and trimmed of excess metal (salvage) and the jagged edges, filed.
At this point, the badge was pierced if necessary, with a small precision drill or minute punch points. The overall effect was to not to bend the metal and detail of badge out of shape.
Typically, around WW1, this was a Woman's profession, with stories that they were preferred over men as they were cheaper to employ, but also had a finer attention to detail!
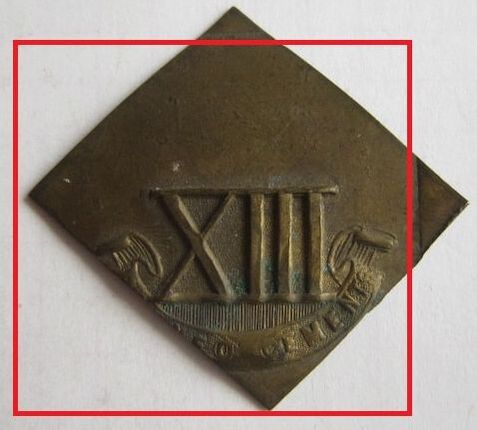
- Above: A off-cut planche, possibly also partly cut to stop it being later "used", to the 13th Reinforcements. It appears to be struck with a square front die (outlined in red), but note the damage to the letters of the word "REINFORCEMENTS", which actually carry over to the finally produced badge (far right).
|
- Above: This show the reverse, with a slight indentation of the Force on the flat brass surround. Note there is NO Company letter above the roman numerals "XIII". This was actually later handcut out of the above flat piece of brass, like the "G" shown opposite on the Cap badge, which is just one piece to center. It just
|
(continued) shows the time and skill put into these badges, as potentially the letters A to H would need to be cut out. Above is a completed 2 piece, G Company, 13th Reinforcement Cap badge.
|
|
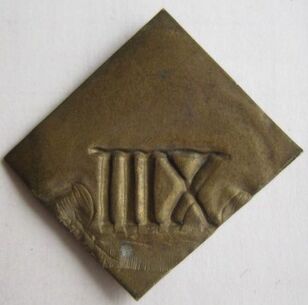
- Above: Another example of a planche or piece of unfinished brass Reinforcement badge. This time to the 14th Draft.
|
- Above: Again this is the reverse view, with Force marks. This again (if completed) would have been trimmed and a letter created above the number "XIV", like the opposite, which is 2 piece to C company, 14th Reinforcement draft.
|
|
- Maker Marks
Maker marks were not required by the New Zealand Army on their badges, and was just an addition at the whim or requirement of the manufacturer.
Early Forces or back dies, which made the impression of the back of a badge, were blank, and just held the reverse details of the front of the badge.
J R Gaunt took the step early on of maker marking most of its "other ranks" and Officer badges it made for the New Zealand Military Forces, by creating a separate small brass plaque, stamped with their name and business location. Though this practice was never used on every badge they made, there are examples of "Gaunt like" badges which exist just with no maker plaque attached.
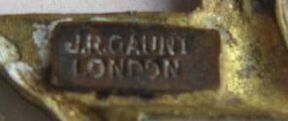
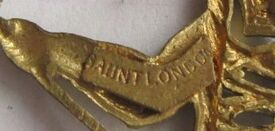
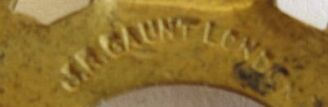
- Above: The 1st type of a "J. R. GAUNT LONDON" plaque to the back of a 3rd (Auckland) Infantry Regiment Collar badge. Found on 90% of Gaunt marked badges
|
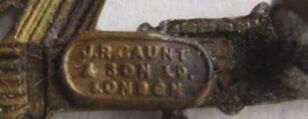
- Above: The 2nd type of a "J. R. GAUNT & SON Co. LONDON" plaque to the back of a New Zealand Machine Gun Corps Collar badge. Not often found, and the Corps badges can also come with the 1st type anyway. These NZMGC badges were manufactured around mid 1916, after the Corps formed in France.
|
- Above: The 3rd type of "J. R. GAUNT LONDON" plaque, which is found on the 15th (North Auckland) Infantry Regiment Collar badge. Due to space constraints, Gaunt need to become inventive on where they put their maker plaque. This badge also comes with the 1st type plaque.
|
- Opposite: The 4th type of "J. R. GAUNT LONDON" plaque, which is found on the 16th (Waikato) Infantry Collar badge. Again, due to space constraints, Gaunt need to become inventive. This same V shaped plaque is also on the back of the 12th (Otago) Mounted Rifles Collar badge. These badges also come with the 1st type plaque.
Firmin & Sons of London also used a similar plaque on the back of their badges, but they were less prolific as Gaunt in terms of supplying badges to the NZ Army and tended to make Officers badges or one-off type items.
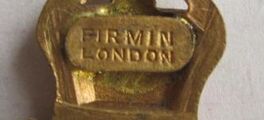
- Opposite: A near solid Officers gilt brass cap badge, with the banner wording of "New Zealand Medical Corps" to front. To back of crown (which is the only indented part of the back of the badge) is a brass plaque with the maker details of "FIRMIN LONDON".
- Opposite: A near solid Officers gilt brass cap badge, with the banner wording of "New Zealand Medical Corps" to front. To back of crown (which is the only indented part of the back of the badge) is a brass plaque with the maker details of "FIRMIN LONDON".
These plaques would have been added when the lugs were also attached to the back of badge and is found on New Zealand badges from the early 1900's to the end of WW1.
Marks were also impressed to back of UK and Australian made NZ badges. This tended to just be on shoulder titles and Officers badges, with their solid or semi-solid backs.
Marks were also impressed to back of UK and Australian made NZ badges. This tended to just be on shoulder titles and Officers badges, with their solid or semi-solid backs.
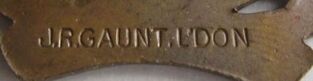
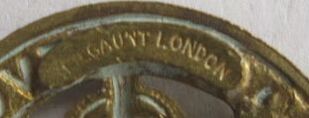
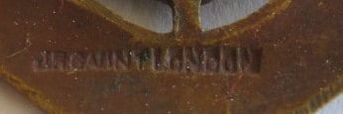
- Above: A large stamped "J.R. GAUNT. L'DON" to the base back of a Officers 7th (Southland) Mounted Rifles Cap badge.
|
- Above: A 2 tiered maker mark to "J. R. GAUNT LONDON" to the back of a darkened Officers 3rd (Auckland) Infantry Regiment Cap badge.
|
- Above: A curved stamped maker mark to "J. R. GAUNT LONDON" to the back of a gilt fired Officers 3rd (Auckland) Infantry Regiment Cap badge.
|

- Above: A similar maker mark but this time to the back of a die stamped NZE's Railway Battalion Cap badge in brass. Its to the back, vertical to the left of the railway Engine.
|
- Above: A similar mark to the one above, of "J. R. GAUNT LONDON", this time to the back of a bronze Officers 6th (Hauraki) Infantry Regiment Cap badge.
|
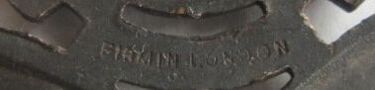
- Opposite: A stamped maker mark of "FIRMIN LONDON" to the back of a darkened Officers Cap badge to the 5th (Wellington Rifles) Infantry Regiment.
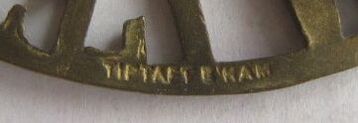
- Opposite: A NEW ZEALAND shoulder title in gilt brass with the maker stamp of "TIPTAFT B'HAM". The titles were made during WW1 with the idea of a national shoulder title be worn, much like what the Australian Imperial Forces were wearing at the time. i.e. "AUSTRALIA" in brass.
The idea was not adopted, though some were worn, and many were make, including by the UK based manufacturer. Also found the back of "NZR" shoulder titles.
The idea was not adopted, though some were worn, and many were make, including by the UK based manufacturer. Also found the back of "NZR" shoulder titles.
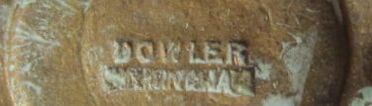
- Opposite: A rarer maker mark to "DOWLER BIRMINGHAM" who didn't make very many items of the New Zealand Military Forces. This mark is found to the back of a Kings Crown New Zealand Staff Cap or Collar badge in gilt brass. Also found to to the back of a 17mm 4 stars NZ Forces button.
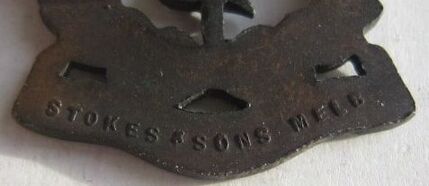
Stokes and Sons appear to have made badges just prior and during WW1 for the New Zealand Military Forces. Not all were maker marked (NZ Field Artillery and NZA badges), but some were. They make a number of different gilt brass shoulder titles and a few Brass or Copper Cap badges.
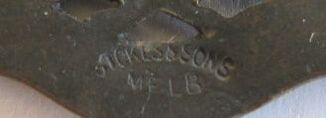
- Above: The 1st type of stamp by "STOKES & SONS MELB", which is to the back of a solid backed, darkened "N.Z.M.C" bannered Cap badges.
|
|

During WW1, some New Zealand manufacturers also added their details. Some by “incusing" i.e stamping the badge after, with a separate punch to the back. This would have been labour intensive and time consuming, so is only found on a few badges
C.M. Bay or Cecil Montague Bay of Wellington operated during WW1 and resided at 66 Willis Street, Wellington.
C.M. Bay or Cecil Montague Bay of Wellington operated during WW1 and resided at 66 Willis Street, Wellington.
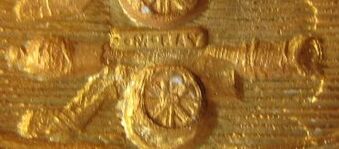
- Above: The back of a NZAOD Officers Cap badge, incused or stamped to "C. M. Bay. The stamping has caused a slight bump on the 3rd Cannon to the front of the badge.
|
- Above: The back of a "On War Service, H.M.N.Z Transport" button-hole badge. The stamping is not quiet clear, with the "C" not forming. Found also on the NZANS Brooch Badge.
|
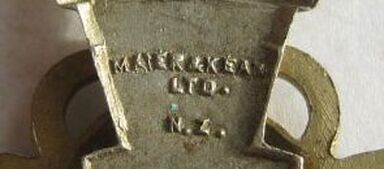
Mayer & Kean Ltd, were founded in 1902, with their offices at 4 Willis Street, and then a brief move Feb 1920, at 6 Willis Street, Singers Avenue, Wellington, and then back again to 4 Willis Street, Wellington.
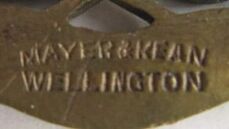
- Above: The maker mark of "MAYER & KEAN, WELLINGTON" which has been added to the solid back of a Officers NZDC Cap badge.
|
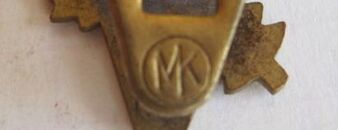
- Above: The circular maker mark stamp of "MK" for Mayer & Kean. This is found on the back of the button-hole WW2 "V" for Volunteer to enlist badge. Also found on the 1930's Boer War Veterans Fern leaf badge.
|
William Bock was another Wellington jeweler and die maker. His badges are also occasionally maker marked. He was located at Evans' Buildings, 95, Lambton Quay, Wellington
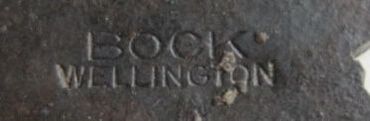
- Above: A stamped maker mark to "BOCK WELLINGTON" to the back of a Officers 2nd Queen Alexandra's (Wellington, West Coast) Mounted Rifles Cap badge.
|
- Above: A slightly different stamp to the back of a NZP & TC Cap badge in die stamped brass. You can just make out "BOCK WELLINGTON" to the back lower banner of the badge.
|

- Above: A maker mark to a NZMGS brass shoulder title. Bock it seems, was also an on-seller, and has taken a title made by the Australian manufacturer "STOKES & SONS MELB" , and over stamped his mark with "BOCK WELLINGTON".
|
Reuben Watts was a Auckland based manufacturer. He is somewhat renown for his unusual kings crown on his badges, especially his NZ Artillery Badge. He did make some Army badges, but again not all of his were maker marked. Here are a couple of his which were.
He appears to have been based at 6 Durham Street East, Auckland.
He appears to have been based at 6 Durham Street East, Auckland.
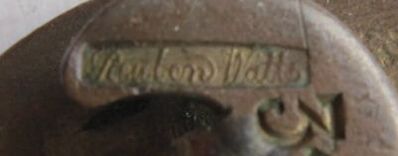
- Above: On the back of a Auckland National Reserve of New Zealand button-hole badge is a maker stamp of "Reuben Watts". The badge has a membership number of 313 stamped also to back.
|
- Above: The back of the 1st type New Zealand Pioneer Battalion badge, with the small "NZNC" to base has two stamped marks. A "WATTS" and then further round a "AUCK" for Auckland.
|
Robert Young & Co, were a jeweler based in at 20-22 Lorne Street, in Auckland and were in business up to the late 1970's.
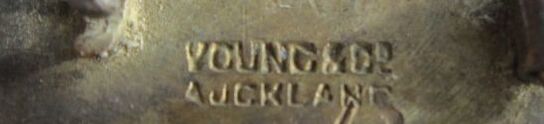
- Above: A maker mark for "YOUNG & Co, AUCKLAND". This is on the back of a "On Active Service NZ SONS" badge, made by the form for WW2. It was a private purchase item, sold to the public by the firm and is made from enameled brass with a brooch fitting.
|
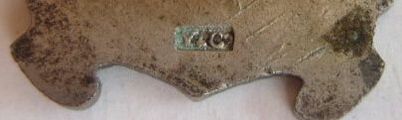
- Above: A maker mark of "Y & Co" for Young & Co of Auckland. This is to the back of a WW2 "2nd N.Z.E.F., 1st Echelon Assn" brooched badge.
|
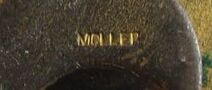
- Above: A maker mark to "MOLLER" to the back of a Otago National Reserve of New Zealand button-hole badge. Moller was based in Dunedin.
|
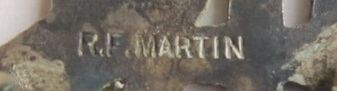
- Above: A maker mark of "R.F. MARTIN" to the back of a Christchurch Boys High School (BHS) Cadets badge.
|
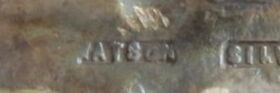
- Above: A maker mark of "WATSON" to the back of the Christchurch St Andrews College Cadets badge.
|
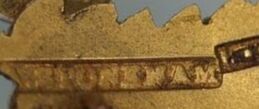
- Opposite: The maker mark for "STONEHAM" which was Arthur Stoneham, a Dunedin native, he ran a Jewellery business in the city and also Gisborne for some 50 years before retiring. He passed away in Gisborne in Oct 1944. He was also connected with the Dunedin Highland Rifles for many years, and rose to the rank of Lieutenant-Colonel of the unit. In 1911, with the change of Volunteer to Territorial system, he was posted to a the Reserve list. This maker mark is to the back of a D Company, 6th Reinforcement badge, which has been brooched, with a safety chain attached. It looks to also have had the brass center with the numbers "D/6" plated in gold (image from the internet).
- Opposite: A maker mark of "HISLOP". John Hislop was a Watchmaker and Jeweler, based in the 1880's and 1890's at 74 Princess Street, in Dunedin. The maker mark is to the back of a New Zealand Torpedo Corps Silver brooched badge, which is either a sweethearts or a association badge.
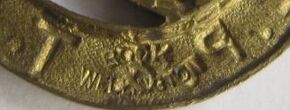
A few badges had their maker marks incorporated into the front dies, therefore appear on the front of the badge. William Bock seems to have done this with some of his badges, and of course many Reinforcement draft badges used the RD or registered design system (a form of copyright on designs), and the number was added to front design.
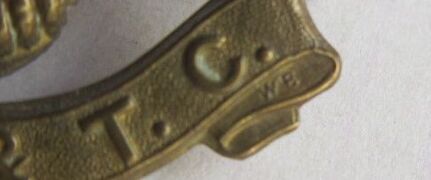
- Above: The front, bottom right hand corner of a gilt brass Cap badge to the New Zealand Post and Telegraph Corps. In the furl of the banner is the initials of "WB".
|
- Above: A close-up of the lower left front of a 24th Reinforcement Cap badge. Just above the "H" in "HOLDFAST" is the maker name of "BOCK.
|
- Above: A front base of a 26th Reinforcement Cap badge. Just above the star is a "B" for Arnold Ashworth Binns? He was a badge manufacturer during WW1, making badges from the 19th Reinforcements onwards. At base, below the banner is "RD" (left), "930" (right).
|
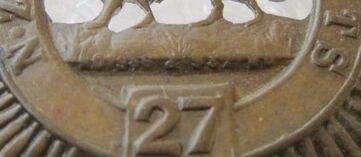
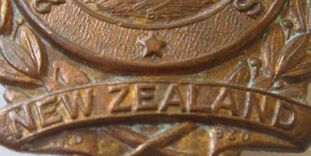
- Above: A front base of a 27th Reinforcement Cap badge. Just above the "27", in the fold of the land beneath the lions feet is the "RD 936 & 937 RD".
|
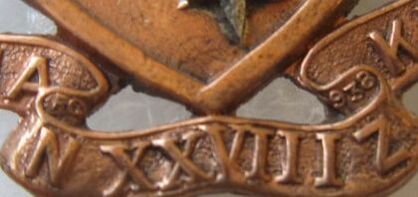
- Above: The base front of a bi-metal 28th Reinforcement Cap badge. Note the RC used or "Registered Copyright" with "RC" above the "N" and "938", above the "Z" in the lower banner.
|
Occasionally the registered design numbers were stamped or incused to back of a badge
|
|
|
- Above: A gilt brass Tiki Collar badge to the 23rd Reinforcements. It has a small "RD902" stamped to back.
|
- Above & Above Right: The back of two gilt brass 19th Reinforcement Collar badges. Both are stamped to "RD873" to back, but on two different sides. The collar was not opposing, so either side could be worn, but it seems where they stamped to back was sometimes different. Note the lugs pictured are different, so I haven't just flipped the image!
Incusing the Force or back die did also occur in New Zealand. The added advantage was the details of RD number or makers mark were automatically added as part of the embossing or stamping process. Initially these were done by punching the Force with letters and numbers which were inversed, so that it gave a positive or raised image to the back of the badge.
Incusing the Force or back die did also occur in New Zealand. The added advantage was the details of RD number or makers mark were automatically added as part of the embossing or stamping process. Initially these were done by punching the Force with letters and numbers which were inversed, so that it gave a positive or raised image to the back of the badge.
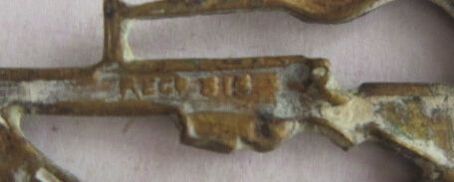
- Above: The back of a "Kiwi over Rifle" Collar, worn from the 10th Reinforcements onwards. It has a raised "REGD 815" to back of rifle.
|
- Above: The back of a 29th Reinforcement bi-metal Cap badge with raised "RD 959 & 960" to top and bottom of "NZ".
|
Badges which were made by Stokes & Son's of Melbourne also had this early Force incusing to back of badges they made. Many were solid or semi-solid to back, with a raised letter maker mark.
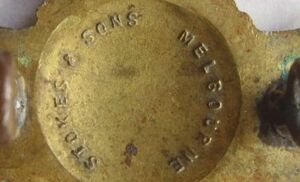
- Above: A maker mark to the back of a gilt brass Cap badge to the New Zealand Corps of Signals. Raised letters to "STOKES & SONS MELBOURNE".
|
- Above: A maker mark to the back of a darkened copper "N.Z.M.C" bannered New Zealand Medical Corps Collar badge. Again raised letters in a curve to base to "STOKES & SONS MELB".
|
Mayer and Kean adopted this latter maker mark method on most of their badges, both during and after WW2, by including a "M & K W" on the back dies of their badges in raised letters. Here are a few.
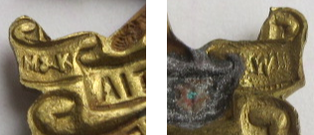
- Above: Often Mayer & Kean split their maker mark. Here, on the back of a 3rd (Auckland) Infantry Collar badge, the back of the banner on the left has "M & K", then on the right it just has "W", for Mayer & Kean of Wellington.
|
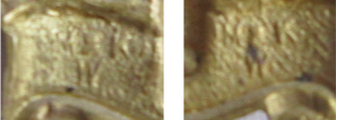
- Above: Faintly on the back of a 5th (Otago Hussars" Mounted Rifles Cap badge, they repeated the logo twice, at each end of the banner of "M & K W" for Mayer & Kean Wellington.
|
- Above: Mayer & Kean also struck the Cap and Collar ONWARD badges, and they marked and dated some. Above left is the left end of the banner with "M & K W", while to the right is "N.Z. 45", for 1945.
|
Other "dated" Onward Cap badges seen are "43" for 1943, and "44" for 1943. I also have a pair of collar which are dated "43" for 1943. Mayer & Kean also just made a Cap badge with "M & K W" marked to the left had side only. There is no year date or "N.Z.".
|
|
|
Solder & Fusion
Multi piece badges (in different metals) and devices, such as looped lugs, screw posts or tangs were brazed onto the base badge.
Common lead solder was not usually used, as it could not stand up to the wear and tear of everyday Army use. Instead, each manufacturer had special recipes of amalgams of lead, copper or silver/zinc. In the early days, heating was done by coal gas and a blow-pipe.
Often times determine the composition of the solder by using the following visual cues. Lead is highly malleable, and has a quicksilver color; copper often develops verdigris over time; and silver/zinc presents a deep patina, sometimes almost black, over time.
A hard solder of silver was used with hat badges so manufacturers could enamel the badge. Such solder allows the badge parts to not come apart or desolder during the enamel firing process.
Badges which were not to be enameled had a gilt or darkened finish applied.
Enamel & Epoxy
After soldering, the badge is allowed to cool and enamels and now-a-days, epoxy are applied. In terms of actual badge production, this is an extremely time-consuming task. Enamel is a paste-like substance consisting of powdered glass and distilled water, epoxy is a resin paste.
After the badge is cleaned in a bath of sulphuric acid and dried at 100 degrees, either paste (glass in a molten state, resin in paste) is applied to the surface of the badge. Application methods involved are either being poured or brushed. The badge is then fired in a kiln between 750 to 850 degrees for 2-5minutes – depending upon the enamel properties – to allow for the enamel to fuse to the metal. This process is repeated for each individual color. The end product of enameling should be of a lustrous and uniform appearance without bubbles.
After enameling, the components of the badge are now stoned. Stoning is done via diamond or sand mesh cloth. At the completion of the process, the enamel is flush, with individual die lines visible.
Polish
Badges are now polished to a high luster. Polishing is achieved using high RPM diamond-brush polishing machines.
Modern Plate/Anodise
Plating is an electrochemical process of depositing metals onto the surface of the badge. Anodization is a process of altering the crystal structure of the metal near the surface and creating a sealed and overall corrosion resistant surface; the trade name for this is STA-BRITE. Various manufacturers have anodized hat badges since the mid-1970s; Ira Green was a pioneer in the field.
In terms of plating, hat badges are found to have nickel, gold, rhodium and silver plate. Since a badge is usually not plated in two metals, more other than not, badges are comprised of different parts and attached to each other via pins, screws, solder or adhesive. To plate, the badges are placed on racks and lowered into a tub. Electrodes are put into position, the solution is zapped for a specified period of time and then parts removed.
Once the badges are air-dried and removed from their plating rack, their constituent parts are assembled and the badge is complete