New Zealand Mounted Rifle Reinforcement Drafts from World War 1
The 12 New Zealand Mounted Rifle Regiment left with the main body of men in October 1914.
They too, would need specialised reinforcements, which would need to be trained in and around New Zealand.
Like their Infantry, and later, Rife Brigade counterparts, their Reinforcement drafts wore a privately purchased cap badge, which varied and depended upon personal taste and what was available.
Like the Infantry, the 1st Reinforcements left with the Main Body of men, while the 2nd followed suit, soon after. Upon arrival in training camp in early 1915, the 3rd, 4th and 5th Mounted Rifle Reinforcements adopted a Squadron system with the following letters:
- A Squadron (Auckland)
- B Squadron (Wellington)
- C Squadron (Canterbury)
- D Squadron (Otago)
This followed the Infantry's Area system which divided NZ up into four Area's.
It also meant that the Mounted Rifle Reinforcements wore the same two piece lettered/numbered badges as their Infantry counterparts. Same style and frame types.
The main body of the New Zealand Expeditionary Force (NZEF) left New Zealand on the 15th of October 1914.
It consisted of:
- Headquarters - 6 Officers & 28 Other Ranks
- The Auckland Mounted Rifles Regiment - 26 Officers & 523 Other Ranks
- The Wellington Mounted Rifles Regiment - 26 Officers & 523 Other Ranks
- The Canterbury Mounted Rifles Regiment - 26 Officers & 523 Other Ranks
- The Otago Mounted Rifles Regiment - 26 Officers & 523 Other Ranks
The 1st Reinforcements left with the main body of the New Zealand Expeditionary Force (NZEF) on the 15th of October 1914.
It consisted of:
- The Auckland Mounted Rifles Regiment - 1 Officers & 52 Other Ranks
- The Wellington Mounted Rifles Regiment - 1 Officers & 52 Other Ranks
- The Canterbury Mounted Rifles Regiment - 1 Officers & 52 Other Ranks
- The Otago Mounted Rifles Regiment - 1 Officers & 52 Other Ranks
Vessels used from Wellington: Maunganui, Tahiti, Ruapehu, Orari, Limerick, Hawke's Bay, Arawa, Athenic - Wellington to Alexandria - 48 days duration.
Vessels used from Auckland: Star of India, Waimana - Auckland to Alexandria - 48 days duration.
The Main Body and 1st Reinforcements also had a Naval escort: HMS Minotaur, HMS Philomel, HMS Psyche, HMS Pyramus & HIJMS Ibuki.
The 2nd Reinforcements left NZ on the 14th of Dec 1914.
- Headquarters - 10 Other Ranks
- The Auckland Mounted Rifles Regiment - 3 Officers & 104 Other Ranks
- The Wellington Mounted Rifles Regiment - 3 Officers & 104 Other Ranks
- The Canterbury Mounted Rifles Regiment - 3 Officers & 104 Other Ranks
- The Otago Mounted Rifles Regiment - 3 Officers & 104 Other Ranks
Vessels used from Wellington: Verdala, Willochra, Knight of the Garter - Wellington to Suez - 46 days duration.
The 3rd Reinforcements left NZ on the 14th of Feb 1915
- The Auckland Mounted Rifles Regiment - 3 Officers & 104 Other Ranks
- The Wellington Mounted Rifles Regiment - 3 Officers & 104 Other Ranks
- The Canterbury Mounted Rifles Regiment - 3 Officers & 104 Other Ranks
- The Otago Mounted Rifles Regiment - 3 Officers & 104 Other Ranks
Vessels used from Wellington: Maunganui, Tahiti, Aparima - Wellington to Suez - 40 days duration.
The 4th Reinforcements left NZ on the 17th of April 1915.
- The Auckland Mounted Rifles Regiment - 3 Officers & 104 Other Ranks
- The Wellington Mounted Rifles Regiment - 3 Officers & 101 Other Ranks
- The Canterbury Mounted Rifles Regiment - 3 Officers & 104 Other Ranks
- The Otago Mounted Rifles Regiment - 3 Officers & 101 Other Ranks
Vessels used from Wellington: Willochra, Knight Templar, Waitomo - Wellington to Suez - 38 days duration.
The 5th Reinforcements left NZ on the 13th of June 1915.
- Headquarters - 5 Other Ranks
- The Auckland Mounted Rifles Regiment - 3 Officers & 104 Other Ranks
- The Wellington Mounted Rifles Regiment - 3 Officers & 106 Other Ranks
- The Canterbury Mounted Rifles Regiment - 3 Officers & 106 Other Ranks
- The Otago Mounted Rifles Regiment - 3 Officers & 104 Other Ranks
Vessels used from Wellington: Maunganui, Tahiti, Aparima - Wellington to Suez - 39 days duration.
6th to 10th Mounted Reinforcements
The 6th and 7th Reinforcements were merged to train together (and thus just became the 6th Mounted Reinforcements), to increase the rate of trained men leaving NZ at the time. Therefore E, F, G, H and J were used as well as A, B, C, and D (these badges were the same as the Infantry Reinforcement badges covered in their page).
|
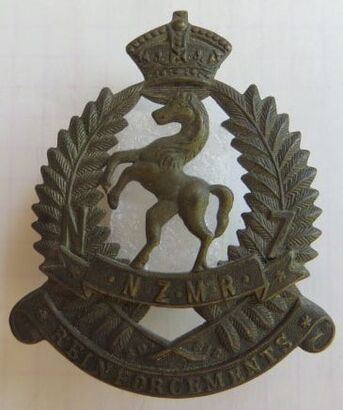
- Above: H Company, 6th Reinforcements Cap badge to the Mounted Rifles. This is a solid backed frame, with separate handcut letter over number soldered to center. Wire looped lugs to back, with no maker mark. Lowe frame Type No. 2. Size 31mm by 31mm.
|
- Above: J Company, 6th Reinforcements Cap badge to the Mounted Rifles. This again is a solid backed frame, with separate handcut letter over number soldered to center. Wire looped lugs to back, with no maker mark. A coat of lacquer has been applied over the badge. Lowe frame Type No. 2. Size 31mm by 31mm.
|

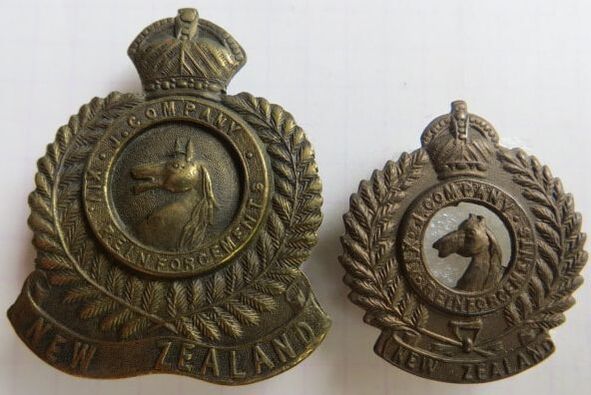
- Opposite: A table cloth purchased by 11/1332 Hubert Hurford, who enlisted as a Trooper with B Company, 6th Reinforcements, and was initially assigned to the Wellington Mounted Rifles. On arriving in Egypt in 1915, he was taken ill, and was transferred to the Military Hospital at Heliopolis on the 25th of Nov 1915. He was eventually transferred to a hospital in England in late Jan 1916. I presume, in his two month stay in Heliopolis, he had this cloth made for his Sister Ida.
It reads "Souvenir of Heliopolis Egypt 1915. NZ. MR, B/6, To Ida from Hubert".
Hubert transferred in England to become a member of the 1st Battalion, Otago Regiment. Sadly he was killed in action on the 21st of Jan, 1918 and is remembered on the Buttes New British Cemetery (NZ) Memorial, Polygon Wood, Zonnebeke, West-Vlaanderen, Belgium, aged 34.
He was one of nine, Ethel, Hubert (KIA 21st Jan, 1918), Bruce (8/1515), Ida, Percy (2668 - 54th Battalion, 6th Reinforcements - AIF), Winifred, Tom, Wyndham and Ralph.
A new 7th Reinforcements was then called into camp and they were lettered A, B, C, D, E, F, G and H.
|
- Above: A hand-cut, semi convex C/7th Reinforcement Cap Badge to the Mounted Rifles. Frame is one piece, with two hex type brass lugs to back. No maker mark (Image from the internet.
|
- Above: A hand-cut, semi convex F/7th Reinforcement Cap Badge to the Mounted Rifles. Frame with a separate letter/number attached to center. Two hex type brass lugs to back. No maker mark. Lowe frame Type No. 3. Size 37mm by 36mm.
|
- Above: H Company, 7th Reinforcements Cap badge to the Mounted Rifles. This is a solid backed frame, with separate handcut letter over number soldered to center. Wire looped lugs to back, with no maker mark. Lowe frame Type No. 2. Size 31mm by 31mm.
|
The 8th to 10th Reinforcements used A, B, C and D only and their badges are the same as what is covered in the Infantry Reinforcement badge section on the website.
Dates of Departure from NZ:
The majority of the 6th Reinforcements left NZ on the 11th of Aug 1915.
- The Auckland Mounted Rifles Regiment - 7 Officers & 240 Other Ranks
- The Wellington Mounted Rifles Regiment - 7 Officers & 254 Other Ranks
- The Canterbury Mounted Rifles Regiment - 8 Officers & 241 Other Ranks
- The Otago Mounted Rifles Regiment - 7 Officers & 242 Other Ranks
Vessels used from Wellington: Willochra and Tofua - Wellington to Suez - 36 days duration.
The balance of the remaining 6th Reinforcements left NZ on the 16th of Sept 1915 with the 2nd Maori Contingent and advanced party for the 1st & 2nd Battalions of the New Zealand Rifle Brigade.
- The Auckland Mounted Rifles Regiment - 9 Other Ranks
- The Wellington Mounted Rifles Regiment - 15 Other Ranks
- The Canterbury Mounted Rifles Regiment - 12 Other Ranks
- The Otago Mounted Rifles Regiment - 1 Officers & 17 Other Ranks
Vessel used from Wellington: Waitemata - Wellington to Suez - 38 days duration.
The 7th Reinforcements left NZ on the 9th of Oct 1915.
- The Auckland Mounted Rifles Regiment - 6 Officers & 201 Other Ranks
- The Wellington Mounted Rifles Regiment - 6 Officers & 200 Other Ranks
- The Canterbury Mounted Rifles Regiment - 6 Officers & 190 Other Ranks
- The Otago Mounted Rifles Regiment - 4 Officers & 197 Other Ranks
Vessels used from Wellington: Maunganui, Tahiti, Aparima, Navua and Warrimoo - Wellington to Suez - 36 to 41 days duration.
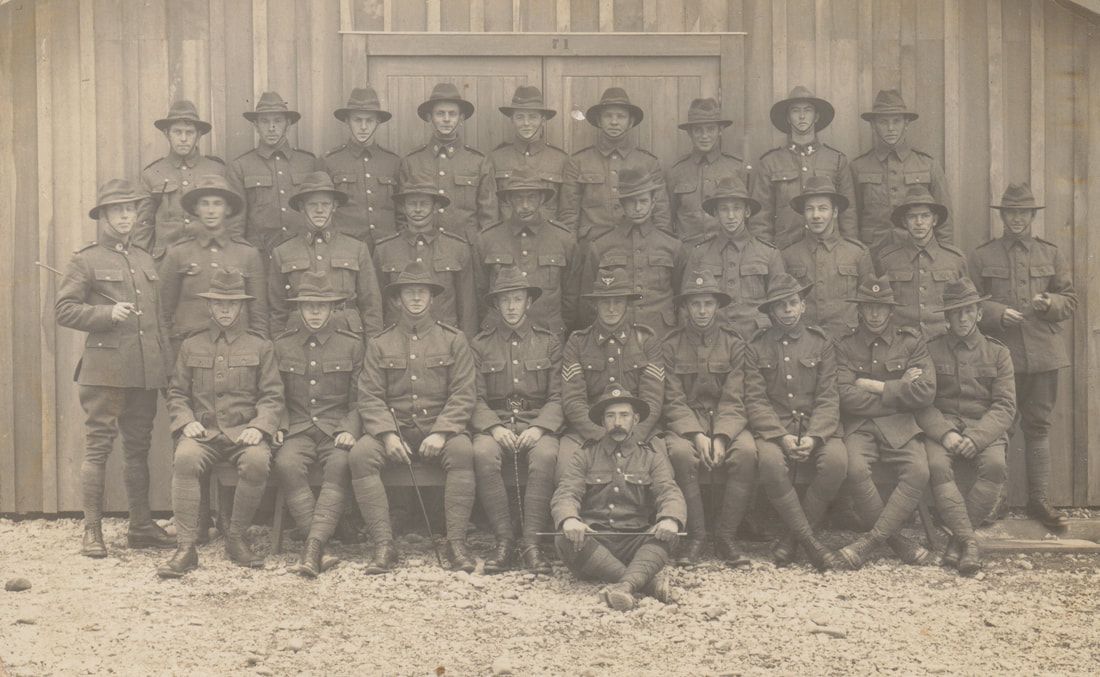
- Above: A interesting image of Mounted Rifle Reinforcements. Three of the chaps above are wearing D/7th Reinforcement Cap badges, which are also found on Infantry Reinforcements. The Sergeant to the center is wearing a Cap and Collar badge set to the 12th (Otago) Mounted Rifles, while the chap standing on the far left of the picture, seems to be wearing a Collar badge to the 11th (North Auckland) Mounted Rifles. Finally, the chap at the far back row 2nd from the right is wearing collars to the 5th (Otago Hussars) Mounted Rifles. To back, the postcard says "Trentham, N.Z., Sept 1915."
The 8th Reinforcements left NZ on the 14th of Nov 1915.
- Headquarters - 4 Other Ranks
- The Auckland Mounted Rifles Regiment - 2 Officers & 103 Other Ranks
- The Wellington Mounted Rifles Regiment - 3 Officers & 105 Other Ranks
- The Canterbury Mounted Rifles Regiment - 3 Officers & 103 Other Ranks
- The Otago Mounted Rifles Regiment - 2 Officers & 105 Other Ranks
Vessels used from Wellington: Willochra and Tofua - Wellington to Suez - 35 days duration.
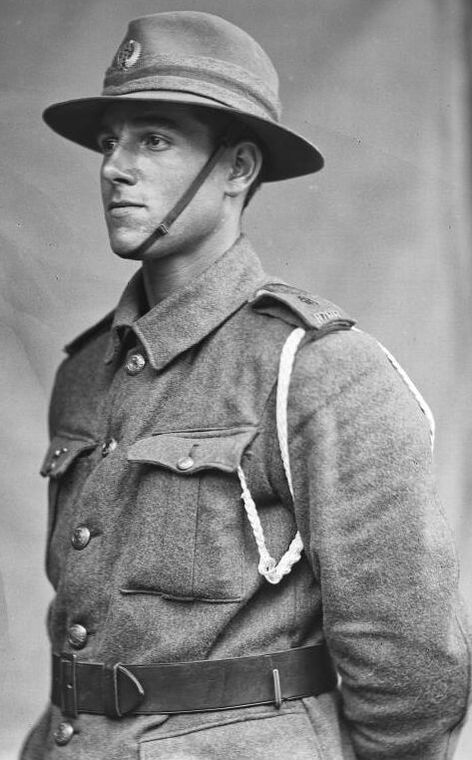
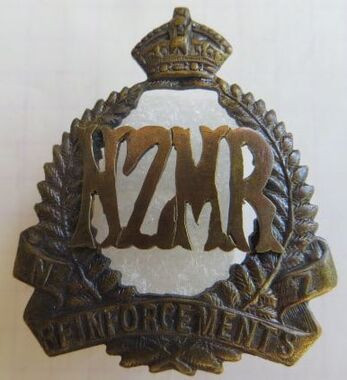
- Opposite: A great image of a A Squadron, 8th Mounted Rifle Reinforcement. He is wearing a "A" over "8" Cap badge with fern wreath, as also worn by Infantry Reinforcements. To his shoulder boards are the number/letter "A" over "8" (one piece) and a small, straight "NZMR" (Auckland Libraries Heritage Collections 1142-D041)
The 9th Reinforcements left NZ on the 9th of Jan 1916.
- Headquarters - 4 Other Ranks
- The Auckland Mounted Rifles Regiment - 4 Officers & 202 Other Ranks
- The Wellington Mounted Rifles Regiment - 4 Officers & 200 Other Ranks
- The Canterbury Mounted Rifles Regiment - 2 Officers & 157 Other Ranks
- The Otago Mounted Rifles Regiment - 4 Officers & 199 Other Ranks
Vessels used from Wellington: Maunganui, Tahiti and Warrimoo - Wellington to Suez - 29 to 32 days duration.
Horse Transport "Dalmore" sailed on the 19th Jan 1916, it also contained:
- The Auckland Mounted Rifles Regiment - 1 Officers & 27 Other Ranks
- The Wellington Mounted Rifles Regiment - 1 Officers & 25 Other Ranks
- The Canterbury Mounted Rifles Regiment - 1 Officers & 71 Other Ranks
- The Otago Mounted Rifles Regiment - 23 Other Ranks
- Headquarters - 4 Other Ranks
- The Auckland Mounted Rifles Regiment - 2 Officers & 103 Other Ranks
- The Wellington Mounted Rifles Regiment - 3 Officers & 105 Other Ranks
- The Canterbury Mounted Rifles Regiment - 3 Officers & 103 Other Ranks
- The Otago Mounted Rifles Regiment - 2 Officers & 105 Other Ranks
Vessels used from Wellington: Willochra and Tofua - Wellington to Suez - 35 days duration.
- Opposite: A great image of a A Squadron, 8th Mounted Rifle Reinforcement. He is wearing a "A" over "8" Cap badge with fern wreath, as also worn by Infantry Reinforcements. To his shoulder boards are the number/letter "A" over "8" (one piece) and a small, straight "NZMR" (Auckland Libraries Heritage Collections 1142-D041)
The 9th Reinforcements left NZ on the 9th of Jan 1916.
- Headquarters - 4 Other Ranks
- The Auckland Mounted Rifles Regiment - 4 Officers & 202 Other Ranks
- The Wellington Mounted Rifles Regiment - 4 Officers & 200 Other Ranks
- The Canterbury Mounted Rifles Regiment - 2 Officers & 157 Other Ranks
- The Otago Mounted Rifles Regiment - 4 Officers & 199 Other Ranks
Vessels used from Wellington: Maunganui, Tahiti and Warrimoo - Wellington to Suez - 29 to 32 days duration.
Horse Transport "Dalmore" sailed on the 19th Jan 1916, it also contained:
- The Auckland Mounted Rifles Regiment - 1 Officers & 27 Other Ranks
- The Wellington Mounted Rifles Regiment - 1 Officers & 25 Other Ranks
- The Canterbury Mounted Rifles Regiment - 1 Officers & 71 Other Ranks
- The Otago Mounted Rifles Regiment - 23 Other Ranks
Horse Transport "Waitemata" sailed on the 12th of Feb, with no Mounted Rifle Reinforcements on board.
Horse Transport "Waihora" sailed on the 22nd of Feb with a grouped lot of Mounted Rifles Reinforcements, their specific units were not recorded.
- 4 Officers & 30 Other Ranks
Horse Transport "Apatitua" sailed on the 29th of Feb with the following Mounted Rifle Reinforcements on board.
- The Auckland Mounted Rifles Regiment - 3 Officers & 113 Other Ranks
- The Canterbury Mounted Rifles Regiment - 9 Other Ranks
The 10th Reinforcements left NZ on the 11th of Mar 1916.
- Headquarters - 2 Other Ranks
- The Auckland Mounted Rifles Regiment - 1 Other Ranks
- The Wellington Mounted Rifles Regiment - 2 Officers & 99 Other Ranks
- The Canterbury Mounted Rifles Regiment - 2 Officers & 92 Other Ranks
- The Otago Mounted Rifles Regiment - 2 Officers & 99 Other Ranks
Vessels used from Wellington: Willochra and Tofua - Wellington to Suez - 35 days duration.
11th to 14th Mounted Reinforcements
The 11th, 12th, 13th and 14th Reinforcements were still in New Zealand when the Allies withdrew from the Gallipoli Peninsular. Up until that time, all Mounted Rifles had fought as dismounted Infantry.
It was decided in April 1916, not to have all 12 NZ Mounted Rifles Regiments fight in the Middle East.
The Otago Mounted Rifles Regiment (which consisted of the three regiments - 5th (Otago Hussars) Mounted Rifles, - 7th (Southland) Mounted Rifles, - 12th (Otago) Mounted Rifles) would instead continue to fight as dismounted Infantry in Europe.
Surplus men were either absorbed into units destined for France, which were greatly expanded at the time, .i.e. NZ Field Artillery, NZ Army Service Corps etc.
Or men joined newly created units, such as the Pioneer Battalion or NZ Cyclist Battalion.
Some also chose not to join, and instead stayed back in New Zealand, until further MR Reinforcements were required.
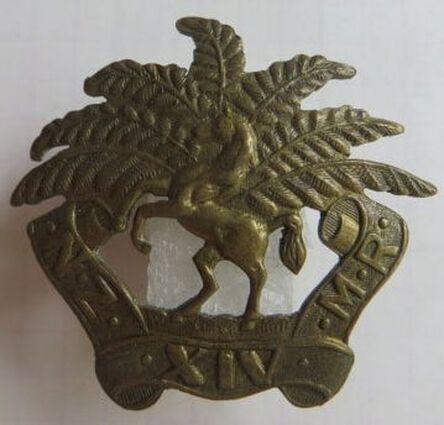
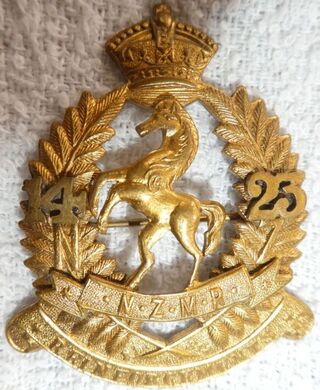
- Opposite: A gilt brass Cap badge to the 14th Mounted Rifle Reinforcements, no maker mark to back, but two two hex type brass lugs.
It was decided in April 1916, not to have all 12 NZ Mounted Rifles Regiments fight in the Middle East.
The Otago Mounted Rifles Regiment (which consisted of the three regiments - 5th (Otago Hussars) Mounted Rifles, - 7th (Southland) Mounted Rifles, - 12th (Otago) Mounted Rifles) would instead continue to fight as dismounted Infantry in Europe.
Surplus men were either absorbed into units destined for France, which were greatly expanded at the time, .i.e. NZ Field Artillery, NZ Army Service Corps etc.
Or men joined newly created units, such as the Pioneer Battalion or NZ Cyclist Battalion.
Some also chose not to join, and instead stayed back in New Zealand, until further MR Reinforcements were required.
- Opposite: A gilt brass Cap badge to the 14th Mounted Rifle Reinforcements, no maker mark to back, but two two hex type brass lugs.
- Above Left: A non-void Cap badge to J Company, 14th Mounted Rifles Reinforcements. Made from brass, with two hex type, brass lugs to back. No maker mark.
- - Above Right: A void Collar badge to J Company, 14th Mounted Rifles Reinforcements. Made from brass, with two hex type, brass lugs to back. No maker mark. I have yet to see whether they had a opposing Collar. I have a feeling the horse head was worn the same way on both collars. |
- Above: A void brass Cap badge to J Company, 14th Mounted Rifles Reinforcements. This has a brooch fitting to back, which is sadly missing the pin. No maker mark.
|
Dates of Departure from NZ:
The 11th Reinforcements left NZ on the 2nd of April 1916.
From the 11th Reinforcements, New Zealand Army records combine the total men which make up the Reinforcement draft to the Mounted Rifles as one figure, as follows:
- The 11th Draft consisted of 5 Officers and 133 Other ranks.
Vessels used from Wellington: Maunganui and Tahiti - Wellington to Suez - 35 days duration.
The 12th Reinforcements left NZ on the 1st and 6th of May 1916.
- The 12th Draft consisted of 6 Officers and 119 Other Ranks.
Vessels used from Wellington: Ulimaroa, Mokota and Navua - Wellington to Suez - 40 days duration.
The 13th Reinforcements left NZ on the 27th of May 1916.
- The 13th Draft consisted of 5 Officers and 102 Other Ranks.
From the 13th Reinforcements onwards, there was no longer a need to ferry troops associated with the ANZAC and New Zealand Divisions via Suez, as both Divisions had moved to France. It meant that Mounted Rifle Reinforcements and their associated units would now leave on separate vessels for Suez and the Middle East, often, via Australia to take advantage of that countries reinforcement transports.
The 13th Reinforcements were at sea, when their route changed.
Vessels used from Wellington: Willochra and Tofua via Cape Good Hope - to Plymouth - 58 days duration.
The 14th Mounted Rifle Reinforcements left NZ on the 10th of July 1916. - Note this was Mounted Rifles Only (plus 2 members of the NZ Ambulance Corps).
- The 14th MR Draft consisted of 3 Officers and 102 Other Ranks.
Vessels used from Wellington: Waihora
15th to the 18th Mounted Reinforcements
The 15th to the 18th Mounted Reinforcements continued to wear the badges covered in the Infantry section on the website. They also wore generic Mounted Reinforcement badges which are covered further down the page.
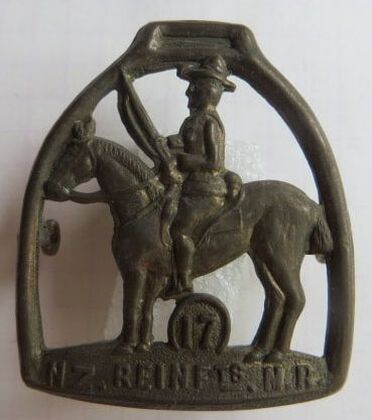
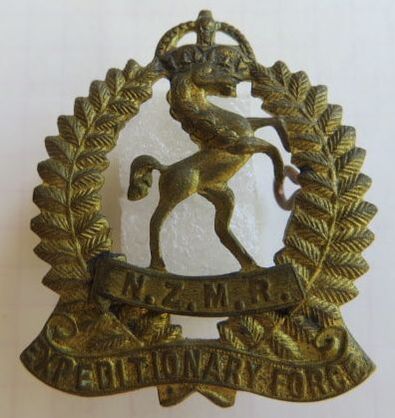
- Opposite: A gilt brass Cap badge to the 17th Mounted Rifle Reinforcements. This has traces of gilt to front detail, on a now darkened frame. To back are traces of silver plating, so possibly this started out as a sweethearts badge.
It unusually features a Mounted Rifles Trooper on his horse within a Stirrup shaped frame. To base are the words "17 NZ. Reinfts. M.R.".
Two copper looped lugs are to back, but I would imagine these are not original, and are replacements. Maybe a brooch fitting originally?
Dates of Departure from NZ:
The 15th Mounted Rifle Reinforcements left NZ on the 18th of July 1916.
- The 15th MR Draft consisted of 4 Officers and 92 Other Ranks.
Vessels used from Wellington: Manuka to Sydney - Malwa from Sydney to Suez.
The 15th general Reinforcements left NZ on the 26th & 29th of July 1916. It contained
- 10 Other Ranks Mounted Rifle Reinforcements.
Vessels used from Wellington: Waitemata and Ulimaroa via Cape Good Hope - to Plymouth - 66 days duration.
The 16th Mounted Rifle Reinforcements left NZ on the 10th of Aug 1916.
- The 16th MR Draft consisted of 4 Officers and 98 Other Ranks.
Vessels used from Wellington: Moeraki to Sydney - Mooltan from Sydney to Suez.
The 16th general Reinforcements left NZ on the 20th & 25th of Aug 1916. It contained
- 10 Other Ranks Mounted Rifle Reinforcements.
Vessels used from Wellington: Aparima, Mokota & Navua via Cape Good Hope - to Newport - 72 days duration.
The 17th general Reinforcements left NZ on the 24th & 26th of Sept 1916. It contained
- 10 Other Ranks Mounted Rifle Reinforcements.
Vessels used from Wellington: Devon and Pakeha via Cape Good Hope - to Plymouth - 58 days duration.
The 17th Mounted Rifle Reinforcements left NZ on the 5th of Oct 1916.
- The 17th MR Draft consisted of 3 Officers and 105 Other Ranks.
Vessels used from Wellington: Manuka to Sydney - Morea from Sydney to Egypt.
The 18th Mounted Rifle Reinforcements left NZ on the 5th of Oct 1916.
- The 18th MR Draft consisted of 3 Officers and 87 Other Ranks.
Vessels used from Wellington: Same as above as the 17th.
The 18th general Reinforcements left NZ on the 14th & 16th of Oct 1916. It contained
- 10 Other Ranks Mounted Rifle Reinforcements for the Divisional Mounted Troops, which the Otago Mounted Rifles Regiment were titled.
Vessels used from Wellington: Willochra and Tofua via Cape Good Hope - to Devonport - 77 days duration.
19th to the 22nd Mounted Reinforcements
Like the above mentioned MR Reinforcement drafts, the 19th to the 22nd MR drafts wore either Infantry style or generic MR style badges.
Their numbers were small (see below for draft sizes) but it appears that at least the 19th did have their own Cap and Collars badges. I have yet to see specific 20th, 21st and 22nd MR Reinforcement badges.
Their numbers were small (see below for draft sizes) but it appears that at least the 19th did have their own Cap and Collars badges. I have yet to see specific 20th, 21st and 22nd MR Reinforcement badges.
|
- Above: A Sterling Silver Cap badge to the 19th Mounted Rifle Reinforcements. Note the pattern is the same for the 14th MR Reinforcements badge covered above, except for the change to the roman numerals to center wreath (at 9 O'clock). To back is a brooch fitting (Ian Hamilton Collection).
|
|
Dates of Departure from NZ:
The 19th general Reinforcements left NZ on the 15th of Nov 1916. It contained
- 10 Other Ranks Mounted Rifle Reinforcements for the Divisional Mounted Troops, which the Otago Mounted Rifles Regiment were titled.
Vessels used from Wellington: Maunganui and Tahiti via Cape Good Hope - to Devonport - 74 days duration.
The 19th & part of the 20th Mounted Rifle Reinforcements left NZ on the 5th of Dec 1916.
- The MR Draft consisted of 4 Officers and 143 Other Ranks.
Vessels used from Wellington: Waihora to Sydney.
The balance of the 20th Mounted Rifle Reinforcements left NZ on the 14th of Dec 1916.
- The MR Draft consisted of 2 Officers and 86 Other Ranks.
Vessels used from Wellington: Moetaki to Sydney - Mooltan from Sydney to Egypt.
The 20th general Reinforcements left NZ on the 30th of Dec 1916 and the 2nd of Jan 1917. It contained
- 10 Other Ranks Mounted Rifle Reinforcements for the Divisional Mounted Troops, which the Otago Mounted Rifles Regiment were titled.
Vessels used from Wellington: Port Lyttelton, Athenic and Opawa via Cape Good Hope - to Plymouth - 87 days duration.
The 21st general Reinforcements left NZ on the 19th & 21st of Jan 1917. It contained
- 10 Other Ranks Mounted Rifle Reinforcements for the Divisional Mounted Troops, which the Otago Mounted Rifles Regiment were titled.
Vessels used from Wellington: Waitemata & Ulmaroa via Cape Good Hope - to Plymouth - 68 days duration.
The 21st Mounted Rifle Reinforcements left NZ on the 8th of Feb 1917.
- The MR Draft consisted of 3 Officers and 116 Other Ranks.
Vessels used from Wellington: Manuka to Sydney - Morea from Sydney to Egypt.
The 22nd Mounted Rifle Reinforcements left NZ on the 15th of Feb 1917.
- The MR Draft consisted of 3 Officers and 116 Other Ranks.
Vessels used from Wellington: Moeraki to Sydney - Australian Transport Kabinga from Sydney to Egypt.
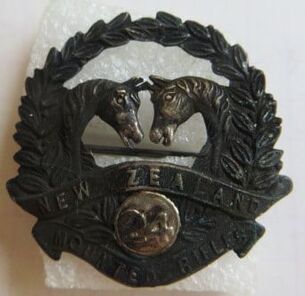
23rd and 24th Mounted Reinforcements
|
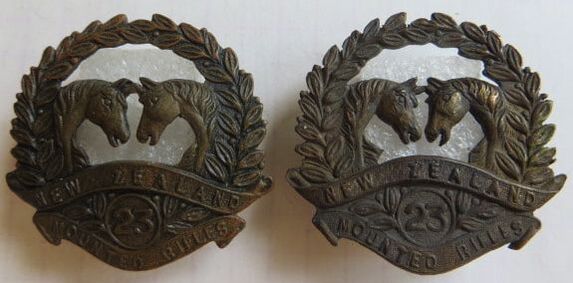
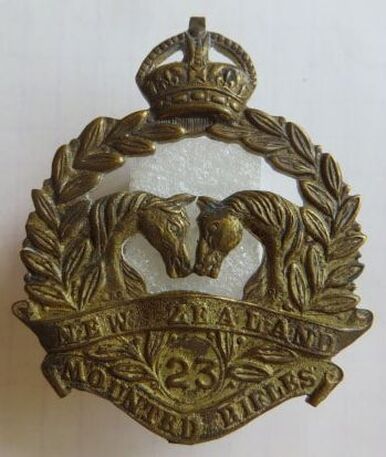
- Opposite and Above: Probably my most favorite style of Reinforcement badge.
The 23rd had their own unique designed in Cap and Collar Badge. All three badges are single piece, with two hex type brass lugs to back. The Cap has traces of gilt still to finish, while the collars are darkened either by design or with age. |
|
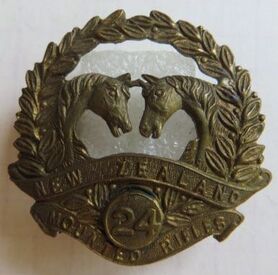
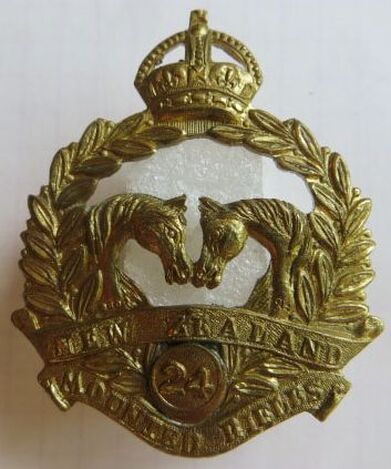
- Opposite and Above: The 24th adopted the same badge, but instead of re-striking a new badge with "24" to bottom center, the Jeweler just made a small round brass plaque, and sweated this over the "23".
This increment of draft number on a base frame with a small plaque, became the basis for Mounted Rifle Reinforcement badges going forward. Like the above badges, the 24th are both in gilt brass, with hex type lugs to back. |
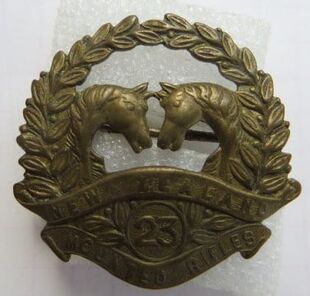
Above: A collar converted to a sweethearts badge to the 23rd Mounted Rifle Reinforcements in gilt brass. This has a brooch fitting to back.
|
Above: A collar size sweethearts badge to the 24th Mounted Rifle Reinforcements in Stirling Silver. This has a brooch fitting to back, with a stamp to lower base to "Stg Silver". It is a 23rd frame with a separate "24" disc sweated to front.
|
Dates of Departure from NZ:
The 23rd & 24th Mounted Rifle Reinforcements left NZ on the 19th of April 1917.
- The MR Draft consisted of 6 Officers and 244 Other Ranks.
Vessels used from Wellington: Moeraki to Sydney - Australian Transport from Sydney to Egypt.
The 23rd & 24th Mounted Rifle Reinforcements left NZ on the 19th of April 1917.
- The MR Draft consisted of 6 Officers and 244 Other Ranks.
Vessels used from Wellington: Moeraki to Sydney - Australian Transport from Sydney to Egypt.
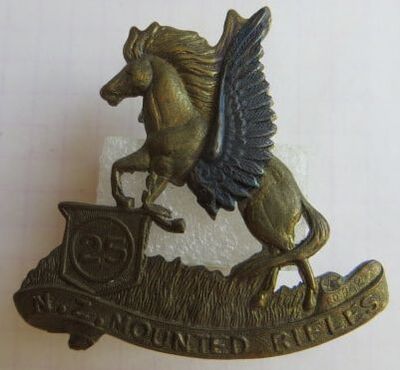
25th to 47th Mounted Reinforcement Drafts
From the 25th NZ Mounted Rifle Reinforcements, a generic frame was introduced and seemed popular with the men at the time. Not all wore them, some wore the badges covered in the Infantry Reinforcement badge section and others wore the generic NZMR badges discussed further down the page.
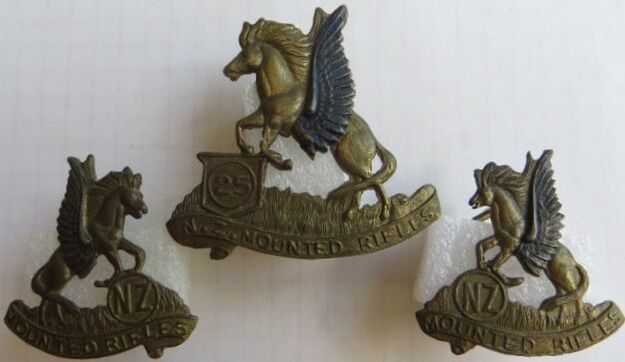
- Opposite: This type of frame was introduced from the 25th MR Reinforcements till the 47th (though there are stories that a 48th to 50th also exist, I have yet to see for myself).
Each subsequent draft had a small brass disc sweated over the "25".
This frame type is called the "Low Tail" due to the horses stance. It came with matching collar badges. Most have hex type brass lugs to back on either the Cap or Collar, though some do have copper wire looped lugs.
All have a white metal or silver wing sweated to the front of the badge.
The Cap has the RD or Registered Design mark of "RD942" to bottom right, above the banner, while the Collar badges have the same number of "RD942" either in the bottom piece on the left, below the banner, or in the grass below the hind legs of the Horse.
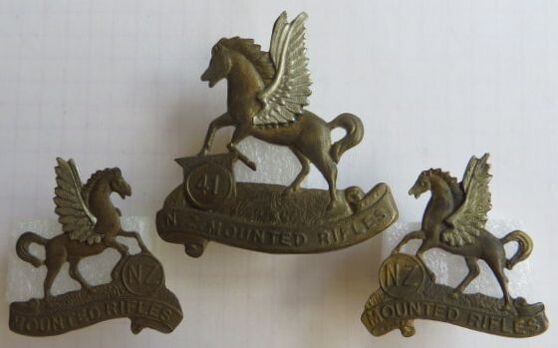
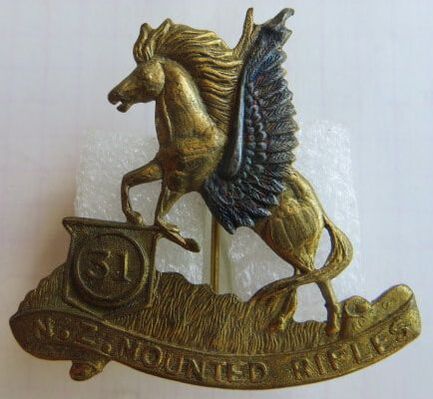
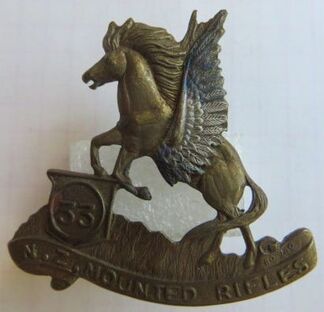
- Opposite: This is the other frame type, which was used from the 31st to 47th MR Reinforcement drafts, and used alongside the other above frame type. It is a scarcer "High Tail type", again based on how the horse stands and the tail sits. The example here has a small round "41" brass disk sweated over the top of a base 31st MR Reio badge frame. Like their other counterparts, they too have matching opposing collars.
Usually found with copper wire lugs to back, and again all have a white metal or Silver wing, sweated to the front of the badge.
The Cap has the RD or Registered Design mark of "RD942" to bottom right, above the banner, while the Collar badges seem to have the same number of "RD942" at the bottom piece of the banner.
- Above: A 25th Mounted Rifles Low tail Cap Badge. Two hex type brass lugs to back.
|
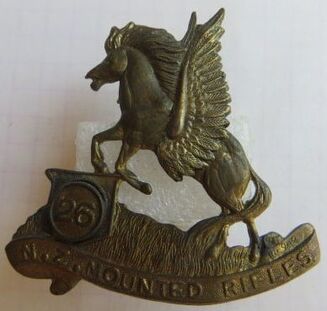
- Above: A 26th Mounted Rifles Low tail Cap Badge. Two hex type brass lugs to back. Note brass disc to front, over the "25", which sits not quite flush.
|
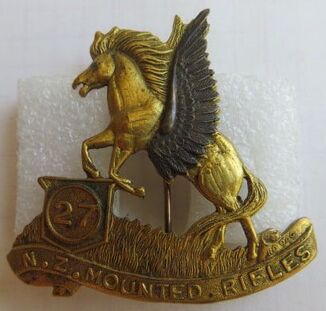
- Above: A 27th Mounted Rifles Low tail Cap Badge. This badge has been brooch fitted to back, with extra gilding applied to the brass as a Sweethearts badge.
|
Dates of Departure from NZ:
The 25th, 26th & portion of the 27th and 28th Mounted Rifle Reinforcements left NZ on the 31st of April 1917.
- The MR Draft consisted of 6 Officers and 317 Other Ranks.
Vessels used from Wellington: Moeraki to Sydney - Australian Transport Port Lincoln from Sydney to Egypt.
The 25th, 26th & portion of the 27th and 28th Mounted Rifle Reinforcements left NZ on the 31st of April 1917.
- The MR Draft consisted of 6 Officers and 317 Other Ranks.
Vessels used from Wellington: Moeraki to Sydney - Australian Transport Port Lincoln from Sydney to Egypt.
|
- Above: A 28th Mounted Rifles Low tail Cap Badge. Two hex type brass lugs to back.
|
- Above: A 29th Mounted Rifles Low tail Cap Badge. Two hex type brass lugs to back.
|
- Above: A 30th Mounted Rifles Low tail Cap Badge. No lugs to back, they have been neatly clipped off.
|
Dates of Departure from NZ:
The balance of the 27th and 28th Mounted Rifle Reinforcements left NZ on the 7th of June 1917.
- The MR Draft consisted of 3 Officers and 171 Other Ranks.
Vessels used from Wellington: Westralia to Sydney - Australian Transport Port Lincoln from Sydney to Egypt.
The balance of the 27th and 28th Mounted Rifle Reinforcements left NZ on the 7th of June 1917.
- The MR Draft consisted of 3 Officers and 171 Other Ranks.
Vessels used from Wellington: Westralia to Sydney - Australian Transport Port Lincoln from Sydney to Egypt.
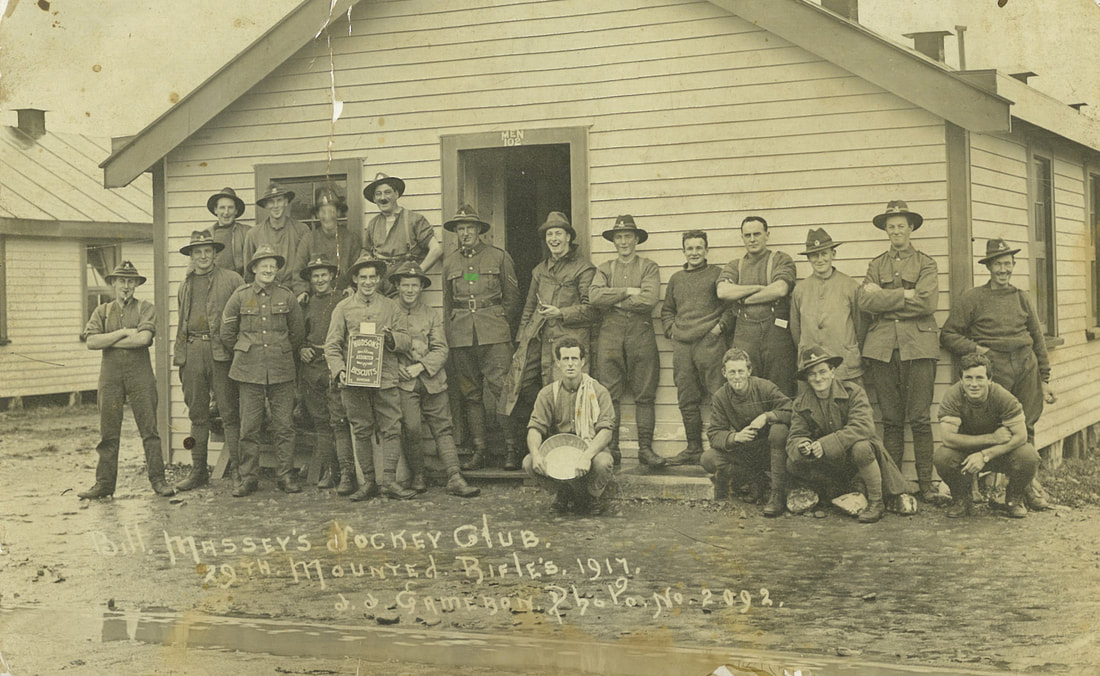
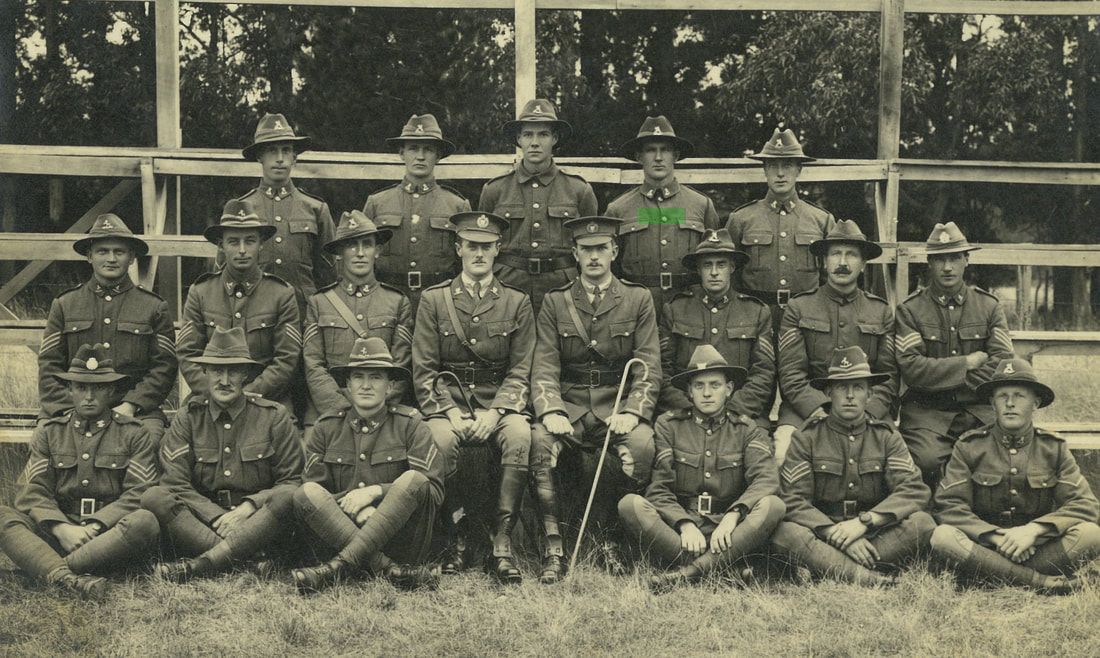
- Above: A jovial picture of members of the 29th Mounted Rifles Reinforcements at Featherston Training Camp prior to Nov 1917. Jokingly its entitled "Bill Massey's Jockey Club", which is named after the New Zealand Prime Minister of the time. Corporal 43271 Alfred "Ernest" Kemp is highlighted in the doorway (with a green rectangle). Ernest was initially part of the 27th MR Reio's, but transferred as a Corporal to the 29th's, on the 10th of June 1917, and then transferred again to the 31st MR Reio's, where he eventually left with them as a Sergeant. He was to spend 1 year and 18 days overseas in the Middle East with the Mounted Rifles, but 342 days prior, in New Zealand, training with the reinforcement drafts as a NCO (Nigel Robson Collection).
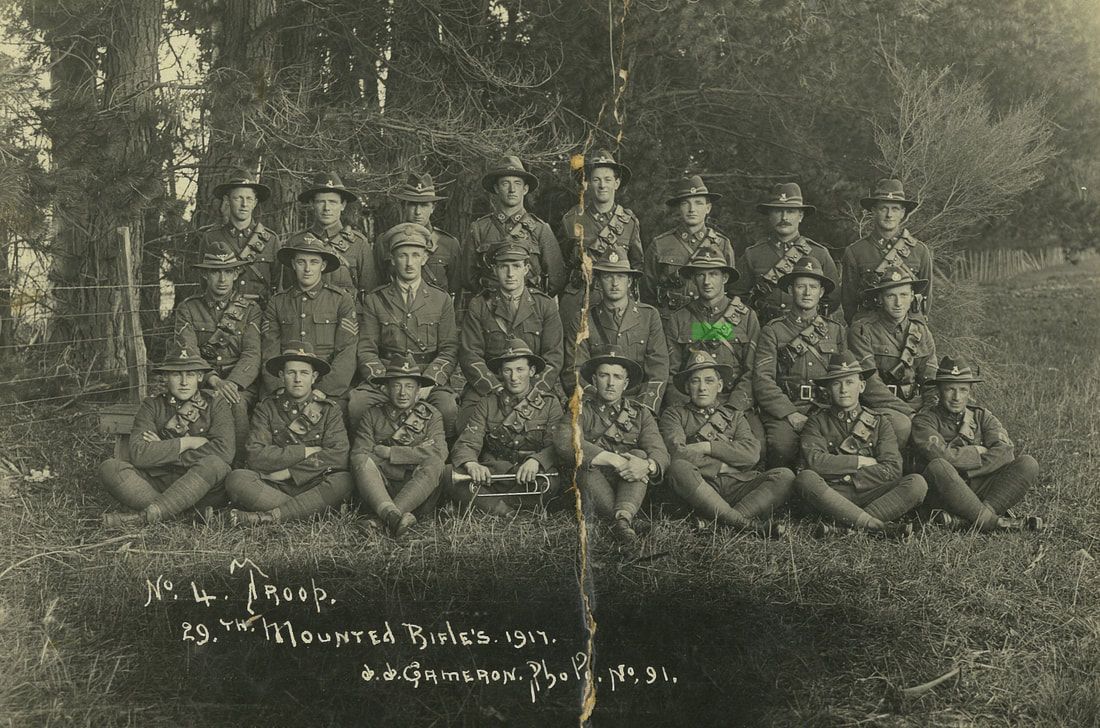
- Above: Another image of Corporal 43271 Alfred "Ernest" Kemp, who is highlighted (with a green rectangle). This time with his troop, No. 4. Note the mixture of Regimental badges as well as Mounted Rifle Reinforcement. Third from the left, to back row is wearing 2nd (Wellington West Coast) Mounted Rifles badge set, 5th from the left, back row is wearing a 11th (North Auckland) Mounted Rifles. In the 2nd row, left and 2nd left are wearing 12th (Otago) Mounted Rifles sets, the first 2nd Lieutenant is wearing 1st (Canterbury Yeomanry Cavalry) Mounted Rifles Cap and Collar badges, the second 2nd Lieutenant is wearing 9th (Wellington East Coast) Mounted Rifles Cap and Collar badges, the third 2nd Lieutenant is wearing 5th (Otago Hussars) Mounted Rifles Cap and Collar badges and is sitting to the left of Ernest. 6th in the front row, from the left is also wearing 5th (Otago Hussars) Mounted Rifles Cap and Collar badges. All others are wearing low tail Mounted Rifle Cap and or Collar badges. Note the Bugler to center, front row, with his trade badge to his left sleeve (Nigel Robson Collection).
- Above: A similar image of Corporal 43271 Alfred "Ernest" Kemp, who is highlighted (with a green rectangle). This is a non-named image, but shows a group of Officers and NCO's. Again a mixture of badges worn, both Reinforcement and also regular Regiment. Both Officers are wearing 5th (Otago Hussars) Cap badges, and the one on the left is wearing the 5th's Collars. At the end of the middle row, right, a Sergeant is wearing a generic Mounted Rifle Rinforcement Cap badge, with possible generic Mounted Rifle Collar badges, though the detail looks the same as the 9th (Wellington East Coast) Mounted Rifles. They would just have "N.Z.M.R" to base (Nigel Robson Collection).
- Above: A 31st Mounted Rifles Low tail Cap Badge. This badge has been brooch fitted to back, with extra gilding applied to the brass as a Sweethearts badge.
|

- Above: A 32nd Mounted Rifles Low tail Cap Badge. Two hex type brass lugs to back.
|
- Above: A 33rd Mounted Rifles Low tail Cap Badge. Two hex type brass lugs to back.
|
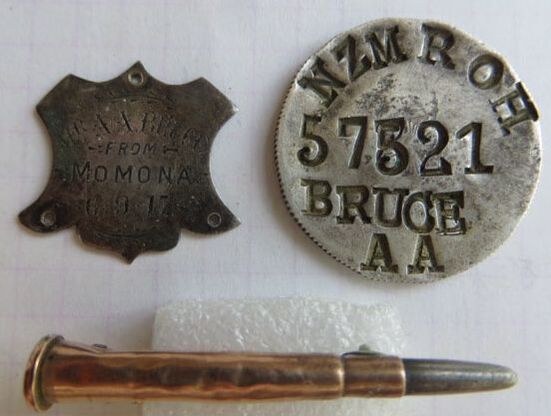
- Above and Opposite: A small collection of items to 57521 Trooper Alexander Abercrombie Bruce. Alec was part of the 32nd Mounted Rifle Reinforcements and joined on the 25th of June 1917. He was to spent 1 year and 308 days overseas as member of the 1st New Zealand Machine Gun Squadron, based in the Middle East.
Above is a small silver plaque which was attached to a case of Pipes present to Alec by the Citizens of Momona (in Otago, his home town) on his final leave before departure overseas from New Zealand. In the Otago Witness - Issue 3313 Page 23 - 12th of Sept 1917: "Valedictory.—Last Thursday evening Trooper Alec Bruce, who is home on final leave, was entertained at a farewell social in the Momona Hall, and presented with a very handsome case of pipes. Mr Arthur Amos presided, and there was a very large attendance". Beside it is a British coin, which has been flattened one side and turned into a ID disc, with Alec's details (N.Z.M.R.O.H - New Zealand Mounted Rifles Otago Hussars). At the base of the above, is a small silver and gold (not hallmarked) brooch in the shape of a bullet. It has a brooch fitting to back, and a small broken length of safety chain attached. |
- Above: A image of 57521 Trooper Alexander Abercrombie Bruce, taken from "Onward : portraits of the New Zealand Expeditionary Force (Vols 4), by Beattie, P.J. & Pomeroy, M. (2013-2020).
Alec's image show him wearing New Zealand Machine Gun Corps collar badges and I believe "NZMGS" shoulder titles. |
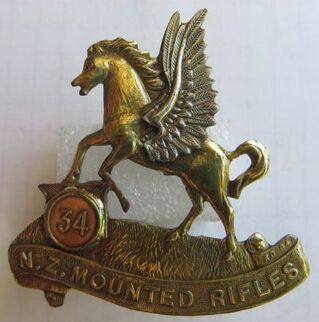
- Above: A scarce 34th Mounted Rifles high tail Cap Badge. Two copper wire looped lugs to back.
|
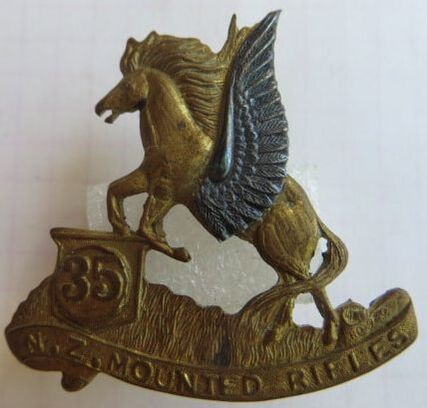
- Above: A 35th Mounted Rifles Low tail Cap Badge. Two hex type brass lugs to back. Note the change in style to the numbered disk. Larger numbers and convex.
|
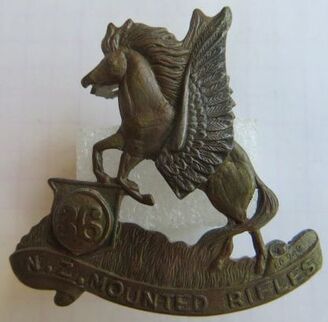
- Above: A 36th Mounted Rifles Low tail Cap Badge. Two hex type brass lugs to back.
|
The 29th, 30th, 31st, 32nd, 33rd and 34th Mounted Rifle Reinforcements left NZ on the 13th of Nov 1917.
- The MR Draft consisted of 17 Officers and 732 Other Ranks.
Vessels used from Wellington: Tofus to Sydney - ? from Sydney to Egypt.
The 35th and 36th Mounted Rifle Reinforcements left NZ on the 21st of Feb 1918.
- The MR Draft consisted of 2 Officers and 244 Other Ranks.
Vessels used from Wellington: Moeraki to Sydney - Australian Transport Ormonde from Sydney to Egypt.
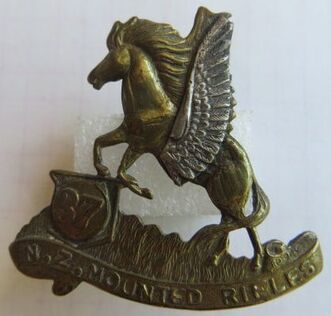
- Above: A 37th Mounted Rifles Low tail Cap Badge. Two hex type brass lugs to back. Note tip of wing has been lost.
|
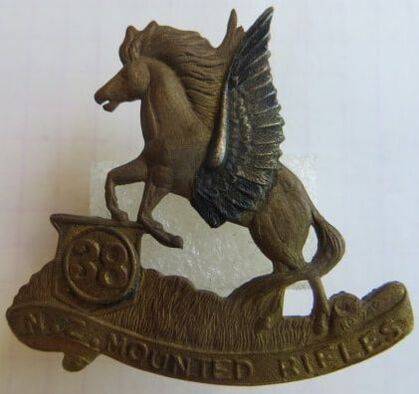
- Above: A 38th Mounted Rifles Low tail Cap Badge. Two hex type brass lugs to back.
|
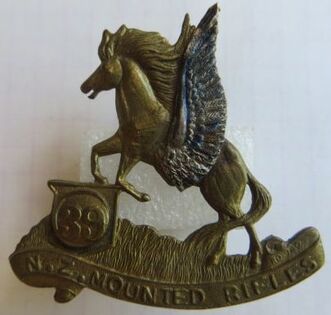
- Above: A 39th Mounted Rifles Low tail Cap Badge. Two copper looped lugs to back, probably replacements, but well done.
|
Dates of Departure from NZ:
The 37th Mounted Rifle Reinforcements sailed with the 36th general Reinforcements and left NZ on the 23rd of April & 2nd of May 1918.
- The MR Draft consisted of 4 Officers and 122 Other Ranks.
Vessels used from Wellington: Willochra to Egypt.
The 38th Mounted Rifle Reinforcements left NZ on the 12th of June 1918.
- The MR Draft consisted of 4 Officers and 124 Other Ranks.
Vessels used from Wellington: Manuka to Sydney - Australian Transport Port Lyttelton from Sydney to Egypt.
The 39th Mounted Rifle Reinforcements left NZ on the 9th of Aug 1918.
- The MR Draft consisted of 5 Officers and 120 Other Ranks.
Vessels used from Wellington: Moeraki to Sydney - Australian Transport Port Sydney from Sydney to Egypt.
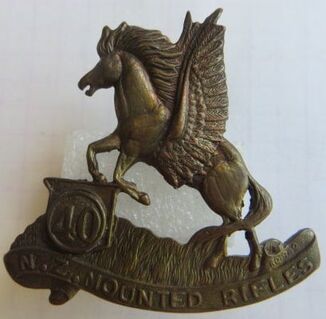
- Above: A 40th Mounted Rifles Low tail Cap Badge. Two hex type brass lugs to back.
|
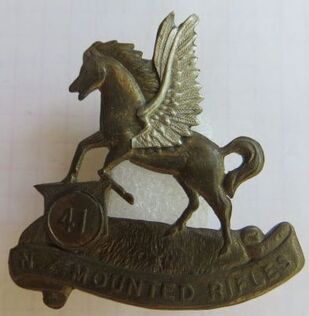
- Above: A scarce 41st Mounted Rifles high tail Cap Badge. Two copper wire looped lugs to back.
|

- Above: A 41st Mounted Rifles Low tail Cap Badge. Brooch fitting to back, with sadly the white metal/silver wing missing from front.
|
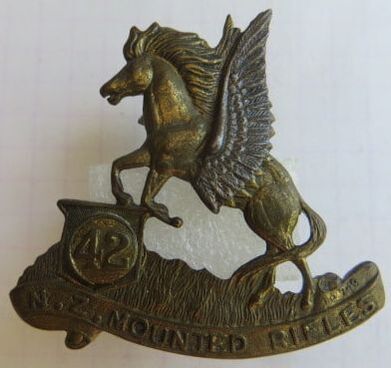
- Above: A 42nd Mounted Rifles Low tail Cap Badge. Two hex type brass lugs to back.
|
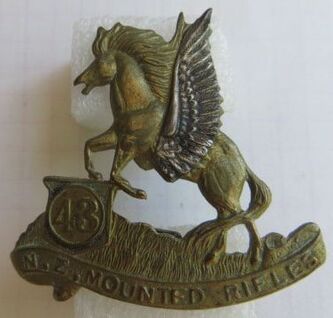
- Above: A 43rd Mounted Rifles Low tail Cap Badge. Two hex type brass lugs to back.
|
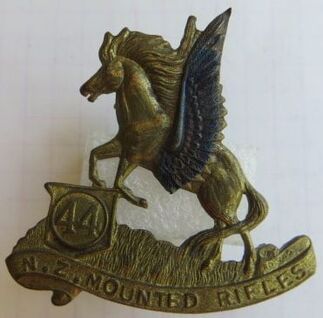
- Above: A 44th Mounted Rifles Low tail Cap Badge. Two hex type brass lugs to back.
|
Dates of Departure from NZ:
The 40th, 41st, 42nd and 43rd Mounted Rifle Reinforcements NZ on the 1st of Oct 1918.
- The MR Draft consisted of 14 Officers and 433 Other Ranks.
Vessels used from Wellington: Moeraki to Sydney - Australian Transport Malta from Sydney to Egypt.
In total, 361 Officers and 11,471 Other Ranks were sent overseas during WW1 for the New Zealand Mounted Rifles.
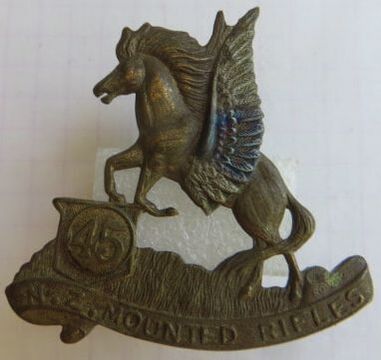
- Above: A 45th Mounted Rifles Low tail Cap Badge. Two hex type brass lugs to back.
|
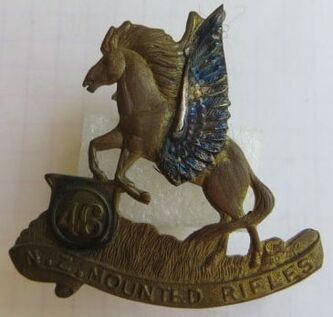
- Above: A 46th Mounted Rifles Low tail Cap Badge. Two hex type brass lugs to back.
|
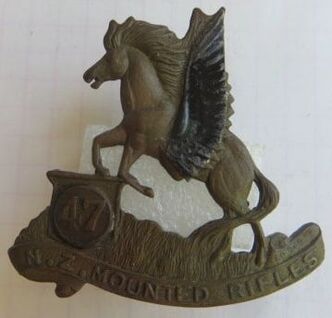
- Above: A 47th Mounted Rifles Low tail Cap Badge. Two hex type brass lugs to back.
|
On the 12th of November 1918, the day after the armistice came into effect in Europe, there were still 13 Officers and 553 Other Ranks Mounted Rifles in training, in New Zealand.
The 44th to the 50th, remained in New Zealand.
The Ottoman Empire had in fact signed an armistice on the 30th of October 1918 on board the British battleship Agamemnon, ending hostilities and its involvement in WW1.
New Zealand's Mounted Rifles stayed in the Middle Eastern region and were disbanded in June 1919.
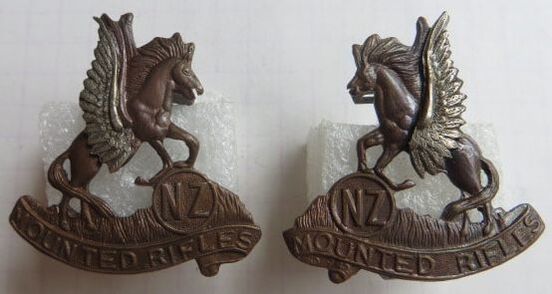
- Opposite: A rare set of matching Collar badges in the "Low Tail type" in Copper and White Metal.
All badges were private purchase, so it was down to what the Trooper could afford and style they wanted.
These Copper based badges seem to have been not as popular or maybe not widely available, as their gilt brass counterparts, so are extremely scarce.
Both have two hex type lugs to back in a North/South configuration.
- Opposite: A image which makes most badge collectors shudder!!!! ..;-)
A set of front dies in steel to make the brass base badge of a "high-tail" Mounted Rifles Reinforcement Cap badge. These die stamps do come to market every now and then. Note the default draft to the Cap badge, which is the "31"st, and then it has "other" draft number disc's around the badge image for the 32nd to 34th.
The die on the right could then be used as a extension for further drafts above the "34"th. Though has quite random numbers.
While the die on the left has the disc's for 42nd to the 59th.
Hopefully these will never used (image from the internet)!
|
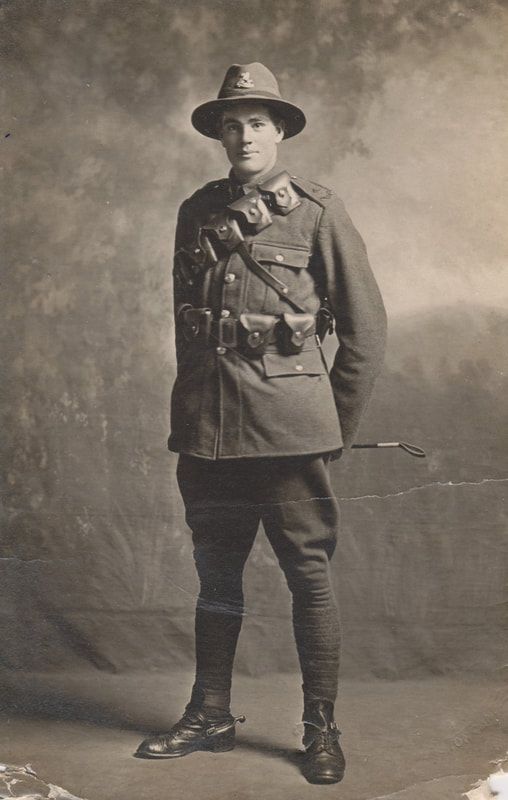
- Opposite: A full length image of 78601 Trooper Arnold Hobson Maddren. Arnold was part of the 43rd Mounted Rifles Reinforcements, yet this picture shows him wearing "45" on his shoulder straps. Sadly I cannot verify as his file is not on-line. To his slouch hat is a "Low Tail" type Cap badge, but the disc cannot be made out from the picture. His collars are obscured by his bandolier.
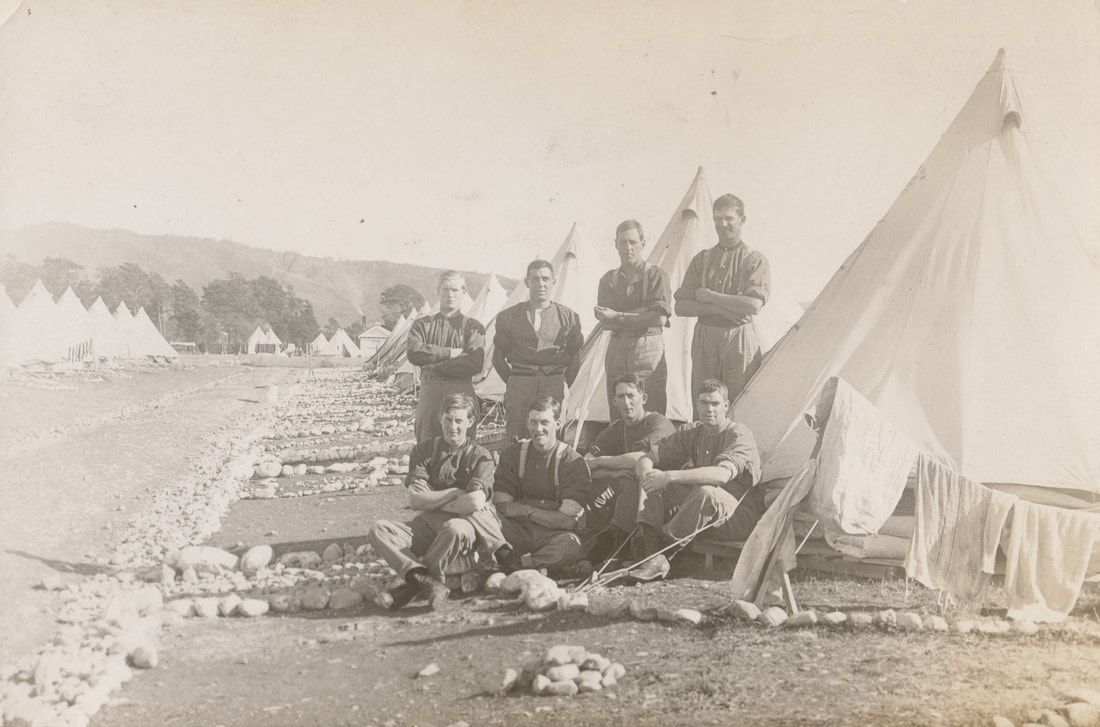
- Above: A picture purportedly showing 78601 Trooper Arnold Hobson Maddren sitting, 1st on the right, by the tent. Taken in camp. |
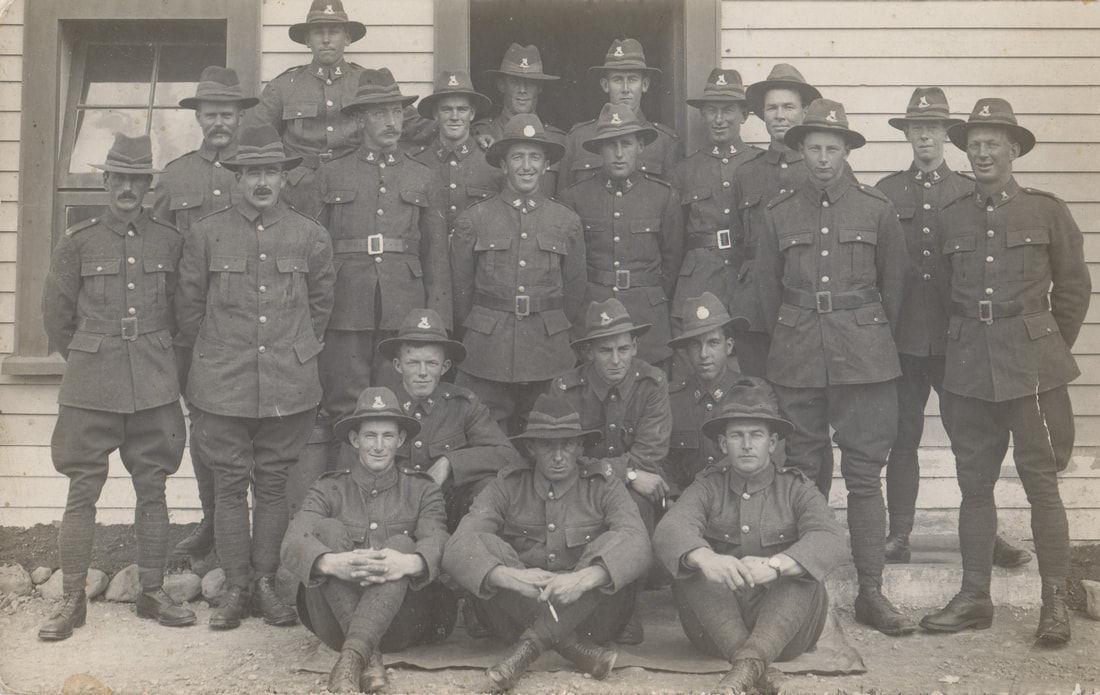
- Above: Another image of 78601 Trooper Arnold Hobson Maddren. He is back row, 3rd from the left (short). Arnold sailed on the 10th of October 1918 with the 43rd's. Sadly he must have returned immediately, as he died of Peritonitis at Temuka's Te Rata Private Hospital on the 12th of April 1919. He was from Winchester, South Canterbury.
Note the "Low Tail type" of Cap and Collar badges being worn.
The Trooper to the center and also second row, right are wearing Cap and Collars to the 1st (Canterbury) Mounted Rifles Regiment.
Note the "Low Tail type" of Cap and Collar badges being worn.
The Trooper to the center and also second row, right are wearing Cap and Collars to the 1st (Canterbury) Mounted Rifles Regiment.
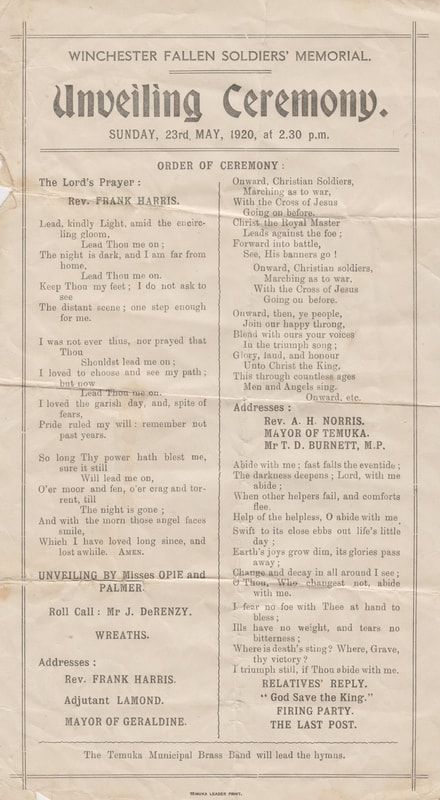
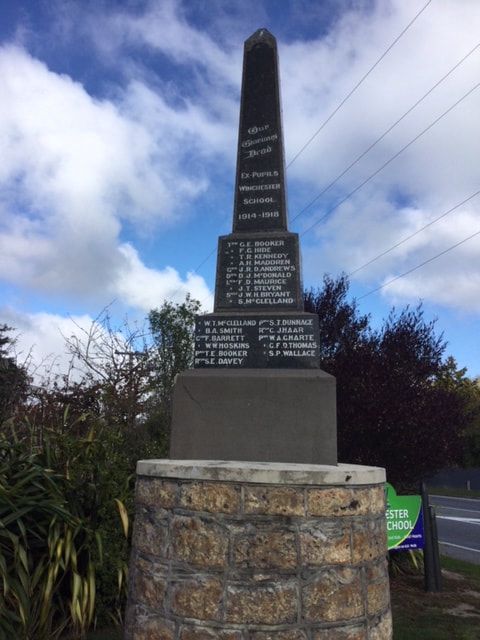
- Above and Opposite: On the 23rd of May, 1920, Winchester's Memorial to its fallen Soldiers was unveiled with a public ceremony held at 2pm on the Sunday. 78601 Trooper Arnold Hobson Maddren's name is 4th from the top on the above memorial.
|
(continued)
Opposite is a original program, which was handed out to those who attended. The memorial is located at the end of the field of Winchester Primary School, just beside State Highway 1. I attended the school for 6 months in the 1980's, when my parents moved and bought a house in Winchester, on Maddren St, which I presume was named after Trooper Maddren or his family, with were the local Flax mill owners. I remember both Opies and Palmers in my class who's family helped unveil the memorial all those years ago. |
Generic Mounted Reinforcement Draft Badges
From about the 10th MR Reinforcements onwards, a generic cap and/or collar was also worn with either specific Mounted Reio Badges or the frame types covered in the Infantry Section on the website.
|
|
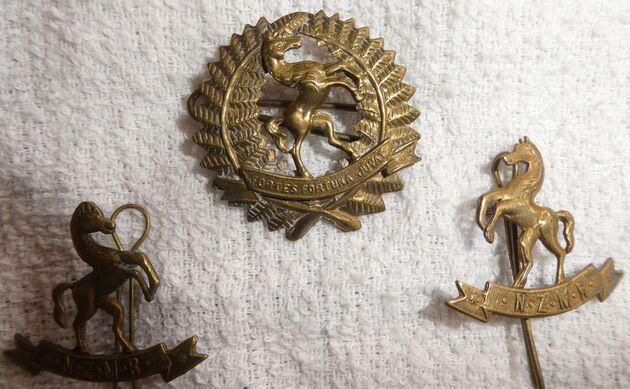
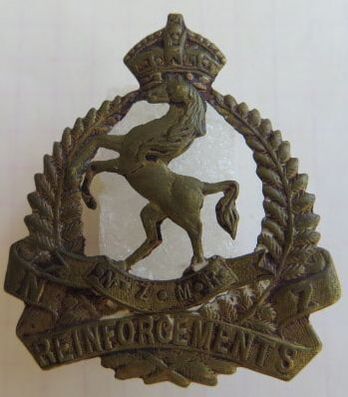
- Opposite: A Cap Badge in gilt brass of what is described as the 1st type Generic MR reinforcement badge. The design is based on the 9th (Wellington East Coast) Mounted Rifles Cap badge, but instead of a motto at the base, just has "N.Z. Mounted Rifles". Two copper wire lugs in a North/South configuration. Size 38mm by 47mm.
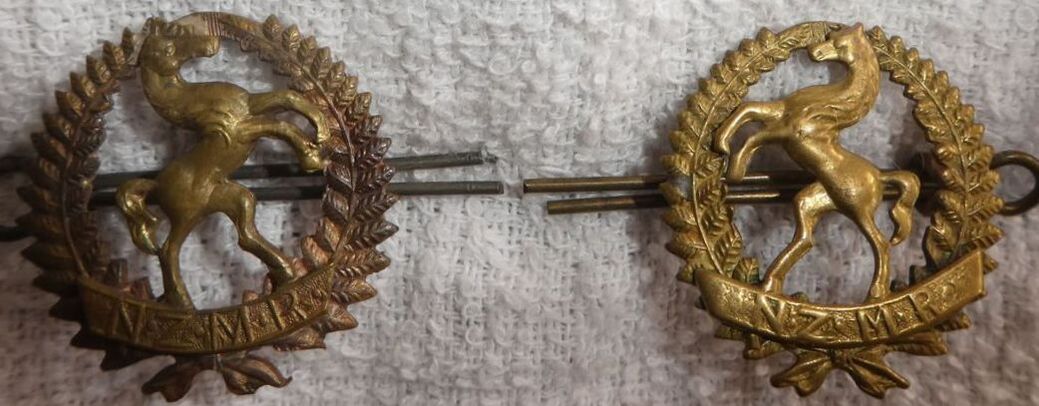
- Opposite: A near matching, opposing pair of gilt brass generic MR reinforcement collars. These were often used on other frame types as the center of the badge. There is some variation in horse and mane. Two copper looped lugs in a North/South configuration. Size 28mm by 34mm. |
|
- Above: A pair of non matching opposing Collars to the NZ Mounted Rifle reinforcements. Note the differences in mane and detail from the left to the right. The right collar also has traces of the 9th (Wellington East Coast) Mounted Rifles motto to the lower banner, which has been over-stamped N.Z.M.R. Copper wire looped to the back of each in a North/South configuration. Size left collar 28mm by 34mm, right collar 25mm by 32mm.
|
- Above: A gilt brass Collar badge to the NZ Mounted Rifle reinforcements. This has been brooched to back, in a North/South configuration. Size 28mm by 34mm.
|
- Opposite: A Cap and Collar badge set to a Mounted Rifle Reinforcement. Note the Cap, with fernleaf wreath and a 9th (Wellington East Coast) Mounted Rifles Regiment Collar badge in the center. The two collars, opposing, are similar to above (Ian Hamilton Collection).

- Above: A two piece gilt brass with white metal center Cap badge to the NZ Mounted Rifle Reinforcements. Generic type, with no draft number, it has a RD 812 to front base, otherwise no other maker mark. Two brass hex type lugs to back.
|
- Above: A similar two piece, with better gilt brass finish and a white metal center Cap badge to the NZ Mounted Rifle Reinforcements (Ian Hamilton Collection.
|
- Above: A two piece gilt brass Cap badge to the NZ Mounted Rifle Reinforcements. Generic type, with no draft number, it has a RD 812 to front base, otherwise no other maker mark. Two brass hex type lugs to back.
|
- Opposite: A generic Mounted Rifle Reinforcement Cap badge, with the additional numbers "14" and "23" to front on the border.
Note the brooch fitting to back and the extra gilt added, which could indicate a sweethearts badge.
It could be that:
- A Mounted Rifle Reinforcement served first in the 14th and then later in the 23rd MR Reio drafts (from the end of the 7th/8th drafts, all reinforcements were held back in Egypt, while the withdrawal from Gallipoli was planned and took place. This also restricted/held back the number of reinforcements sent from New Zealand. Many of these men were absorbed into the formation of the ANZAC and New Zealand Divisions, which set sale from Egypt in April 1916. But I have found that some held back in NZ, joined later MR Reio drafts when places became available. This meant a much later draft, for example the 23rd).
- A family with two son's in the Mounted Rifles and in two different reinforcement drafts.
(Ian Hamilton Collection)
|
- Above: A silver plated Cap badge to the New Zealand Mounted Rifle Reinforcements. Two piece, with brooch fitting to back (Ian Hamilton Collection).
|
- Above: A darkened brass, two piece Cap badge to the NZ Mounted Rifle Reinforcements. Note the traces of black paint to detail. Two copper looped lugs to back. No maker mark.
|
- Above: A two piece, brass Cap badge to the NZ Mounted Rifle Reinforcements. Two brass hex type lugs to back. No maker mark.
|
- Above: A two piece, gilt brass Cap badge to the NZ Mounted Reinforcements. The rampant horse is on a frame used by the 34th Reinforcements and onwards. Two copper wire looped lugs to back. No maker mark.
|
- Above: A similar two piece, gilt brass Cap badge to the NZ Mounted Reinforcements (Ian Hamilton Collection).
|
- Above: A sterling silver Mounted Rifles brooch badge (Ian Hamilton Collection).
|
- Above: A pair of opposing gilt brass Collar badges to the Mounted Rifles Reinforcements. A round frame, with a separate rearing horse on a lower banner of "N.Z.M.R" (Ian Hamilton Collection".
|
- Above: A two piece, brass Collar badge to the NZ Mounted Rifles in rare frame type. Two small copper lugs to back. No maker mark.
|
- Above: A similar two piece, brass Collar badge to the NZ Mounted Rifles as the one opposite. Note the base banner, which has had the word "REINFORCEMENT" obliterated (Ian Hamilton Collection).
|