New Zealand Mounted Rifle Badges
Like their Infantry counterparts, the New Zealand Mounted Rifle Regiments were all formed in 1911, mainly from pre-existing Volunteer Mounted Rifle units.
Unlike the Infantry, very few survived passed WW2, just due to changes in warfare and technology.
Most New Zealand Mounted Rifle units, play a significant role in the Middle East, while the Otago Mounted Rifle Regiments fought on the Western Front during WW1 as Infantry.
Instead of 4 regiments for each Military District (like the Infantry), there were 3 as follows:
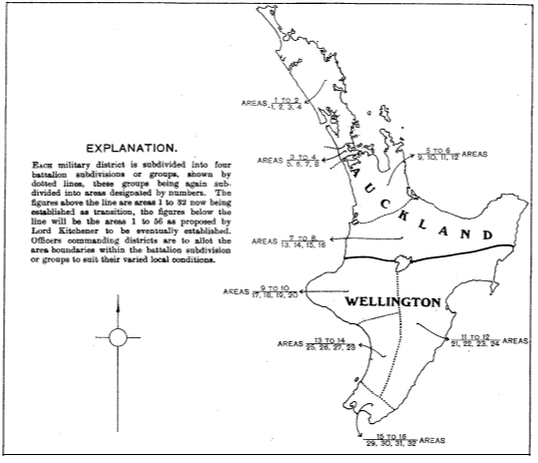
A - Auckland District - covering from the middle to the top of the North Island of NZ.
- 3rd (Auckland) Mounted Rifles
-4th (Waikato) Mounted Rifles
-11th (North Auckland) Mounted Rifles
B - Wellington District - covering from the middle to lower half of the North Island of NZ.
- 2nd (Wellington West Coast) Mounted Rifles
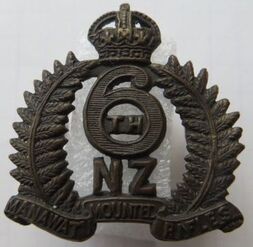
- 6th (Manawatu) Mounted Rifles
- 9th (Wellington East Coast) Mounted Rifles
- Opposite: A map showing the two Military Districts for the North Island (Map taken from the 1910 AJHR H19a - page 7).
- 3rd (Auckland) Mounted Rifles
-4th (Waikato) Mounted Rifles
-11th (North Auckland) Mounted Rifles
B - Wellington District - covering from the middle to lower half of the North Island of NZ.
- 2nd (Wellington West Coast) Mounted Rifles
- 6th (Manawatu) Mounted Rifles
- 9th (Wellington East Coast) Mounted Rifles
- Opposite: A map showing the two Military Districts for the North Island (Map taken from the 1910 AJHR H19a - page 7).
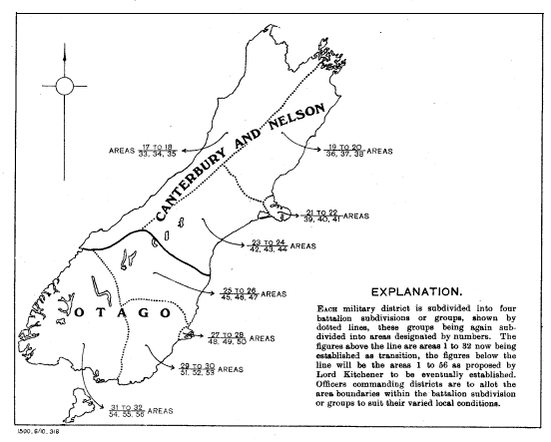
C - Canterbury District - covering from the middle to the top half of the South Island of NZ.
- 1st (Canterbury Yeomanry Cavalry) Mounted Rifles
- 8th (South Canterbury) Mounted Rifles
- 10th (Nelson) Mounted Rifles
D - Otago District - covering from the middle to the lower half of the South Island and including Stewart Island.
- 5th (Otago Hussars) Mounted Rifles
- 7th (Southland) Mounted Rifles
- 12th (Otago) Mounted Rifles
- Opposite: A map showing the two Military Districts for the South Island (Map taken from the 1910 AJHR H19a - page 7).
The last three regiment of the Otago Mounted Rifles, left with the "Main Body" of men, known as the New Zealand Expeditionary Force (N.Z.E.F) in Oct 1914, and fought (as all Mounted Rifle units did) as dismounted Infantry at Gallipoli.
With the reorganisation and formation of the ANZAC and NZ Divisions after the withdrawal from Gallipoli in April 1916, the three units of Otago Mounted Rifle were not required to serve in the Middle East. Instead their members and reinforcements fought as dismounted Infantry or joined other newly formed or greatly expanded units in France and on the Western Front.
This section of the website will look at the Cap and Collar badges worn by the 12 Mounted Rifle Regiments from 1911 until now.
New Zealand Mounted Rifle Regiments
1st (Canterbury) Mounted Rifles.
The 1st (Canterbury) Mounted Rifles was formed in 1911 from the amalgamation of the 1st and 2nd Battalions, North Canterbury Mounted Rifles.
Headquarters were at Christchurch.
On the 16th of Aug 1911 their initial badge was approved as
"The G.O.C has approved the badges of the 1st Mounted Rifles (Canterbury Yeomanry Cavalry) sketches of which were submitted, as under
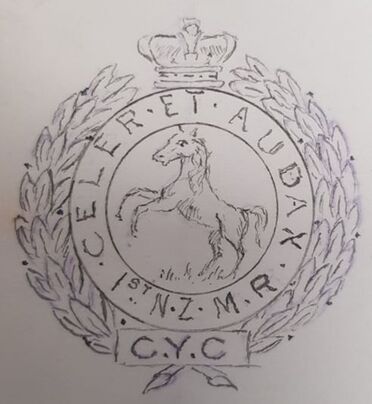
Cap Badge. Within a laurel wreath and circle inscribed "Cedex Et Audax" & "1st N.Z.M.R," surmounted by a crown, a horse rampant. "C.Y.C" inscribed on plate at base of wreath.
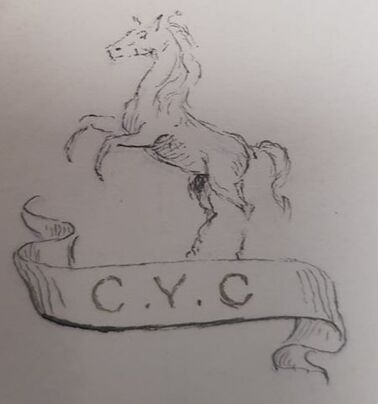
Collar Badge. A horse rampant over a scroll inscribed "C.Y.C"."
Headquarters were at Christchurch.
On the 16th of Aug 1911 their initial badge was approved as
"The G.O.C has approved the badges of the 1st Mounted Rifles (Canterbury Yeomanry Cavalry) sketches of which were submitted, as under
Cap Badge. Within a laurel wreath and circle inscribed "Cedex Et Audax" & "1st N.Z.M.R," surmounted by a crown, a horse rampant. "C.Y.C" inscribed on plate at base of wreath.
Collar Badge. A horse rampant over a scroll inscribed "C.Y.C"."
|
|
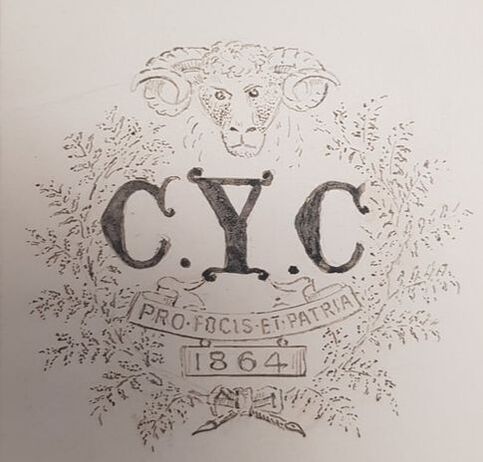
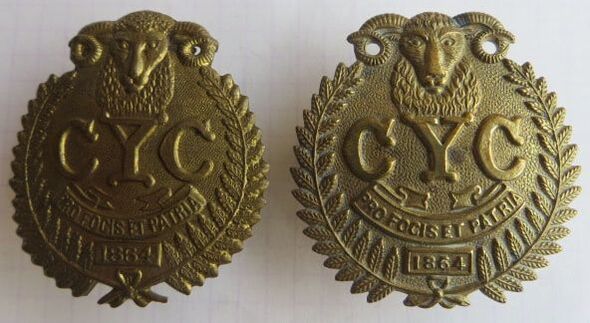
The above initial designs were eventually rejected by members of the 1st (Canterbury) Mounted Rifles and it wasn't until the 18th of Dec 1913, that the below designs were submitted.
|
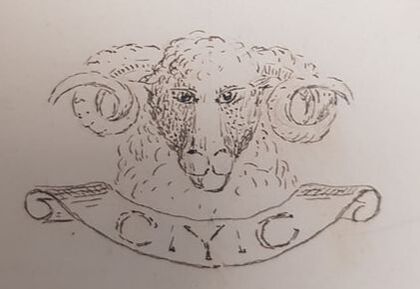
- Opposite & Above: The original hand drawings attached to the memo dated the 18th of Dec 1913, showing the proposed design of the Cap (opposite) and Collar (above) badge to the 1st (Canterbury) Mounted Rifles (Badges - Regimental - Territorial Force, R23534556 AD1 AAYS 13-13 Archives NZ).
|
On the 20th of Jan 1914 the badges were approved by the Army.
(Badges - Regimental - Territorial Force, R23534556 AD1 AAYS 13-13 Archives NZ).
Motto: PRO FOCIS ET PATRIA (For hearth and home).
(Badges - Regimental - Territorial Force, R23534556 AD1 AAYS 13-13 Archives NZ).
Motto: PRO FOCIS ET PATRIA (For hearth and home).
|
|
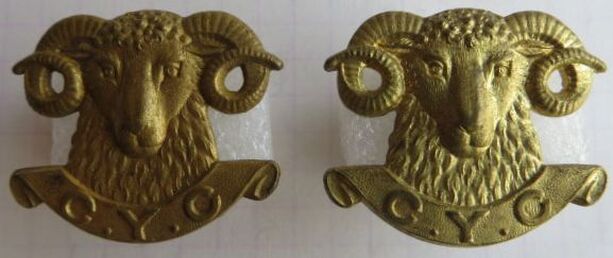
- Opposite: A semi-solid gilt brass Cap badge to the 1st (Canterbury) Mounted Rifles. D shaped copper looped lugs to back, and impressed to "J R GAUNT LONDON". Size 45mm by 41.5mm.
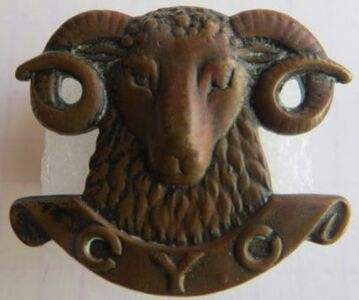
- Above: A semi-solid, and well worn bronze Collar badge to the 1st (Canterbury) Mounted Rifles. Two D shaped copper looped lugs to back and maker impressed to "J R GAUNT LONDON". Size 25mm by 30mm. |
|
|
- Opposite & Above: A gilt brass Cap and Collar badge pair to the 1st (Canterbury) Mounted Rifles. All have copper looped lugs to back, with the Cap in a East/West, while Collars are in a North/South configuration. Maker plaque to "J R GAUNT LONDON". Cap badge size is 46.5mm by 52.5mm, Collar badge size is 25mm by 30mm.
|
- Above Left: A gilt brass Cap badge to the 1st (Canterbury) Mounted Rifles. Narrow, with the central "bar" across the top of the "Y" to center, it has a different styled Ram's head and horns. No maker mark and copper wire looped lugs to back. Size 47.5mm by 42mm.
- Above Right: A gilt brass Cap badge to the 1st (Canterbury) Mounted Rifles. Note the gap, in the top of the "Y" to center. A wide badge, with thick wire copper lugs to back. Small maker mark to back base to "M & K W" or Mayer and Kean of Wellington. Size 46.5mm by 45mm. |
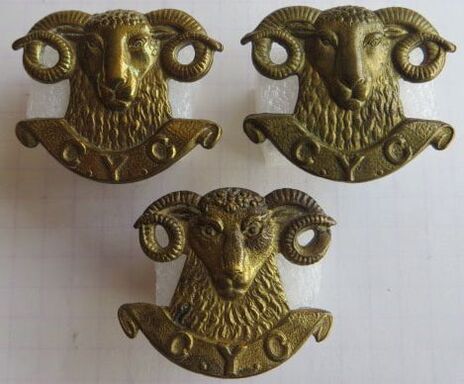
- Above Top: A matching pair of gilt brass Collar badges to the 1st (Canterbury) Mounted Rifles. No maker mark and two copper looped lugs in a North/South configuration to back. Size 25.5mm by 30.5mm.
- Above Bottom: A single gilt brass Collar badge to the 1st (Canterbury) Mounted Rifles. No maker mark and two copper looped lugs to back. Size 25.5mm by 29.5mm. |
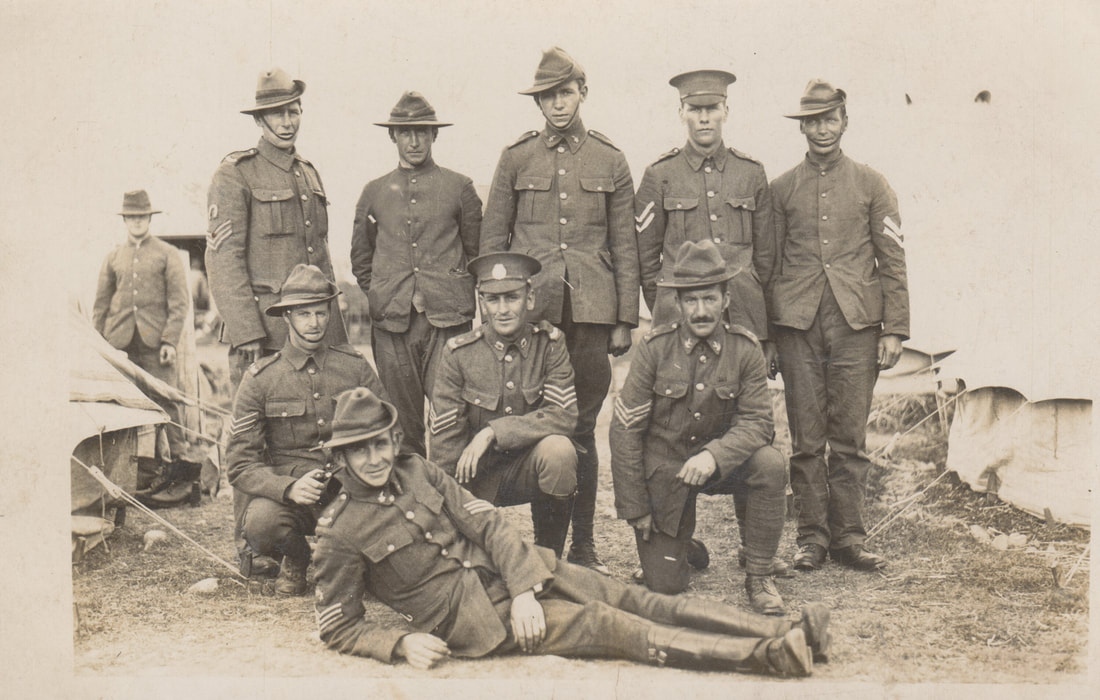
- Above: A mixture of South Island Mounted Rifles in Camp. To center crouching, is a Sergeant to the 1st (Canterbury) MR, with Cap to hat, and Collar badges. He wears a number "1" in brass on his shoulder strap, and "NZMR" Shoulder titles either side. To his left is a 10th (Nelson) MR Sergeant, while lying down in front, is a Sergeant to the 8th (South Canterbury) MR. The soldier at the back, center is also wearing collars to the 8th.
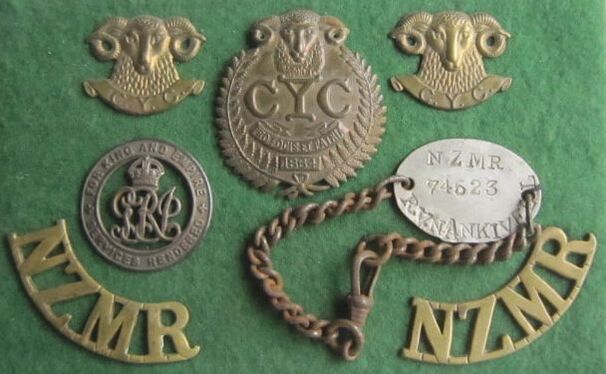
- Opposite: A Cap & Collar badge set, with shoulder titles, ID disc and Silver War Badge to 74523 Trooper Robert Victor Nankivell. Robert was from Christchurch, and joined on the 4th of Dec 1917, but wasn't called to training until 4th of March 1918 as part of the 41st Mounted Rifle Reinforcements.
On the 1st of Oct 1918 he boarded the Moeraki at Wellington, to travel to Sydney, where he then boarded Australian Transport ship "Malta" to Egypt.
He disembarked at Ismailia, and was put into isolation (due to Spanish Flu), and then joined the NZ Mounted Rifles Training Battalion.
Attached to a working party from the 1st of Feb 1919 to 12th of Feb 1919 at Aotea Convalescent Hospital, in Heliopolis (a suburb of Cairo).
Attached to the Canal MB Police from the 20th to 24th of Mar 1919.
Transfer to brigade on the 22nd of May 1919, and joined the 1st (Canterbury) Mounted Rifles, in the field.
Transferred to Training Regiment on the 26th of June 1919 to return to New Zealand.
Re-embarked for New Zealand from Ismailia on the 23rd of July 1919.
Discharged in New Zealand on the 12th of Oct 1919, due to "termination of period of engagement", basically the war was over.
Robert served 340 days overseas, with a total service of 1 year and 223 days.
For his service, Robert was awarded the British War Medal only, as he arrived after hostilities had ceased, both in Europe and the middle east, so was therefore NOT entitled to the Victory Medal.
Silver War Badge is numbered NZ25168.
The Cap and Collar badges to the 1st NZMR have copper wire looped lugs to back. There is no maker mark. The two NZMR gilt brass shoulder titles are both "J R GAUNT LONDON" marked, with two brass hex lugs to back.
The 1st (Canterbury) Mounted Rifles amalgamated with the 8th (South Canterbury) Mounted Rifles in 1921, and the Regiments title was changed to the 1st New Zealand Mounted Rifles (Canterbury Yeomanry Cavalry).
The Regiment was then absorbed into the 3rd Armoured Regiment in March 1944.
- Opposite: A unfinished Cap badge to the 1st (Canterbury) Mounted Rifles. It has the detail to both front and back, so has been die-stamped, but not had the cutter die applied. Additionally the holes would be made for the inside of the horns.
No maker mark to back, and no lugs either.
2nd (Wellington, West Coast) Mounted Rifles.
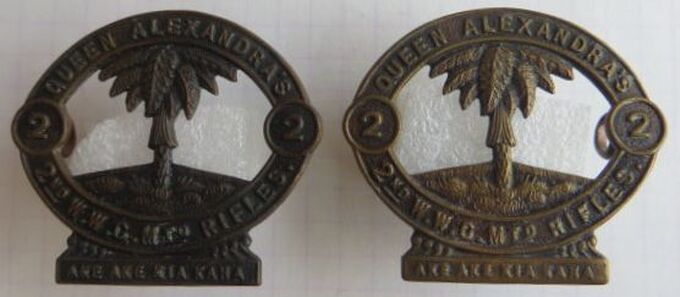
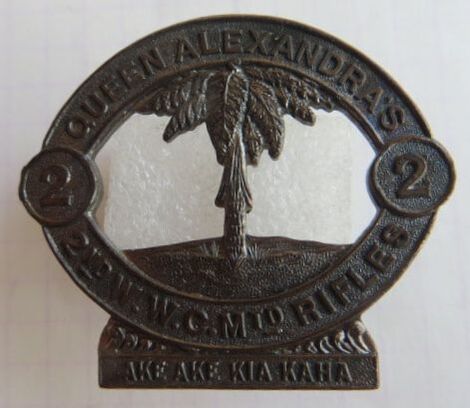
The 2nd Queen Alexandra's (Wellington, West Coast) Mounted Rifles were formed in 1911 from the 1st Regiment, Wellington (West Coast) Mounted Rifles.
Headquarters were at Wanganui.
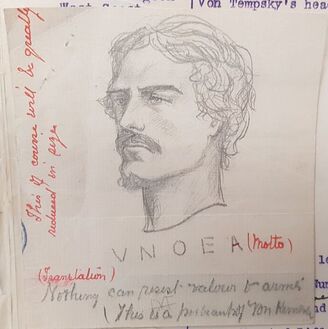
The initial design in 1911 was the opposite sketch, described as a "Facsimile of Von Tempsky's head & motto (Latin) "V.N.O.E.A" (Nothing can resist valour in Arms)".
- Opposite: The first proposal of the 2nd N.Z.M.R's badge, which was rejected by the G.O.C. (General Officer Commanding), with the Officer commanding of the military district also added the comments that it "conveyed no meaning".
Headquarters were at Wanganui.
The initial design in 1911 was the opposite sketch, described as a "Facsimile of Von Tempsky's head & motto (Latin) "V.N.O.E.A" (Nothing can resist valour in Arms)".
- Opposite: The first proposal of the 2nd N.Z.M.R's badge, which was rejected by the G.O.C. (General Officer Commanding), with the Officer commanding of the military district also added the comments that it "conveyed no meaning".

The design was later changed with its approval being granted on the 23rd of Aug 1911:
"the G.O.C. has approved the substitution of the following badge for the 2nd Mounted Rifles, a sketch of which was forwarded, in lieu of that previously submitted, viz.- Within a garter inscribed "2nd N.Z.M.R." and motto "Ake Ake Kia Kaha", a Punga tree".
Motto in 1911 described as "Be ever strong" (Cadets, Regimental Badges and Uniforms R21078962 Box 19 AD37 24 c1912 Archives N.Z)
- Opposite: The amended sketch of the 2nd N.Z.M.R's cap badge, sent to the G.O.C on the 19th of Aug 1911.
(Badges - Regimental - Territorial Force, R23534556 AD1 AAYS 13-13 Archives NZ).
Motto: AKE AKE KIA KAHA (Forever and ever be strong).
Note the Cap badge was worn as either a Cap or Collar, and there is much variation in the Cabbage Tree and its base ground!
It is only until relatively recently that the Regiment has worn different sized Collars.
|
- Above: A Officers solid, darkened Cap badge to the 2nd Queen Alexandra's (Wellington, West Coast) Mounted Rifles. Its a rough badge, with imperfections to front. To back is a solid, with two tangs or blades. Marker mark impressed to "BOCK WELLINGTON". Size 35mm by 41mm.
|
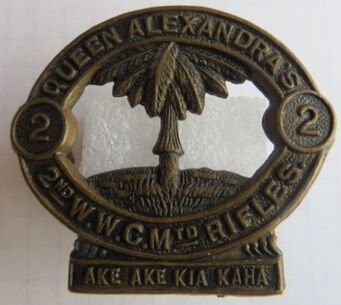
- Above: A darkened brass Cap or Collar badge to the 2nd Queen Alexandra's (Wellington, West Coast) Mounted Rifles. Its a thin, die stamped badge, with 2 short looped lugs to back. No maker mark, and size 35.5mm by 41mm.
|
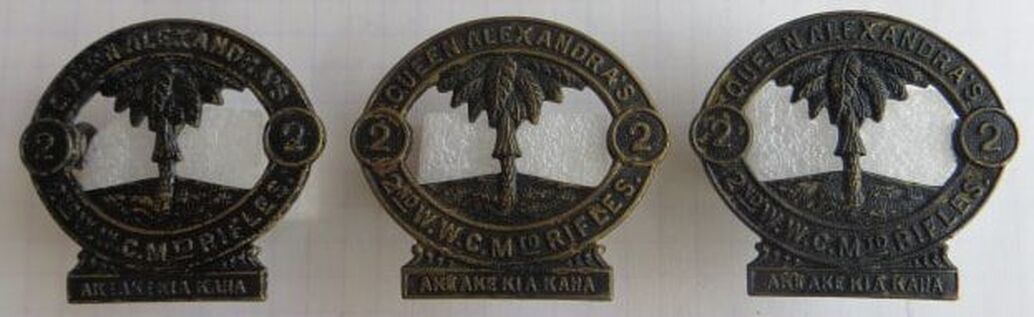
- Above: A darkened Cap and Collar badge set to the 2nd Queen Alexandra's (Wellington, West Coast) Mounted Rifles. All three have two D shaped copper looped lugs to back and a maker plaque to "J R GAUNT LONDON". Size 35.5mm by 40.5mm.
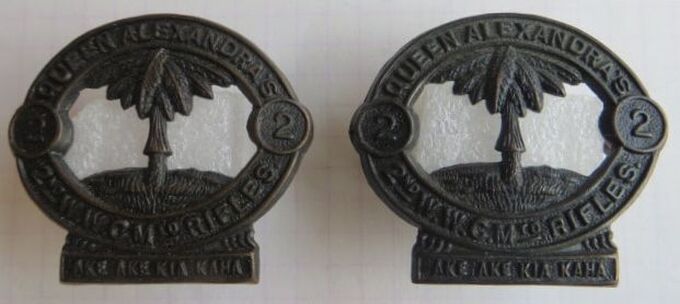
- Above: A darkened Cap or Collar badge in copper, to the 2nd Queen Alexandra's (Wellington, West Coast) Mounted Rifles. Both have copper looped lugs but no maker mark. Note the rounded ground at the base of the Cabbage Tree. These badges have a deep stamping, with a pronounced edge. Size 36.5mm by 41.5mm.
|
- Above: Same badge as the opposing two, but in darkened brass. No maker mark and two copper looped lugs to back. Size 36mm by 41mm.
|
- Opposite Left: A painted gold Cap or Collar badge to the 2nd Queen Alexandra's (Wellington, West Coast) Mounted Rifles. Both lugs have been replaced to back, and no maker mark. Size 35mm by 41mm.
- Opposite Right: A gilt brass Cap or Collar badge to the 2nd Queen Alexandra's (Wellington, West Coast) Mounted Rifles. Both lugs have been clipped off to back, and no maker mark. Size 35.5mm by 41mm.
- Opposite Right: A gilt brass Cap or Collar badge to the 2nd Queen Alexandra's (Wellington, West Coast) Mounted Rifles. Both lugs have been clipped off to back, and no maker mark. Size 35.5mm by 41mm.
- Opposite: A matching pair in terms of strike to the 2nd Queen Alexandra's (Wellington, West Coast) Mounted Rifles. The above left is in darkened copper, while the above right is in darkened brass. Two D shaped looped lugs to back. No maker mark. Copper badge size is 36mm by 40.5mm, while the brass is 35.5mm by 40.5mm.
|
- Above & Opposite: A modern Cap and Collar badge set to the Queen Alexandra's Squadron, Royal New Zealand Armoured Corps. The Cap badge is a darkened bronze metal, solid to back, with two pins to use with clutches. The collars are a near black in colour and also have 2 pins to back to each. They show the two versions. The Cap has a near flat background, while the Collars feature Mt Egmont behind. You can get a Cap with Mt Egmont and Collars with a flat background. None are maker marked.
|
In 1921 the regiments title was changed to the 2nd New Zealand Mounted Rifles (Queen Alexandra's Wellington West Coast).
This was later altered to Queen Alexandra's (Wellington West Coast) Mounted Rifles.
During WW2 its members served in a number of units including 2nd New Zealand Divisional Cavalry Regiment, which saw action in Greece, Crete, North Africa and Italy. Some men also served in the Long Range Desert Group.
Members were also part of 3rd New Zealand Division's Special Army Tank Squadron Group in the Pacific, and with the 4th New Zealand Armoured Brigade in Italy.
Members served as part of J-Force after WW2 with the occupation of Japan.
The regiment went through a number of title and organisational changes over the years and is currently called "Queen Alexandra's Mounted Rifles, Royal New Zealand Armoured Corps" and is again Regiment size, based in Burnham, South Island, New Zealand.
- Opposite: A small resin and metal pin to celebrate the 150th anniversary of the Regiment, from 1864 to 2014. No maker mark and 2 pins to back to be used with clutches. Size 30mm by 35.5mm.
Fakes & Forgeries
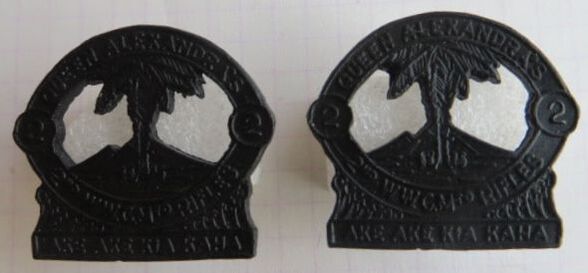
A fake Cap badge to the 2nd Queen Alexandra's (Wellington, West Coast) Mounted Rifles.
- Cast, with OK to good detail to front. The detail is a little flat and colour wrong.
- To back, it has a flat area to base, where the excess brass from the mold has been removed and filed down flat. It lacks all detail, which you would expect on a die stamped original, and note the pitting.
- Small short lugs, which do not feature on originals, note they looked soldered on.
- Size of left 34mm by 40mm.
|
|
|
|
3rd (Auckland) Mounted Rifles.
The 3rd (Auckland) Mounted Rifles formed in 1911 from the 1st Regiment, Auckland Mounted Rifles.
Headquarters were at Auckland.
Headquarters were at Auckland.
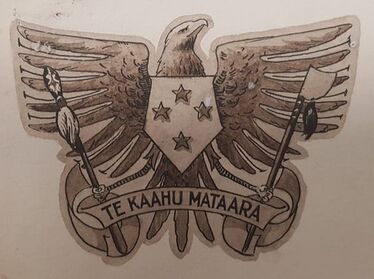
- Opposite: the original drawing of the proposed badge of the 3rd N.Z.M.R.
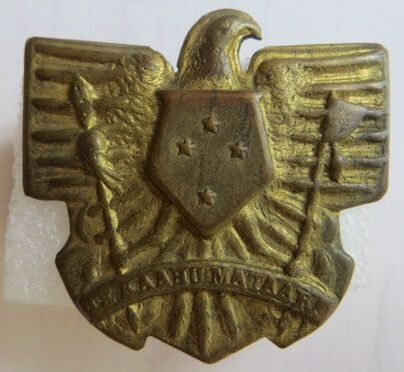
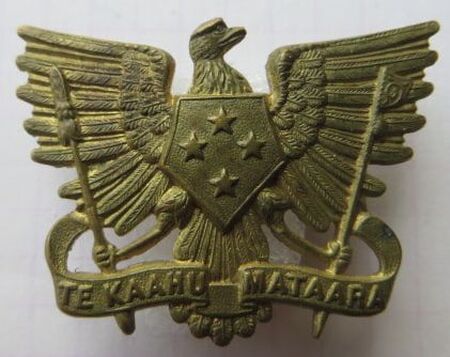
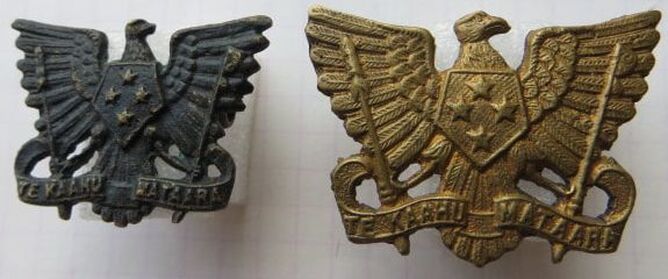
The Cap badge was description the 10th of July 1911 as a "Hawke (spread-eagle) bearing a shield with the "Southern Cross" on breast & Maori Club & Battle-axe in Claws.
Motto "Te Kaahu Mataara" on scroll at base. For both cap and collar (diameter about 1 inch)".
(Badges - Regimental - Territorial Force, R23534556 AD1 AAYS 13-13 Archives NZ).
In 1911 the motto was described as "The Hawk ever watchful and ready to strike" (Cadets, Regimental Badges and Uniforms R21078962 Box 19 AD37 24 c1912 Archives N.Z.).
Motto: TE KAAHU MATAARA (Be like a hawk).
|
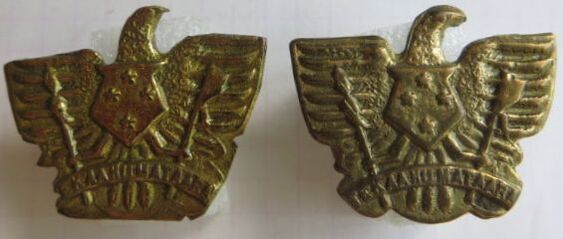
- Opposite & Above: A locally made "Rough" type gilt brass Cap and Collar badge to the 3rd (Auckland) Mounted Rifles. These apparently were the first version of the badge, before the Gaunt produced ones were issued.
The Cap badge has a short brass slider to back, while one collar has two thick wire looped lugs, the other has had its lugs clipped off. The books only show the eagles head facing this way, there appears no opposing other side. Size of Cap 37mm by 40mm, while Collar 26mm by 33mm. |
|
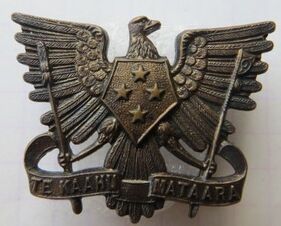
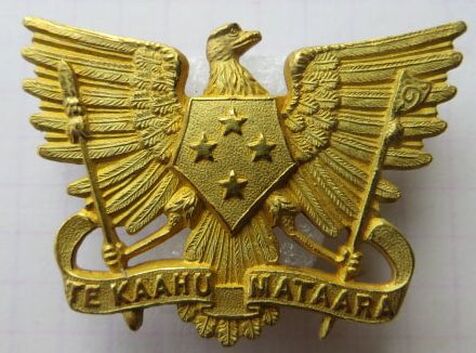
- Opposite & Above: A scarce, gilt fired Cap and Collar badge to the 3rd (Auckland) Mounted Rifles. Both are semi-solid to back and impressed "J R GAUNT LONDON". Note the Collar is dark as it has been heated to add two new replacement lugs to back (not by me!!). Size of Cap 29mm by 40.5mm, while Collar 24.5mm by 32mm.
|
|
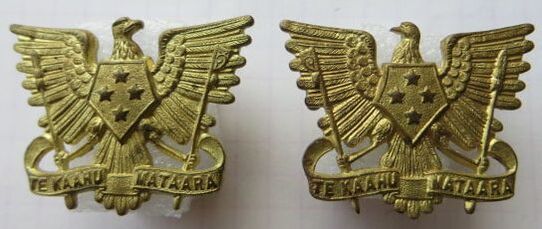
- Opposite & Above: Gilt brass Cap and Collar badge set to the 3rd (Auckland) Mounted Rifles. All have a makers plaque to back to "J R GAUNT LONDON", and all have two D shape copper looped lugs. Note the Collars are opposing, with Eagle's head facing either way. Size of Cap is 29.5mm by 40.5mm, while Collar is 24.5mm by 32.5mm.
|
- Above: A darkened brass Cap badge to the 3rd (Auckland) Mounted Rifles. All finish has been polished off to front. Two copper wire lugs to back, with the marker marked to back base of "M & K, W" for Mayer and Kean of Wellington. Size 29mm by 40.5mm.
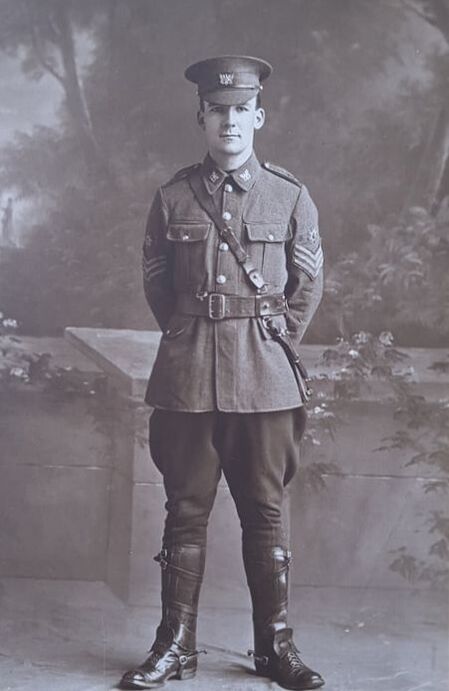
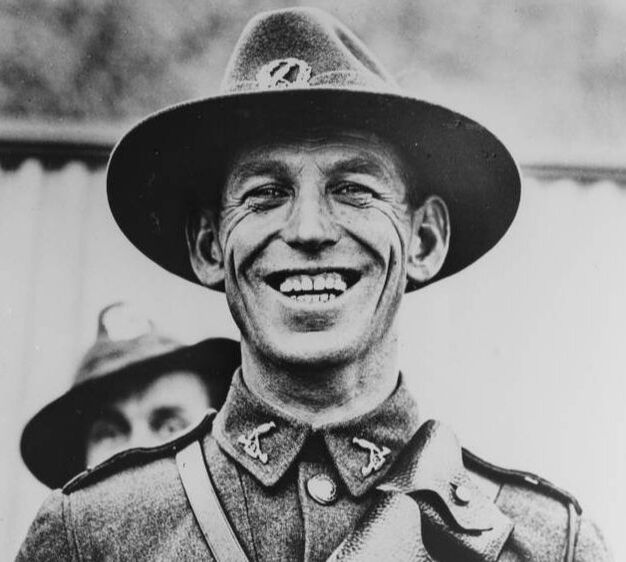
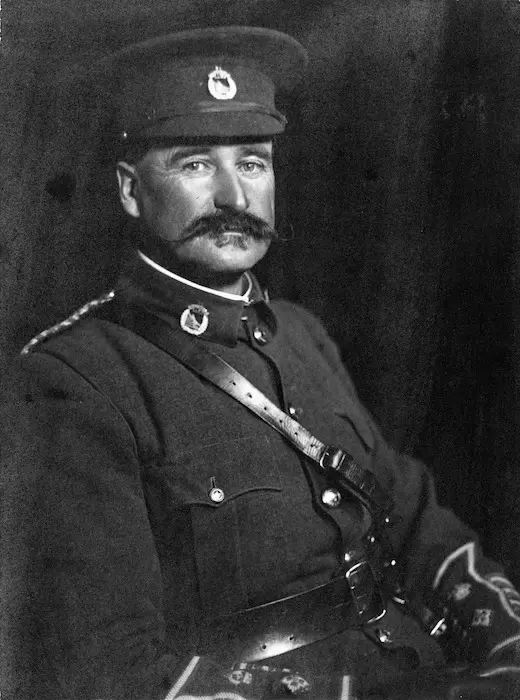
- Opposite: A full length image of Quartermaster Sergeant (QMS) 13/2512 James Leslie Buchanan, taken in July 1915. Here, he is wearing the insignia of the 3rd (Auckland) Mounted Rifles. James left with A Squadron, 8th Mounted Rifles Reinforcements, as a Sergeant Major, but was held back in Egypt, while the Allies withdrew from Gallipoli, and then joined the New Zealand Field Artillery. Wounded in France, in 1918, he would eventually lose a leg. James served with the 3rd (Auckland) Mounted Rifles prior to his service in WW1. Note the QMS stars to sleeves above his Sergeants chevrons (Nigel Robson Collection). |
|
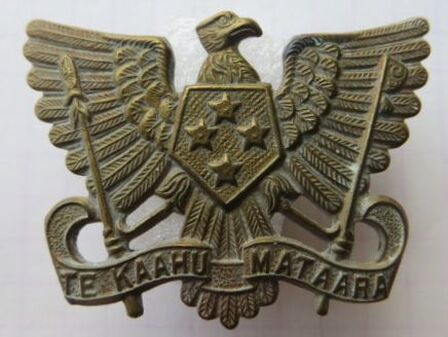
- Opposite: A sand cast Cap and Collar badge to the 3rd (Auckland) Mounted Rifles. Both have a Gaunt plaque cast into the back of them, indicating possibly WW1 era, and made in the middle East.
Size of Cap is 28.5mm by 40mm, while Collar is 24mm by 32mm.
Size of Cap is 28.5mm by 40mm, while Collar is 24mm by 32mm.
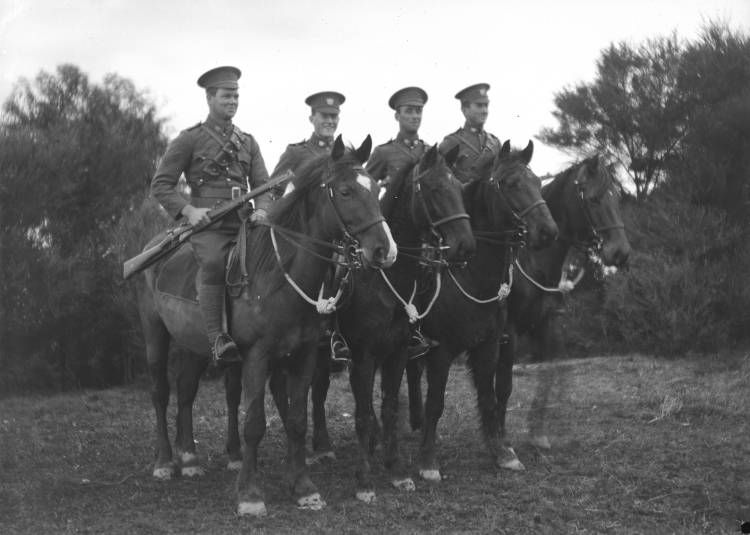
- Opposite: A ca 1913 image of 4 soldiers on horseback. The Auckland Library website states its possibly four Waikato Mounted Rifles, but the way the badges are solid, and slightly wider at the top indicates that its more likely four 3rd (Auckland) Mounted Rifles chaps. Certainly their collar badges are more 3rd NZMR than 4th NZMR.
Just a great image and apparently at Clevedon, NZ (Auckland Libraries Heritage Collections Footprints 02612)
Just a great image and apparently at Clevedon, NZ (Auckland Libraries Heritage Collections Footprints 02612)
The Regiments title was changed in 1921 to the 3rd New Zealand Mounted Rifles (Auckland).
This was then changed to the Auckland (East Coast) Mounted Rifles.
It was absorbed into the 1st Armoured Regiment in March 1944.
This was then changed to the Auckland (East Coast) Mounted Rifles.
It was absorbed into the 1st Armoured Regiment in March 1944.
4th (Waikato) Mounted Rifles.
The 4th (Waikato) Mounted Rifles formed in 1911 from the amalgamation of the 2nd and 4th Regiments, Auckland Mounted Rifles.
Headquarters were at Hamilton.
Headquarters were at Hamilton.
|
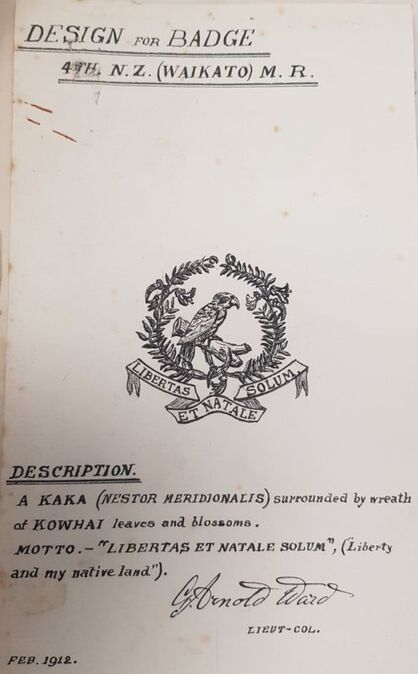
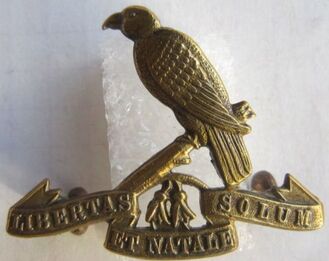
- Opposite: A submitted design of the 4th (Waikato) Mounted Rifles within the New Zealand Archives, dated Feb 1912.
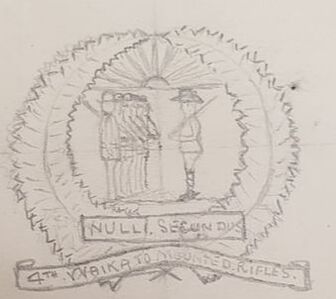
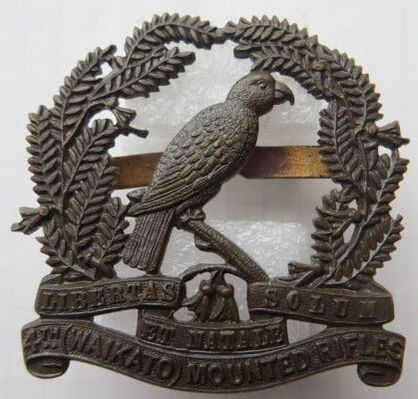
Cap Badge - On the 4th of April 1912, the General Officer Commanding (G.O.C) approved the design of "A Kaka within a wreath of Kowhai leaves and blossoms, with the motto "Libertas et natale solum" on a scroll below". - Above: A undated hand drawn design of the 4th (Waikato) Mounted Rifles, which was rejected on the 10th of July 1911. It was reported in the papers that the design was done by a Mr J Wyndham Hopkins, late of the Taranaki Guards: "With regard to the sketch of proposed badge (attached) for this Regiment, the G.O.C. considers the badge is too large, and too much detail is proposed. He suggests the omission of the armed citizens and the motto "Nulli Secundus" or that, if the armed citizens are to be retained, something else should come out. |
The total size of badge must be much smaller- perhaps the rising sun could be much smaller.- A suggestion (sketch) by Colonel Heard is attached.
Please refer this matter to the O.C. Regiment for further consideration."
(Badges - Regimental - Territorial Force, R23534556 AD1 AAYS 13-13 Archives NZ).
Motto: LIBERTAS ET NATALE SOLUM (Liberty and homeland).
Please refer this matter to the O.C. Regiment for further consideration."
(Badges - Regimental - Territorial Force, R23534556 AD1 AAYS 13-13 Archives NZ).
Motto: LIBERTAS ET NATALE SOLUM (Liberty and homeland).
|
- Opposite: A bronze Officers Cap badge to the 4th (Waikato) Mounted Rifles. Semi-solid to back, with two blades or tangs. It is impressed to back with the maker details of "J R GAUNT LONDON". Size 41mm by 43.5mm.
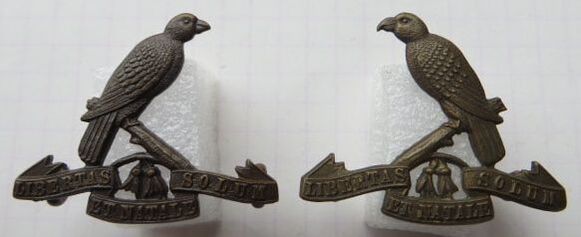
- Above: A non-matching pair of Collar badges to the 4th (Waikato) Mounted Rifles. Both are maker impressed to back to "J R GAUNT LONDON". The above left has two D shaped copper lugs to back of base banner, while the above right has three D shaped Copper lugs, one to the back of the bird (Kaka), and one either side of the back of the banner. Size 29mm by 36mm. |
|
|
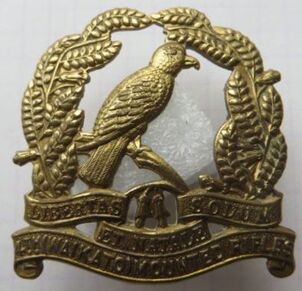
- Opposite: A gilt brass Cap badge to the 4th (Waikato) Mounted Rifles. Three copper looped lugs to back, with the maker plaque to "J R GAUNT LONDON". This badge has been lacquered, which has filled in some of the detail to front and turned it a yellowy brown in tone. Size 41.5mm by 43mm.
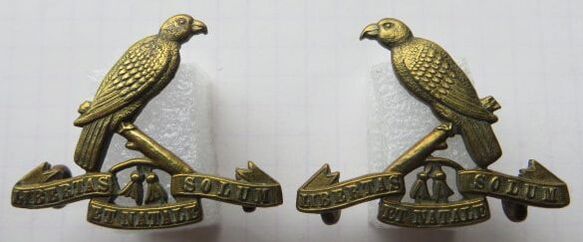
- Above: A matching pair of gilt brass Collar badges to the 4th (Waikato) Mounted Rifles. Two D shaped copper looped lugs to lower back and the maker plaque of "J R GAUNT LONDON". Size 29mm by 36mm. |
|
|
- Opposite: A rare variation of the 4th (Waikato) Mounted Rifles Cap badge. This badge was issued with a hook to hold back the flap of a slouched hat. Similar to the 1st (Canterbury) Infantry Regiment hooked Cap badge, they came about prior to WW1 due to different Regiments adopting a wide range of hats. Maker plaqued to "J R GAUNT LONDON" to back, and with a single screw post, nut and washer. Size 56mm by 44mm.
- Above: A locally made Cap badge to the 4th (Waikato) Mounted Rifles. Variation in detail to bird (Kaka) and wreath. Lacks detail to back and has two copper wire lugs. Size 42mm by 42mm. |
|
- Above: A semi-solid Officers Collar badge in brass to the 4th (Waikato) Mounted Rifles. It looks to have been lacquered in the passed, but also has a subdued finish to back. Looks to have had a lug added, with one behind the Kaka's head (now snapped off) and two remaining D shaped copper lugs to base. Maker impressed to "J R GAUNT LONDON", and size 30mm by 36mm.
|
Above: A photo which appeared in the Weekly News, 20th Sept 1939, showing 1059 John William Reeves, a Sergeant (at the time) signing up with 17 other members of the Pakauranga Troop of the 4th (Waikato) Mounted Rifles to volunteer for action in WW2. Note his cap badge and set of collar to his tunic collar. He would join the 2nd Divisional Cavalry and rise to the rank of Lieutenant, leaving with the 2nd Echelon of the 2nd NZEF.
On the 19th March 1942, he was awarded the Military Cross for action under fire.
Sadly he was killed in action on the 16th of Dec 1942, in the Western Desert.
The Regimental title was changed in 1921 to the 4th New Zealand Mounted Rifles (Waikato).
This was then changed to the Waikato Mounted Rifles.
It was absorbed into the 1st Armoured Regiment in March 1944.
5th (Otago Hussars) Mounted Rifles.
The 5th (Otago Hussars) Mounted Rifles formed in 1911 from the 1st Regiment, Otago Mounted Rifles.
Headquarters were at Dunedin.
Its badges were approved by the G.O.C on the 25th of July 1911.
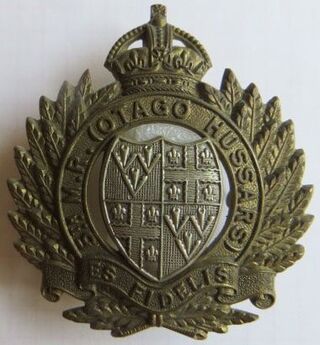
Cap Badge - "Coat of Arms (white-metal - rest brass) surrounded by a circle bearing words "5th Regiment Otago Mounted Rifles", as noted below, the circle instead reads "5th M.R. (Otago Hussars).
It goes on to say "a coat of arms (Nicholas & Cowie quarterly).
First and fourth quarters - Nicholas - Sable three pheons argent. (part French it means three silver pheons (which are downward pointing arrowheads, javelins or darts) in sand).
Second & third quarters - Cowie - Argent a cross engrailed asure between four fleur de lis gules. (again part french, a silver cross between four flowers)"
Collar Badge - "Coat of Arms (white metal) over motto (brass)".
(Badges - Regimental - Territorial Force, R23534556 AD1 AAYS 13-13 Archives NZ).
Motto: ES FIDELIS (Be faithful).
Headquarters were at Dunedin.
Its badges were approved by the G.O.C on the 25th of July 1911.
Cap Badge - "Coat of Arms (white-metal - rest brass) surrounded by a circle bearing words "5th Regiment Otago Mounted Rifles", as noted below, the circle instead reads "5th M.R. (Otago Hussars).
It goes on to say "a coat of arms (Nicholas & Cowie quarterly).
First and fourth quarters - Nicholas - Sable three pheons argent. (part French it means three silver pheons (which are downward pointing arrowheads, javelins or darts) in sand).
Second & third quarters - Cowie - Argent a cross engrailed asure between four fleur de lis gules. (again part french, a silver cross between four flowers)"
Collar Badge - "Coat of Arms (white metal) over motto (brass)".
(Badges - Regimental - Territorial Force, R23534556 AD1 AAYS 13-13 Archives NZ).
Motto: ES FIDELIS (Be faithful).
|
- Above: A early, 1st pattern, bi-metal, darkened Cap badge to the 5th (Otago Hussars) Mounted Rifles. This is based on the design for the Volunteer period "1st Regt. Otago M.R." badge, with a rounded crown and fine leafed wreath. Note this example has had the crown crushed slightly and the overall badge darkened. Two copper looped lugs to back, but no maker mark. Size 57mm by 50mm.
|
- Above: A 1st pattern, bi-metal, darkened Cap badge to the 5th (Otago Hussars) Mounted Rifles. Smaller crown to top, with two copper looped lugs. No maker mark and size 58mm by 49mm.
|
- Above: The more common, 2nd pattern, bi-metal Cap badge to the 5th (Otago Hussars) Mounted Rifles. It has a more angular crown and broader leafed wreath. Two long copper looped lugs to back and the maker plaque to back of crown to "J R GAUNT LONDON". Size 57.5mm by 52mm.
|
|
- Above: A darkened, all brass Cap badge to the 5th (Otago Hussars) Mounted Rifles. Two copper looped lugs to back, but no maker mark. Size 59mm by 50mm.
|
- Above: A bi-metal Cap badge to the 5th (Otago Hussars) Mounted Rifles. This is maker marked to "M & K W" or Mayer and Kean, Wellington, on either side of the back of the lower banner. Size 59mm by 52.5mm.
|
|
- Above: A darkened pair of single piece, semi-solid Bronze Officers Collar badge pair to the 5th (Otago Hussars) Mounted Rifles. Both have two maker marks impressed to back to "J R GAUNT LONDON" and have two D shaped lugs to back in a East/West configuration. Size 29mm by 39mm.
|
- Above: A all gilt brass pair of single piece, Collar badges to the 5th (Otago Hussars) Mounted Rifles. Two copper looped lugs (with feet) to the back of each, in a North/South configuration. No maker mark. Size 28mm by 39mm.
|
|
- Above: A bi-metal pair of Collar badges to the 5th (Otago Hussars) Mounted Rifles. Two copper looped lugs to the back of each, in a East /West configuration. Large sweat hole to back. No maker mark. Size 29mm by 39mm.
|
- Above: A bi-metal pair of Collar badges to the 5th (Otago Hussars) Mounted Rifles. Two D shaped copper lugs to the back of each, in a North/South configuration. Tiny sweat hole to back. No maker mark. Size 29mm by 39mm.
|
|
- Above: A bi-metal pair of Collar badges to the 5th (Otago Hussars) Mounted Rifles. Two D shaped copper lugs to the back of each, in a North/South configuration. The front detail is stamped to back of brass backing. Maker plaque to "J R GAUNT LONDON". Size 29mm by 39mm.
|
- Above: A bi-metal pair of Collar badges to the 5th (Otago Hussars) Mounted Rifles. Two D shaped copper lugs to the back of each, in a North/South configuration. No detail to back, with the maker mark of "J R GAUNT LONDON" impressed twice, with small sweat hole. Size 29mm by 39mm.
|
In 1921, the 5th (Otago Hussars) Mounted Rifles was amalgamated with the 7th (Southland) Mounted Rifles and 12th (Otago) Mounted Rifles to become the 5th New Zealand Mounted Rifles (Otago).
This was then changed to the 5th New Zealand Mounted Rifles (Otago Hussars) in August 1923.
It became the Otago Mounted Rifles in 1927.
It was absorbed into the 3rd Armoured Regiment in March 1944.
This was then changed to the 5th New Zealand Mounted Rifles (Otago Hussars) in August 1923.
It became the Otago Mounted Rifles in 1927.
It was absorbed into the 3rd Armoured Regiment in March 1944.
6th (Manawatu) Mounted Rifles.
The 6th (Manawatu) Mounted Rifles formed in 1911 from the 3rd Regiment, Wellington (Manawatu) Mounted Rifles.
Headquarters were at Palmerston North.
Headquarters were at Palmerston North.
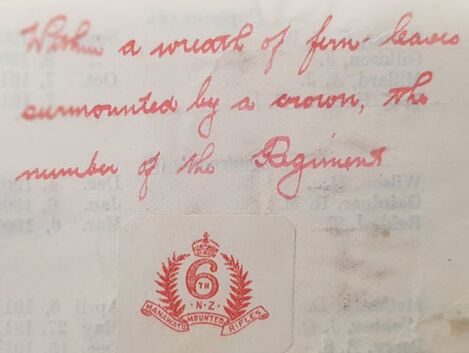
- Opposite: A sketch of the proposed badge of the 6th N.Z.M.R held by Archive NZ.
Cap Badge - In 1911, their badge was described as "Wreath of laurel leaves surmounted by a crown. Number of Regiment over letters "N.Z" & words Manawatu Mounted Rifles on scroll at base" (Note a modification to description with a Fern leaf rather than Laurel wreath).
Collar Badge - "Smaller"
(Badges - Regimental - Territorial Force, R23534556 AD1 AAYS 13-13 Archives NZ). .
Motto: HE KAWAU MARO (Unyielding as the Shag).
|
|
- Opposite: A solid darkened bronze Officers Cap badge to the 6th (Manawatu) Mounted Rifles. Two tangs to back, and a maker impressed mark to "J R GAUNT LONDON" Size 49mm by 47mm.
- Above: A solid darkened Collar badge to the 6th (Manawatu) Mounted Rifles. Possible Officers, and certainly a finer strike with extra fretting around the "TH" to center and under the "Z". Two looped lugs to back, no maker mark. Back is rough, and not well finished, with size 31mm by 30mm. |
|
|
- Opposite: A darkened brass Cap badge to the 6th (Manawatu) Mounted Rifles. Long Copper looped lugs to back and the maker plaque to "J R GAUNT LONDON". Size 49mm by 47mm.
- Above: A pair of near matching Collar badges to the 6th (Manawatu) Mounted Rifles. Both have D shaped copper looped lugs to back and a maker plaque behind the crown to "J R GAUNT LONDON". Size 32mm by 31mm. |
|
- Above: A darkened brass Cap badge to the 6th (Manawatu) Mounted Rifles. Its been coated in the passed with lacquer. Two copper looped lugs to back, but no maker mark. Size 50mm by 47mm.
|
- Above: A gilt brass Cap badge to the 6th (Manawatu) Mounted Rifles. Two copper looped lugs to back, but no maker mark. Size 48mm by 46mm (note the badge has been domed or curved so shortened the size).
|
- Above: A sandcast, and well worn Cap badge to the 6th (Manawatu) Mounted Rifles.
Both lugs have broken off the back, but they appear to have been to cast into the back. It also has a cast Gaunt plaque to the back. Size 47mm by 45mm. |
- Opposite: A die-stamped, darkened Collar badge to the 6th (Manawatu) Mounted Rifles.
No maker mark to back, and two copper looped lugs with feet to back. Size 32mm by 30.5mm.
The Regiments title was changed in 1921 to the 6th New Zealand Mounted Rifles (Manawatu). This was then changed to the Manawatu Mounted Rifles.
It was absorbed into the 2nd Armoured Regiment in March 1944.
No maker mark to back, and two copper looped lugs with feet to back. Size 32mm by 30.5mm.
The Regiments title was changed in 1921 to the 6th New Zealand Mounted Rifles (Manawatu). This was then changed to the Manawatu Mounted Rifles.
It was absorbed into the 2nd Armoured Regiment in March 1944.
Fakes & Forgeries
|
|
|
- Above & Opposite: Two fake Cap badge to the 6th (Manawatu) Mounted Rifles.
- Both are cast brass, with OK to good detail to front. Note the one on the left has age tone.
- To back, both have a flat area to base, where the excess brass from the mold has been removed and filed down flat.
- Both have small short lugs, which do not feature on originals. Someone has squeezed the left's into points, to mount into a board.
Size of left 50mm by 46mm, size of right 49mm by 46mm.
7th (Southland) Mounted Rifles.
The 7th (Southland) Mounted Rifles formed in 1911 from the 2nd Regiment, Otago Mounted Rifles.
Headquarters were at Invercargill.
Headquarters were at Invercargill.
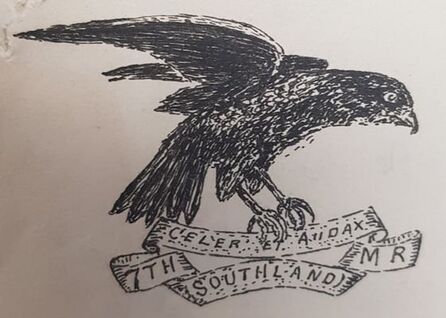
- Opposite: A undated sketch of the proposed 7th N.Z.M.R badge which is in Archive NZ.
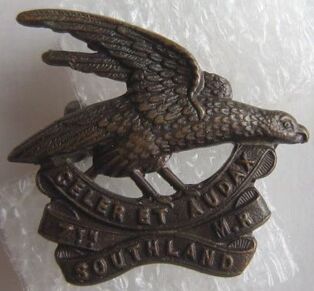
Cap Badge - In 1911, their badge was described as "NZ Sparrow-hawk swooping on its pray. Motto "Celer et Audax" & "7th Southland M.R" on scroll at base"
Collar Badge - "Smaller"
(Badges - Regimental - Territorial Force, R23534556 AD1 AAYS 13-13 Archives NZ).
Motto: CELER ET AUDAX (Swift and bold).
Cap Badge - In 1911, their badge was described as "NZ Sparrow-hawk swooping on its pray. Motto "Celer et Audax" & "7th Southland M.R" on scroll at base"
Collar Badge - "Smaller"
(Badges - Regimental - Territorial Force, R23534556 AD1 AAYS 13-13 Archives NZ).
Motto: CELER ET AUDAX (Swift and bold).
|
- Above: A darkened bronze Officers Cap badge to the 7th (Southland) Mounted Rifles. Two tangs or blades to back and a maker mark impressed to "J R GAUNT LONDON". Size 29mm by 34mm.
|
|
|
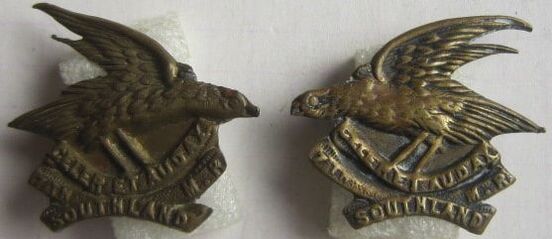
- Above: A pair of gilt brass Collar badges to the 7th (Southland) Mounted Rifles. Both are Gaunt plaqued to back with "J R GAUNT LONDON" and have two D shaped copper lugs.
Size 25mm by 28mm. |
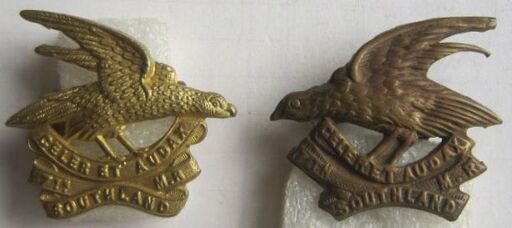
- Above: To show variations in dies, two unmarked and opposing unmatching Collar badges. On the left is a Gaunt "like" (not maker marked) collar with D shaped Copper loops to back. Size 26mm by 28mm. The right is a different strike, with non-voiding between the legs. Again, two copper looped lugs to back. Size 25mm by 28mm.
|
Note the Cap badge to this regiment is only marginally larger than the right Collar badge (when worn).
Caution therefore needs to be taken when purchasing, especially if you think you are buying a Cap and its turns out to be a Collar Badge!
Caution therefore needs to be taken when purchasing, especially if you think you are buying a Cap and its turns out to be a Collar Badge!
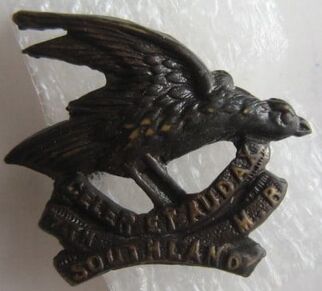
- Above: A darkened brass Collar badge to the 7th (Southland) Mounted Rifles. Two looped lugs to back, with no maker mark. Size is 24mm by 28mm. Note the non-voiding between the legs of the Sparrow-Hawk.
|
- Above: A darkened bronze Collar badge to the 7th (Southland) Mounted Rifles. Two D shaped copper looped lugs to back, with no maker mark. Size is 25mm by 28mm.
|
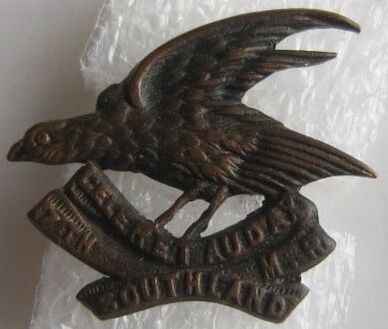
- Above: A darkened copper Collar badge to the 7th (Southland) Mounted Rifles. Two copper looped lugs to back, with no maker mark. Size is 25mm by 29mm.
|
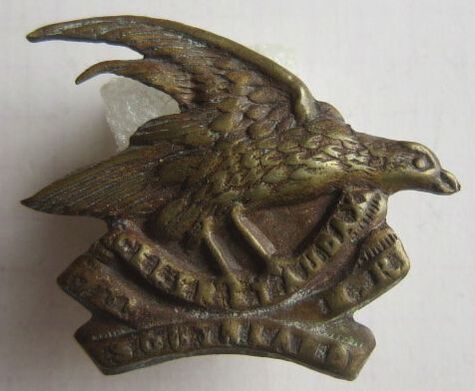
- Above: A locally made Cap badge to the 7th (Southland) Mounted Rifles. Non-void brass, with copper looped lugs to back. No maker mark. Size 29mm by 35mm.
|
- Above: A locally made Collar badges, matching the opposite Cap badge to the 7th (Southland) Mounted Rifles. Non-void brass, with copper looped lugs to back. No maker mark. Size 26mm by 29mm.
|
The Regiment amalgamated with the 5th Mounted Rifles (Otago Hussars and 12th (Otago) Mounted Rifles in 1921 to become the 5th New Zealand Mounted Rifles (Otago).
8th (South Canterbury) Mounted Rifles.
The 8th (South Canterbury) Mounted Rifles was formed in 1911 from the 1st Regiment, South Canterbury Mounted Rifles
Headquarters were at Timaru.
Specimens (sketches) of the proposed badges were sent to the G.O.C on the 10th of July 1911.
Cap Badge - "Lord Ranfurly's coat of Arms"
Collar badges - "Lord Ranfurly 's Crest"
They were approved by the G.O.C on the 25th of July 1911.
A description of the badge in 1911 also expands on the above, with the Cap being a "Shield bearing a falcon, flanked by falcons, and surmounted by a coronet and falcon". The collar was described as "A falcon over a coronet" (Cadets, Regimental Badges and Uniforms R21078962 Box 19 AD37 24 c1912 Archives N.Z.).
In a earlier memo, the O.C. (Lieut-Col Millton) of the 8th N.Z.M.R. states:
"Sir,
Regimental Badge,
I have the honour to enclose herewith a pattern of the proposed cap and collar badges of the 8th Regiment.
The Cap badge is the coat of arms, and the collar badge the crest, of Lord Ranfurly the Honorary Colonel of the 1st Regiment, South Canterbury Mounted Rifles.
The 1st S.C.M.R. being now merged in the 8th N.Z.M.R. it will afford the latter much satisfaction if the badges of the old regiment be approved. There adoption would form a link between the old organisation and the new, and would serve to perpetuate the identity of the former."
(Badges - Regimental - Territorial Force, R23534556 AD1 AAYS 13-13 Archives NZ).
Motto: MOVEO ET PROFITIOR (By my actions I am known).
|
- Above: A darkened bronze Officers Cap badges to the 8th (South Canterbury) Mounted Rifles. Semi-solid to back, and impressed with the maker details of "J R GAUNT LONDON". Two brass tangs are to back in a East/West configuration. Size 41mm by 63mm.
|
- Above: A matching, opposing pair of darkened bronze Officer Collar badges to the 8th (South Canterbury) Mounted Rifles. Both are semi-solid to back, with a marker mark impressed to "J R GAUNT LONDON". Both have two D shaped copper lugs in a North/South configuration. Size 32mm by 19mm.
|
|
- Above: Two Gaunt made Cap badges to the 8th (South Canterbury) Mounted Rifles. On the right is a standard sized Cap badge in gilt brass roughly (note the falcon is bent upwards) 43mm high by 63mm wide. On the left is the large version, 51mm high by 74mm wide. Its purpose is unknown. Maybe a manufacturers mistake or was to be used as something other than a Cap badge (Pouch badge instead?). Both have two copper looped lugs to back and both have a maker plaque to "J R GAUNT LONDON".
|
- Above: A matching, opposing pair of gilt brass Collar badges to the 8th (South Canterbury) Mounted Rifles. Both are die stamped, with a marker plaque to "J R GAUNT LONDON". Both have two D shaped copper lugs in a North/South configuration. Size 32mm by 19mm.
|
|
- Above: A painted gilt brass Cap badge to the 8th (South Canterbury) Mounted Rifles. The brown finish has just been applied to front of the badge. To back are two copper looped lugs and a maker plaque to "J R GAUNT LONDON". Size 42mm by 63mm.
|
- Above: A gilt brass Cap badge to the 8th (South Canterbury) Mounted Rifles. No maker and two copper looped lugs to back. Size 42mm by 65mm.
|
- Above: A sandcast Cap badge to the 8th (South Canterbury) Mounted Rifles. Probably made in the middle east in WW1, which is where the 8th served. Two copper looped lugs cast into the back of the badge, with a impression of a Gaunt plaque also to back. Size 41mm by 61mm.
|
|
|
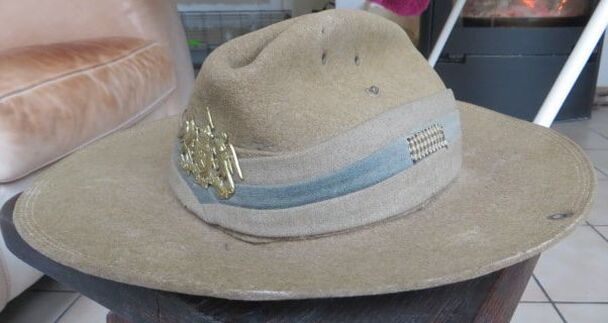
- Above, Right and Opposite: A chance find by my Dad in the 1980's in a local Timaru, New Zealand household auction sale.
A 1918 dated, British made, wear-home hat to a Trooper in the 8th (South Canterbury) Mounted Rifles (it came in a kit-bag, with bandolier and corded MR breaches).
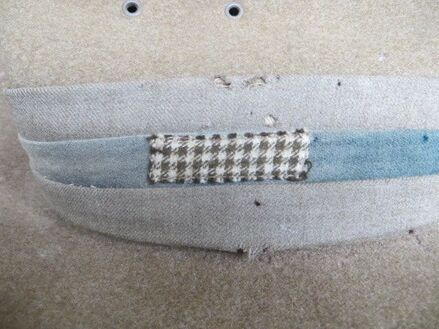
Note the unit patch to both sides of the Puggaree (cloth band in Khaki/Green/Khaki - Colours for the New Zealand Mounted Rifles). All NZ Mounted Rifle units were allowed from 1917, to wear a unit distinguish patch to their hat.
This Black and White patterned patch is to the Canterbury Regiment, which the 8th was part of.
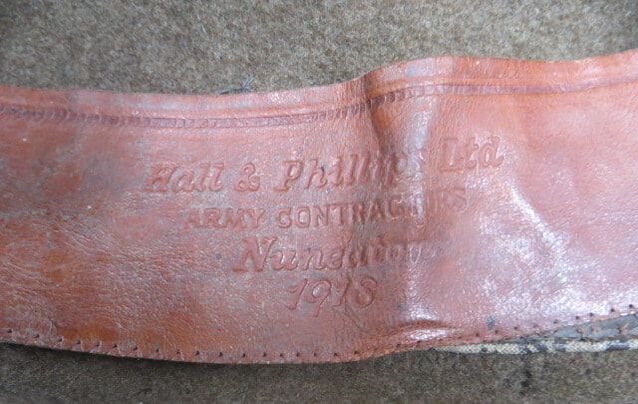
Maker marked to inside to "Hall & Phillips Ltd, Army Contractors, Nuneaton, 1918.
A 1918 dated, British made, wear-home hat to a Trooper in the 8th (South Canterbury) Mounted Rifles (it came in a kit-bag, with bandolier and corded MR breaches).
Note the unit patch to both sides of the Puggaree (cloth band in Khaki/Green/Khaki - Colours for the New Zealand Mounted Rifles). All NZ Mounted Rifle units were allowed from 1917, to wear a unit distinguish patch to their hat.
This Black and White patterned patch is to the Canterbury Regiment, which the 8th was part of.
Maker marked to inside to "Hall & Phillips Ltd, Army Contractors, Nuneaton, 1918.
|
|
|
|
- Above: A large (53mm by 71mm) sand cast Cap badge to the 8th (South Canterbury) Mounted Rifles. Semi-hollow to back, with a brooch fitting to back. No maker mark.
|
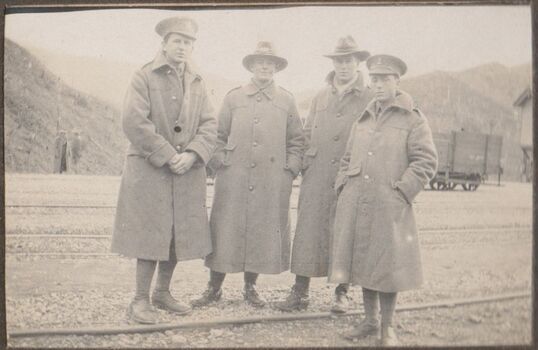
- Above: Its very hard to find a image of a 8th Cap badge being worn! The following is a sequence of three photo's, which shows 5 chaps from different units. In the first two, the photographer changes. This first image is a little blurry, but shows two NZRB chaps with two NZMR, a 8th and a 9th chap wearing their slouch hats and Cap badges.
|
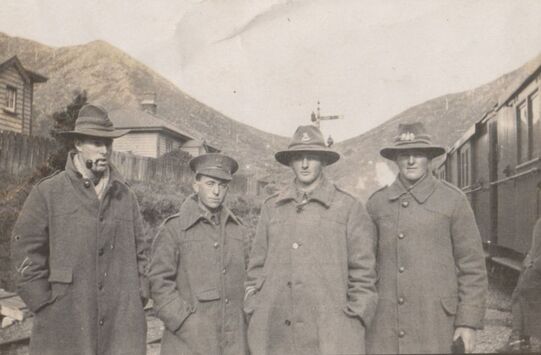
- Above: A clearer image, with from left to right, a 9th (Wellington East Coast) Mounted Rifles Cap badge (with pipe in mouth), then a chap with a NZ Rifle Brigade Cap badge, a chap with a low tail Mounted Rifle Reinforcement Cap badge to the front of his hat and finally a 8th (South Canterbury) Mounted Rifles chap.
|
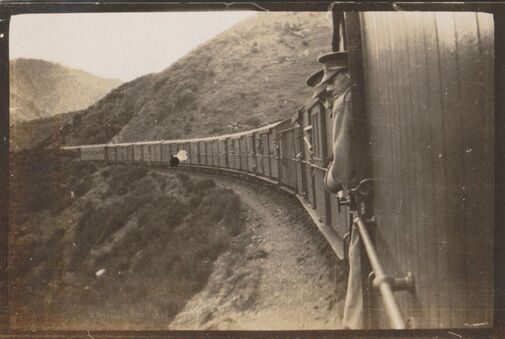
- Above: The three images are from the same album, so I imagine this could be either before they arrive at Trentham or as they go towards somewhere like Wellington. They are of course in uniform, so its more likely they are on their way to Wellington, either to depart for overseas, or maybe on a weekend of leave. No writing to back of images.
|
The 8th (South Canterbury) Mounted Rifles amalgamated with the 1st (Canterbury) Mounted Rifles in 1921, and the Regiments title was changed to the 1st New Zealand Mounted Rifles (Canterbury Yeomanry Cavalry).
Fakes and Forgeries
An example of a 8th NZMR Cap which is a fake/copy. This is by no means the only type encountered.
- Detail is lacking to the front, and note, some is missing completely i.e. the ribbons hanging down from the tips of the wings and touching the center shield.
- Colour is wrong, and a orangey-yellow, instead of gilt.
- To back is pitted, some detail, but not as crisp if die-stamped.
- Note the cast ends (highlighted in the red circles), which shows that this badge was produced via a mold. These flat pieces show where the excess brass protruded from the mold, and is then filed down after when removed.
- Copper looped lugs have been attached, but are two small compared to originals.
- Size 43mm by 63mm.
|
|
|
9th (Wellington East Coast) Mounted Rifles Regiment.
The 9th (Wellington East Coast) Mounted Rifles Regiment formed in 1911 from the amalgamation of the 2nd Regiment, Wellington (Wairarapa) Mounted Rifles and the 4th Regiment, Wellington (East Coast) Mounted Rifles.
Headquarters were at Napier.
Headquarters were at Napier.
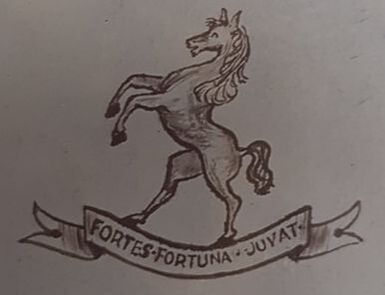
- Opposite: A sketch of the proposed badge of the 9th N.Z.M.R held by Archive NZ.
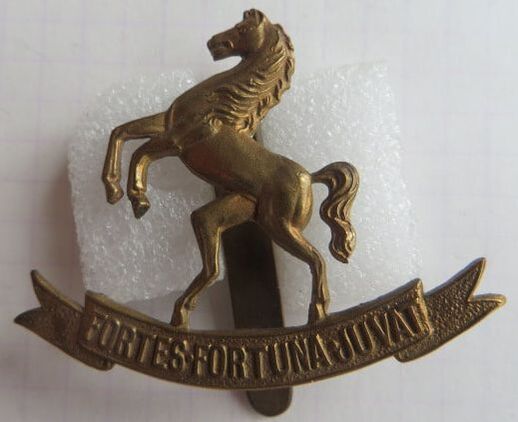
Their badge was described as "A horse rampant supported by a scroll with Lord Islington's motto"
In a memo dated 8th of April 1911:
"His Excellency, Lord Islington, has been pleased to give us his permission to adopt his motto "Fortes fortuna juvat" in connection with our regimental badge."
A further memo dated the 22nd May 1911 states:
"In reply to your communication of 19th inst. , the regimental badge submitted for approval is to be worn on the collars and caps, viz "Horse rampant with scroll bearing motto "Fortes fortuna juvat". The badges for collars to be 1 inch high and the cap badge to be 1 1/2 inches high. Bronze for collars and cap, brass for blue tunics and caps".
(Badges - Regimental - Territorial Force, R23534556 AD1 AAYS 13-13 Archives NZ).
Motto: FORTES FORTUNA JUVAT (Fortune favours the brave).
|
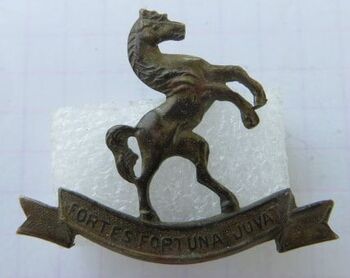
- Above: A Officers Bronze Cap badge to the 9th (Wellington East Coast) Mounted Rifles Regiment. Dark finish to front, with two tangs to back, in a North/South configuration. No maker mark and though solid to back, it has a rough finish to back. Size 38mm by 43mm.
|
- Above: A gilt Cap badge to the 9th (Wellington East Coast) Mounted Rifles Regiment. The darkened finish to front has been polished off, with just traces if it in the detail and to back. Lacquer has been applied, which has browned with age. Two long looped lugs to back. No maker mark. Size 38mm by 43mm.
|
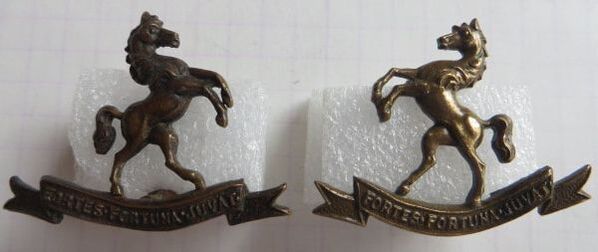
- Above: A pair of opposing bronzed Collars to the 9th (Wellington East Coast) Mounted Rifles Regiment. Both have a darkened finish to front, with the above right, a little more polished. Two D shaped copper lugs to back, in a North/South configuration. No maker mark. Size 26mm by 34mm.
- Opposite: A variation on the Cap badge to the 9th (Wellington East Coast) Mounted Rifles Regiment. Referred to as the "wide banner" version, this badge has a slider to back which is impressed with the maker mark of "J R GAUNT LONDON". Size 40.5mm by 50mm. |
|
|
- Opposite: A unmarked collar badge to the 9th (Wellington East Coast) Mounted Rifles Regiment. Slight differences in tail and horse to front. To back are two long copper wire looped lugs. No maker mark. Size 26mm by 34mm.
|
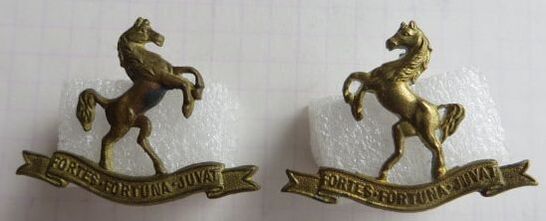
- Opposite & Above: A matching set of gilt brass Cap and Collar badge to the 9th (Wellington East Coast) Mounted Rifles Regiment. All are marked to back with maker plaque to "J R GAUNT LONDON", and all have copper looped lugs in a North/South configuration. Size of Cap 38mm by 43mm, while Collars are 26mm by 34mm.
|
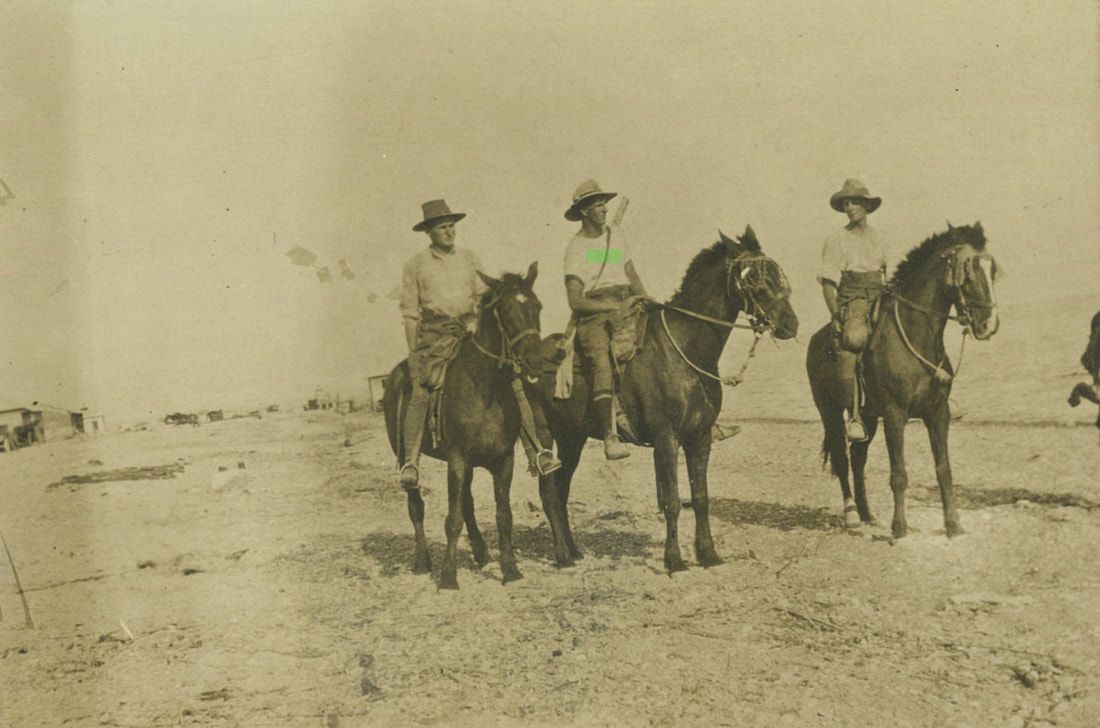
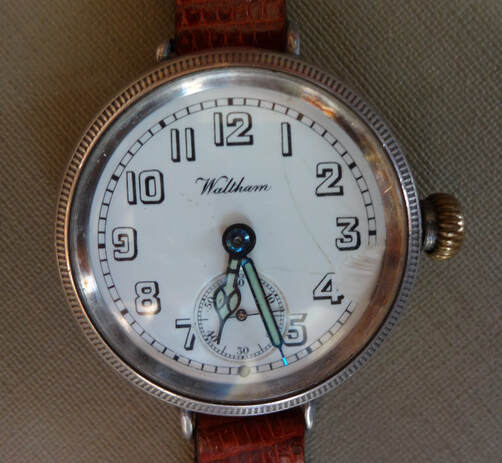
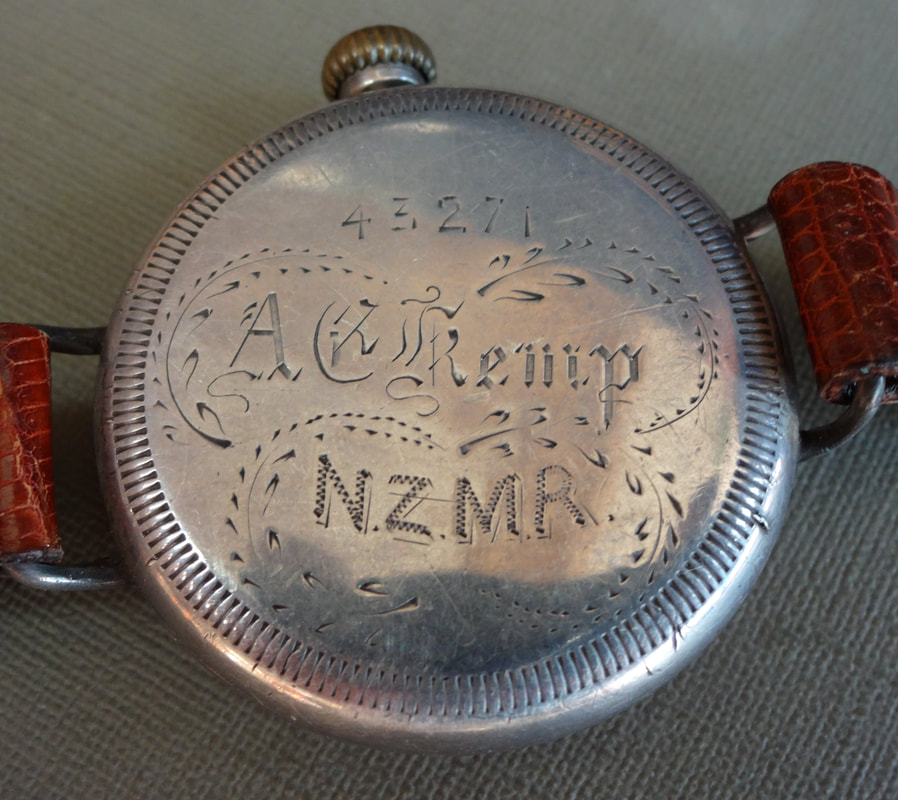
- Above: A rare image of 43271 Alfred "Ernest" Kemp (highlighted with a green rectangle) somewhere in Palestine, possibly 1918. Note the lack of tunics, due to the heat, while two of the Horse wear beads over their eyes to keep the flies away. Ernest was part of the Wellington Mounted Rifles Regiment, and on the side of his slouch hat, you can just see the units distinguishing patch of a rectangle, cut in half, at a 45 degree angle, White over Black (see below for a example of the patch). Note the cover over Ernest rifle, to keep the sand out (Nigel Robson Collection).
|
|
- Above: A wrist watch owned by 43271 Alfred "Ernest" Kemp. In Nigel Robson's words "The watch was the one Ernest wore in Palestine - he told me when I was a boy that it was the only watch in his unit that was still working at the end of the war because the jeweler he bought it from told him to rub Vaseline around the threads of the face and the back to keep out the desert dust (Nigel Robson Collection).
The Regiments title was changed in 1921 to the 7th New Zealand Mounted Rifles (Wellington East Coast). This was then changed to the Wellington East Coast Mounted Rifles.
It was absorbed into the 2nd Armoured Regiment in March 1944.
It was absorbed into the 2nd Armoured Regiment in March 1944.
10th (Nelson) Mounted Rifles Regiment.
The 10th (Nelson) Mounted Rifles was formed in 1911 from the 1st Regiment, Nelson Mounted Rifles.
Headquarters were at Blenheim.
Headquarters were at Blenheim.
In a memo dated the 24th of Aug 1911:
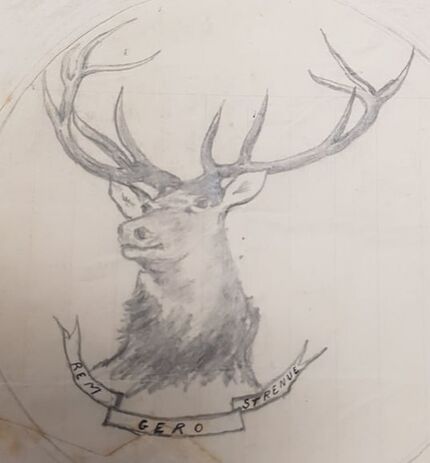
"The G.O.C has approved the badge proposed for the 10th (Nelson) Mounted Rifles, a sketch of which was submitted , viz.-
A stag's head (Royal) with motto "Rem Gero Strenue" on scroll below".
- Opposite: A hand drawn design of the 10th's badge submitted to Headquarters on the 11th of Jan 1912.
(Badges - Regimental - Territorial Force, R23534556 AD1 AAYS 13-13 Archives NZ).
Motto: REM GERO STRENUE (Fight with zeal).
|
- Above: A solid back, Officers bronze Cap badge to the 10th (Nelson) Mounted Rifles. Two tangs or blades to back, with maker impressed details to "J R GAUNT LONDON". Size 34mm by 39mm.
|
- Above: A solid backed Officers bronze Collar badge (nearly the same size as opposite Cap) to the 10th (Nelson) Mounted Rifles. Two D shaped copper looped lugs in a North/South configuration to back. Maker impressed to "J R GAUNT LONDON". Size 34mm by 38mm.
|
|
|
- Above & Opposite: A gilt brass Cap badge to the 10th (Nelson) Mounted Rifles. Two copper looped lugs to back. This is a unusual badge as it is maker marked to "FIRMIN LONDON". Not a common maker of New Zealand Mounted Rifles Badges.
Size 34.5mm by 40mm. |
- Opposite: A matching opposing pair of Other Ranks gilt brass Collar badges to the 10th (Nelson) Mounted Rifles. Two D shaped copper lugs to back, and maker plaque to "J R GAUNT LONDON". Size 26mm by 30mm.
|
|
- Opposite: A gilt brass Other ranks Cap badge to the 10th (Nelson) Mounted Rifles. No maker mark to back, and two copper looped lugs. Size 34.5mm by 40mm.
- Above: An opposing pair of unmarked gilt brass Other ranks Collar badges to the 10th (Nelson) Mounted Rifles. Both have two D shaped copper looped lugs to back. Size 27mm by 32mm. |
|
- Above: A slightly larger Cap badge in brass to the 10th (Nelson) Mounted Rifles. It clearly lacks detail to front but is roughly 5mm larger overall. It has been lead filled to back, and has two copper wire loop embedded in the lead. Size 37mm by 44mm.
|
- Above: A sand cast Collar badge to the 10th (Nelson) Mounted Rifles. This is the right side (when worn), which is the harder side to find.
There are stories that only a few runs of the above collar were made, and then the men took to wearing two left collars. It may explain why this sand cast brass versions was made, and a locally fix, made in Egypt and the middle East, which is where the 10th were deployed in WW1. Two integrated copper loops to back, in a North/South Configuration. Gaunt plaque can also be seen, cast into the back. Size 26mm by 29mm. |
The Regiments title was changed in 1921 to the 8th New Zealand Mounted Rifles (Nelson). This was then changed to the Nelson-Marlborough Mounted Rifles.
It was absorbed into the 3rd Armoured Regiment in March 1944.
It was absorbed into the 3rd Armoured Regiment in March 1944.
11th (North Auckland) Mounted Rifles Regiment.
The 11th (North Auckland) Mounted Rifles formed in 1911 from the 3rd Regiment, Auckland Mounted Rifles.
The badge design is based on the pre 1911 3rd (Auckland) Mounted Rifles badge (see the Volunteer Badges page).
Headquarters were at Kawakawa.
The badge design is based on the pre 1911 3rd (Auckland) Mounted Rifles badge (see the Volunteer Badges page).
Headquarters were at Kawakawa.
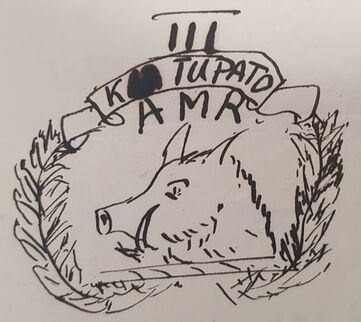
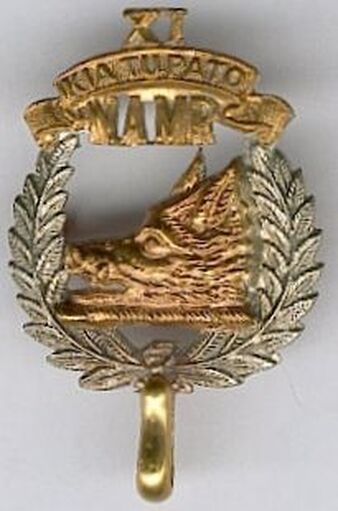
- Opposite: A sketch of the proposed badge for the 11th N.Z.M.R held by Archive NZ dated the 10th of July 1911, with a description of their badge as a:
"Boar's head (bronze) surrounded by fern fronds (white metal) and surmounted by "III, Kai Tupatu, A.M.R".
Cap and Collar same size.
The G.O.C (General Officer Commanding) approves this badge if "XI" is substituted for "III" and the letter "N" prefixed to A.M.R."
(Badges - Regimental - Territorial Force, R23534556 AD1 AAYS 13-13 Archives NZ).
Motto: KIA TUPATO (Be cautious).
Photographic evidence of personal from the 11th (North Auckland) Mounted Rifles pre WW1, during and after, shows that they wore their badge facing in a different direction from what was stated by some of the New Zealand badge books on the subject.
Both "Cap" and "Collar" were the same size, therefore I will not make the distinction of either, as it appears that though they wore the Boar's head facing left (when worn) on their Cap or Hat, there were some exceptions.
The badges on their tunic collar, were opposing, and worn with the Boar's head facing forward or center to the collar opening.
|
- Above: A gilt fire brass and Silver Officers badge to the 11th (North Auckland) Mounted Rifles. Solid to back, with the impressed maker mark of "J R GAUNT LONDON" in a curve to top. The brass parts are riveted on to back. Two looped lugs, and size 36mm by 30mm.
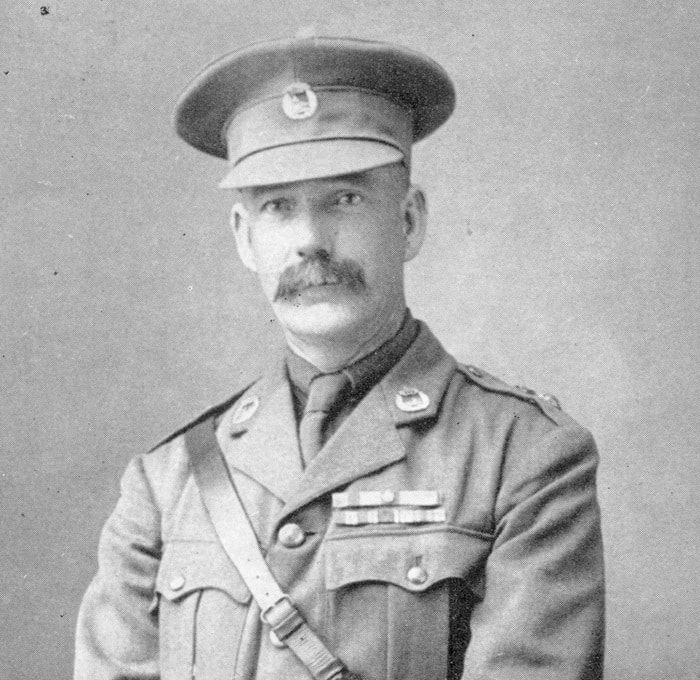
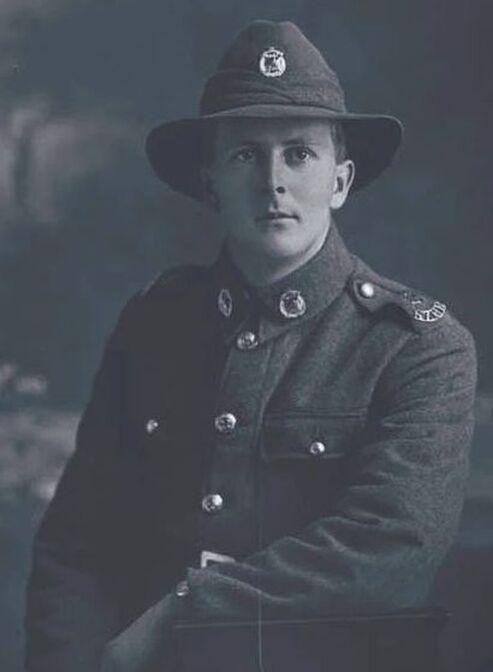
- Opposite: A image of the 11th NAMR OC (Officer Commanding) 13/610 Lt Col Charles Ernest Randolph Mackesy. Likely this image is around 1912/1913, as he is wearing a Territorial Officers "closed" collar tunic which was a feature of the time, and which was replaced in April 1913 by a different pattern. To his cap, he wears a 11th NAMR badge, with the Boar's head facing to the left (when worn), like the above badge. You can just see two badges to his Collar (Image Auckland Cenotaph). |
|
- Above: A bi-metal brass and white metal, badge to the 11th (North Auckland) Mounted Rifles. Solid to back, with three round sweat holes and a brass makers plaque to "J R GAUNT LONDON". Two copper looped lugs and 36mm by 30mm in size.
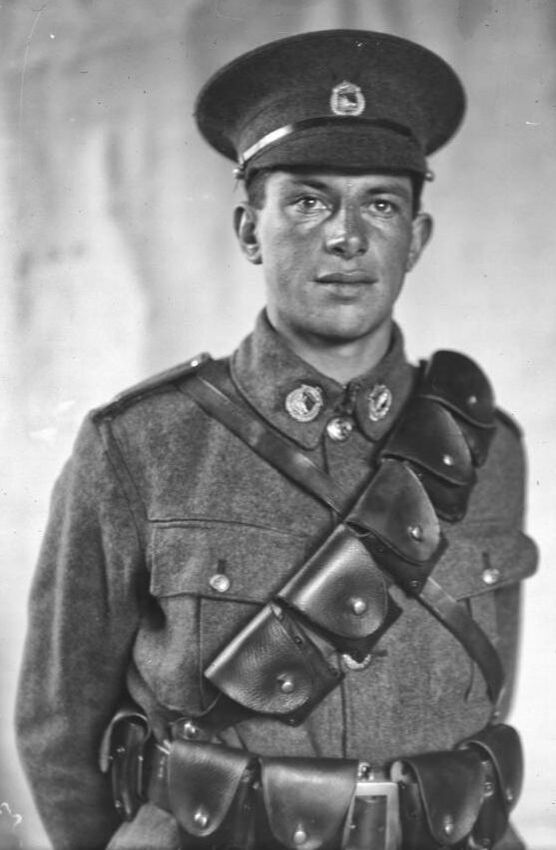
- Opposite: A superb clear, pre or early WW1 era image of a Trooper in the 11th (North Auckland) Mounted Rifles. He is wearing a peaked cap, with a badge facing to the left (when worn) to front, and then opposing Collar badges on his tunic. Note the 5 pouch bandolier, which is an early first type, with rounded flaps. He also has extra ammunition pouches attached to his belt. 4 star gilt brass New Zealand Forces buttons can be seen, but I cannot make out his shoulder title, which will be likely a curved "NZMR" (Auckland Libraries Heritage Collections 1142-D042). |
|
|
- Above: A bi-metal brass and white metal, badge to the 11th (North Auckland) Mounted Rifles. Solid to back, with no sweat holes and two copper looped lugs. No maker mark and 37mm by 30mm in size.
|
|
|
- Above: A image taken in 1922 of the then OC of the 11th NAMR 13/148 Colonel James Neil McCarroll. Again it shows the three badges worn, with the Boars head facing to the left (when worn) on the Peaked Hat. (image Auckland Cenotaph).
|
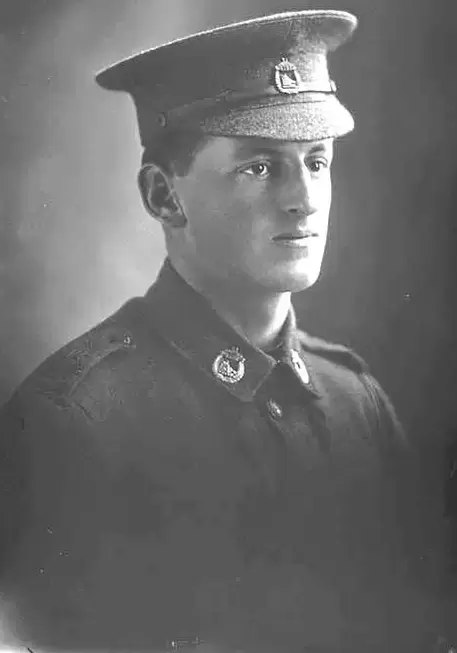
- Above: A image of 13/263 Trooper John Beresford Swan Dudding, who departed with the Main body of the NZEF in October 1914. He also wears a Cap and Collar badge set to the 11th NAMR. Note the Boar's head is pointing to the left on his peaked Hat (image from Auckland Libraries).
|
- Above: A bi-metal brass and white metal, badge to the 11th (North Auckland) Mounted Rifles. Solid to back, with three rectangular sweat holes and two D shaped copper looped lugs. No maker mark and 38mm by 31mm in size.
- Opposite: A image of 16135 Trooper Ronald Harris Trounson, who started his service on the 19th of March 1916 as part of A Squadron, 15th Mounted Rifle Reinforcements. He is wearing his 11th (North Auckland) MR badge to the right in his Slouch Hat, and has a pair of opposing Collars. To his shoulder strap is the number "15" over a curved "NZMR" (image from the Auckland Libraries). |
|
|
- Above: A bi-metal brass and white metal, badge to the 11th (North Auckland) Mounted Rifles. Solid to back, with three rectangular sweat holes and two D shaped copper looped lugs. Note the darkened finish which has been applied to the brass. Some of this is also on the white metal wreath. No maker mark and 38mm by 30.5mm in size.
|
|
The Regiments title was changed in 1921 to the 9th New Zealand Mounted Rifles (North Auckland).
This was then changed to the North Auckland Mounted Rifles.
The Regiment was absorbed into the 1st New Zealand Armoured Regiment in March 1944.
This was then changed to the North Auckland Mounted Rifles.
The Regiment was absorbed into the 1st New Zealand Armoured Regiment in March 1944.
Fakes and Forgeries
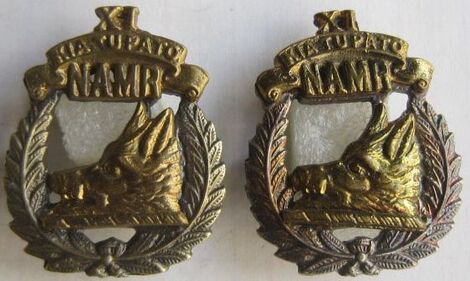
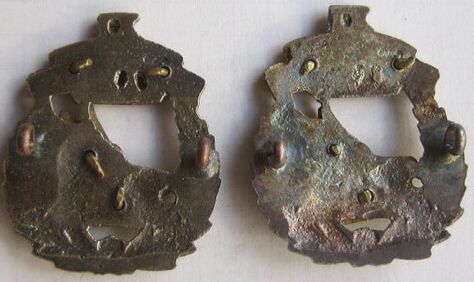
Some examples of the 11th NZMR Cap/Collar which are fakes/copies. This is by no means the only type encountered.
- Cast three piece, with brass over a white metal frame.
- Front lacks crisp detail of originals, and note the fretting between the letters is poor to "NAMR" and also "XI".
- Biggest give-away is the way the brass is joined to the white metal frame, which is by wire hooks, originals have the brass sweated onto the white metal.
- Lugs are smaller than originals, but still copper.
- Back of badge is not smooth and the colour to both brass and white metal is off.
- Size 36mm by 29mm.
|
|
12th (Otago) Mounted Rifles Regiment.
The 12th (Otago) Mounted Rifles formed as a new unit in 1911.
Headquarters were at Balclutha.
Headquarters were at Balclutha.
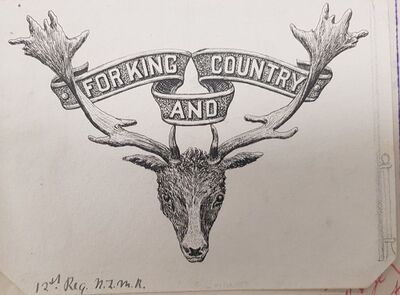
- Opposite: The original drawing of the designs submitted on the 20th of July 1911 for the Cap and Collar badge of the 12th N.Z.M.R.
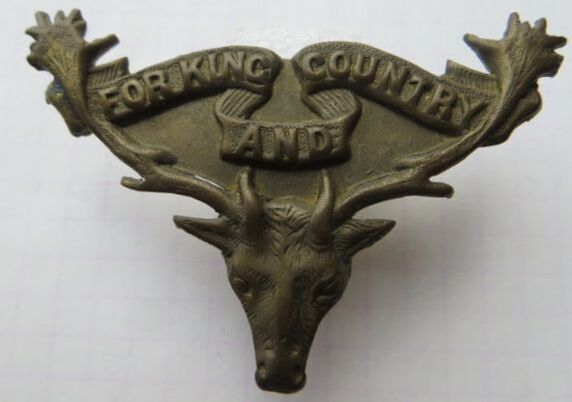
It received approval on the 25th of July 1911, but with the condition that the "red" deer be substituted for a "fallow" deer as the G.O.C "considers would be much nicer and more appropriate".
The described of the badge was "A Fallow Deer's head with motto "For King and Country" on a scroll between antlers"
The O.C. (Lieut-Colonel Scott Stewart) in a memo dated the 16th of August 1911, gave the following reasoning behind the design"
"Sir
I have the honour to acknowledge receipt of yours dated 31st July last. I notice that the General Officer Commanding considers it would be wiser and more appropriate to substitute a red deer head for the fallow. I would respectfully point out that the Blue Mountains which run right through the center of this regimental district are a fallow deer forest & that nearly all the men in the regiment are in the habit of stalking these animals. These deer are thus much more a district association".
The design was re-submitted on the 17th of Aug 1911, and approved by the G.O.C on the 21st of Aug 1911.
(Badges - Regimental - Territorial Force, R23534556 AD1 AAYS 13-13 Archives NZ).
Motto: FOR KING AND COUNTRY.
|

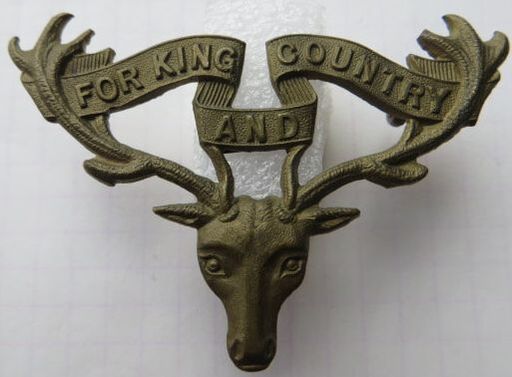
- Opposite & Above: A Cap and Collar Badge pair to the 12th (Otago) Mounted Rifles. They fought as dismounted Infantry both in Gallipoli and on the Western Front in France and Belgium. All have copper looped lugs to back and a maker plaque of "J R GAUNT LONDON". Size of Cap 40mm by 58mm, size of Collar 25mm by 33mm
|

|
|
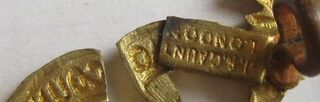
- Opposite: To back of some of the 12th NZMR Collars made by J R Gaunt can be found different types of maker plaques. The far left image shows a V shaped plaque, with a curved "GAUNT LONDON". The right image shows the standard Gaunt plaque, found on most of their badges. Issue is, is there enough space!!!
|
|
- Above: Two variations to the Cap badge to the 12th (Otago) Mounted Rifles. Both show differences in the stags features, banner and antlers. No maker mark to back to either, and two copper looped lugs to each. Size of left Cap 40mm by 57mm. Size of right Cap 40mm by 57mm.
|
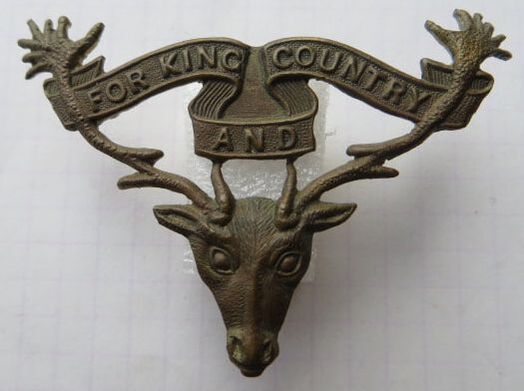
- Above: Another variation on the 12th (Otago) Mounted Rifles Cap Badge. Note the solid area mid banner. I imagine this is to strengthen. No maker mark and two copper looped lugs to back. Size 41mm by 58mm.
|
|
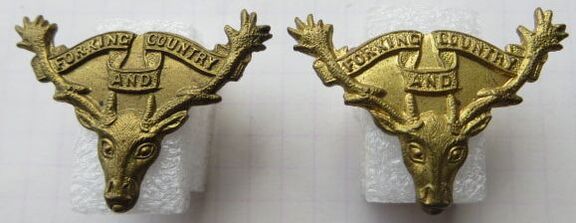
- Opposite & Above: The solid type of Cap and Collar badges to the 12th (Otago) Mounted Rifles. All have small copper looped lugs and no maker mark. Size of Cap is 41mm by 58mm, size of Collars are 26mm by 35mm.
|
The Regiment amalgamated with the 5th Mounted Rifles (Otago Hussars and 7th (Southland) Mounted Rifles in 1921 to become the 5th New Zealand Mounted Rifles (Otago).
Fake and Forgeries
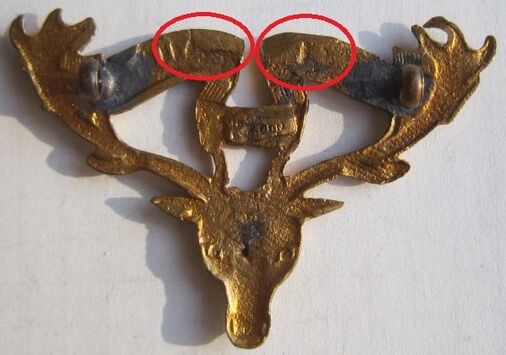
An example of a 12th NZMR Cap which is a fake/copy. This is by no means the only type encountered.
- Detail is lacking to the front, notably in the banner and around the form of the lettering.
- Colour is wrong, and a orangey-yellow, instead of gilt.
- To back, there is a general lack of detail, but they have cast in the makers plaque which would have been on the original.
- Note the cast ends (highlighted in the red circles), which shows that this badge was produced via a mold. These flat pieces show where the excess brass protruded from the mold, and is then filed down after when removed.
- Copper looped lugs have been attached, but are two small compared to originals.
- Size 38mm by 56mm.

|
|
Mounted Rifle Sleeve Trade Badges.
New Zealand Mounted Rifle Regiments based their sleeve qualification badges on the British Army system.
- Opposite Left: A Saddlers Sleeve Qualification badge, a brass Bit, with 4 looped lugs to back.
- Opposite Right: A Riding Instructors Sleeve Qualification badge, a brass spur, with round backing plate. Three looped lugs to back.
- Opposite Left: A Saddlers Sleeve Qualification badge, a brass Bit, with 4 looped lugs to back.
- Opposite Right: A Riding Instructors Sleeve Qualification badge, a brass spur, with round backing plate. Three looped lugs to back.
|
- Above Left: A brass Farriers Sleeve Qualification badge, a Horse shoe. Two looped lugs to back.
- Above Right: A sand cast New Zealand Farriers Sleeve Qualification badge, in the shape of a Horse shoe with the letters "N. Z" to center. Two looped lugs to back. I presume this is WW1 era middle east made, where the NZ Mounted Rifles were stationed. |
- Above: A embroidered cloth Farriers Sleeve Qualification badge. Light khaki thread, with Black and a Brown boarder, on a Khaki wool background. White cotton backing. No maker mark (Ian Hamilton Collection).
|
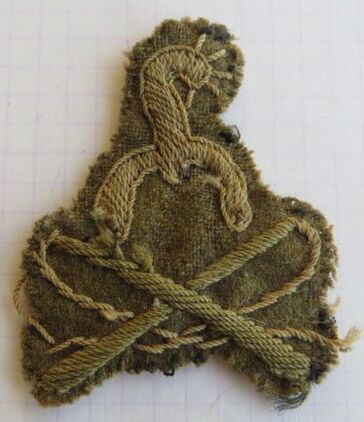
- Opposite: A rare embroidered and cloth Military Skill in Driving Horses proficiency trade badge. A spur above two crossed whips. The badge is mounted on a light khaki cotton backing cloth. Note this badge was also worn by New Zealand Field Artillery and New Zealand Army Service Corps personnel.
Overseas Mounted Rifle Battalion Formation Patches of WW1
On the 15th of July 1917, General Order 359 permitted the following patches to be worn by the New Zealand Mounted Rifles on the side of their slouch hat, attached to the Puggaree.

Auckland Mounted Rifles - Wore a White rectangle with a Red stripe, offset to the right of center.
- Opposite: Two differently constructed formation patches to the Auckland Mounted Rifles (Ian Hamilton Collection).
- Opposite: Two differently constructed formation patches to the Auckland Mounted Rifles (Ian Hamilton Collection).
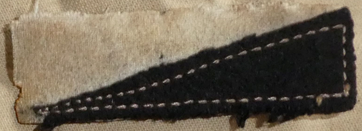
Wellington Mounted Rifles - Wore a White over Black rectangle.
- Above: A formation patches to the Wellington Mounted Rifles (Ian Hamilton Collection). |
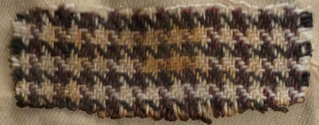
Canterbury Mounted Rifles - Wore a White and Black checkered rectangle.
- Above: A variation to the formation patches to the Canterbury Mounted Rifles (Ian Hamilton Collection). |
WW1 New Zealand Camel Corps.
The New Zealand Battalion of the Camel Corps formed in July of 1916, from men of the New Zealand Mounted Rifles. They operated in Egypt, the Sinai Desert and Jordan Valley during 1917 and 1918.
The New Zealanders served in No. 4 Battalion, 15th and 16th (NZ) Companies.
It included 6 Officers and 169 other ranks who were Kiwi's.
Any badge to this small unit is is a extremely rare, and it wasn't until recently, that photographic evidence was found, showing the Cap badge being actually worn at the time.
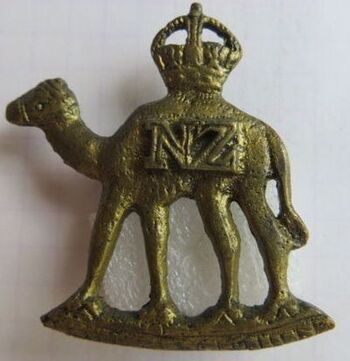
- Above: A sand cast Cap badge to the New Zealand Camel Corps. Two copper lugs, cast into the back of the badge in a North/South configuration. No maker mark.
|
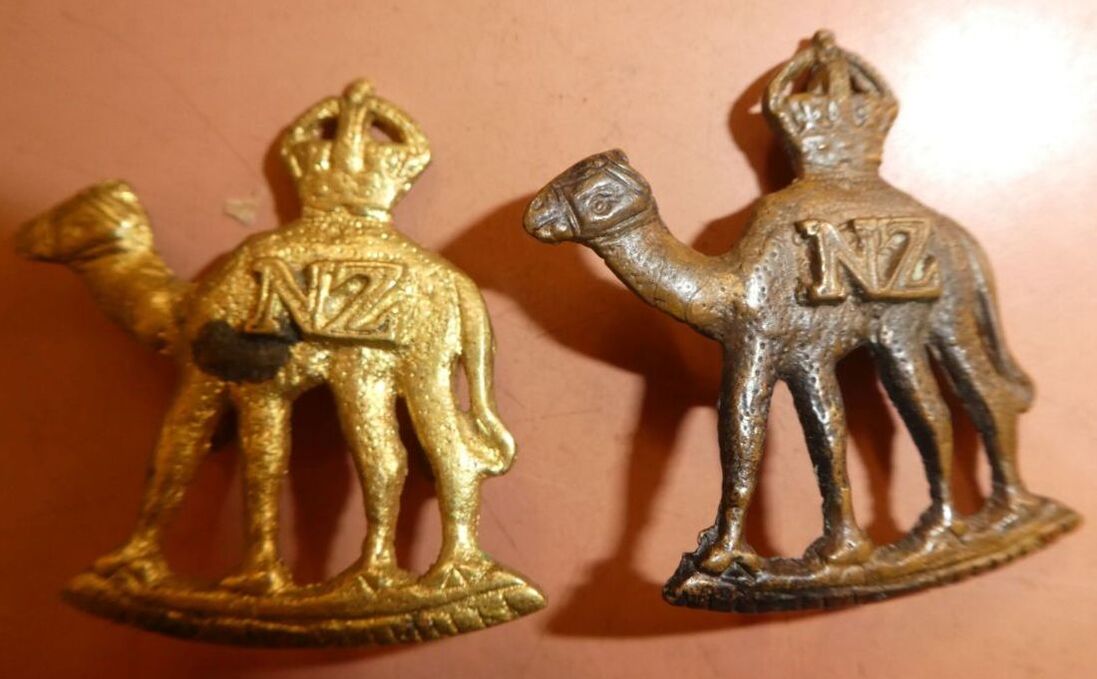
- Above: A pair of sand cast Cap badges to the New Zealand Camel Corps. The badge on the left has two copper lugs, cast into the back in a East/West configuration. Note the difference in colour. In a recent sale in New Zealand, a example of this badge sold with a large copper slider to back (Ian Hamilton Collection).
|
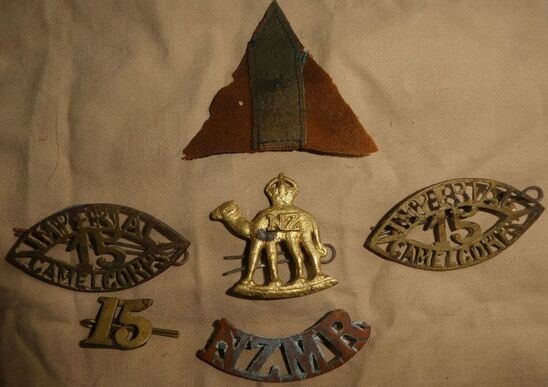
- Opposite: A display of New Zealand Camel Corps related items from the Ian Hamilton's Collection.
- Top: A coloured patch for the Australian Camel Field Ambulance - Brown, Green, Brown.
- Middle: A pair of sand cast Company titles to the 15th Imperial Camel Corps, which the Kiwi's would have served in and worn. The Cap badge is the same as pictured above.
- Bottom: A multi-piece 15th shoulder title number. Probably made by Stokes & Sons, in Australia. Beside it is a standard New Zealand Mounted Rifles (N.Z.M.R) Shoulder title in Brass.
Anything to the New Zealand Camel Corps has been repeatedly faked over the years, and great caution needs to be taken when purchasing. Most fakes of the Cap badge, esp from the 1990's don't replicate the colour of the sandcast brass, i.e. are too bright or overly dull. Also, as they are cast, taken from a original badge, they are just ever so slightly smaller in size to the original examples.
Current fakes seem to ether been too thick on the legs and/or get the back and lugs wrong.
Current fakes seem to ether been too thick on the legs and/or get the back and lugs wrong.
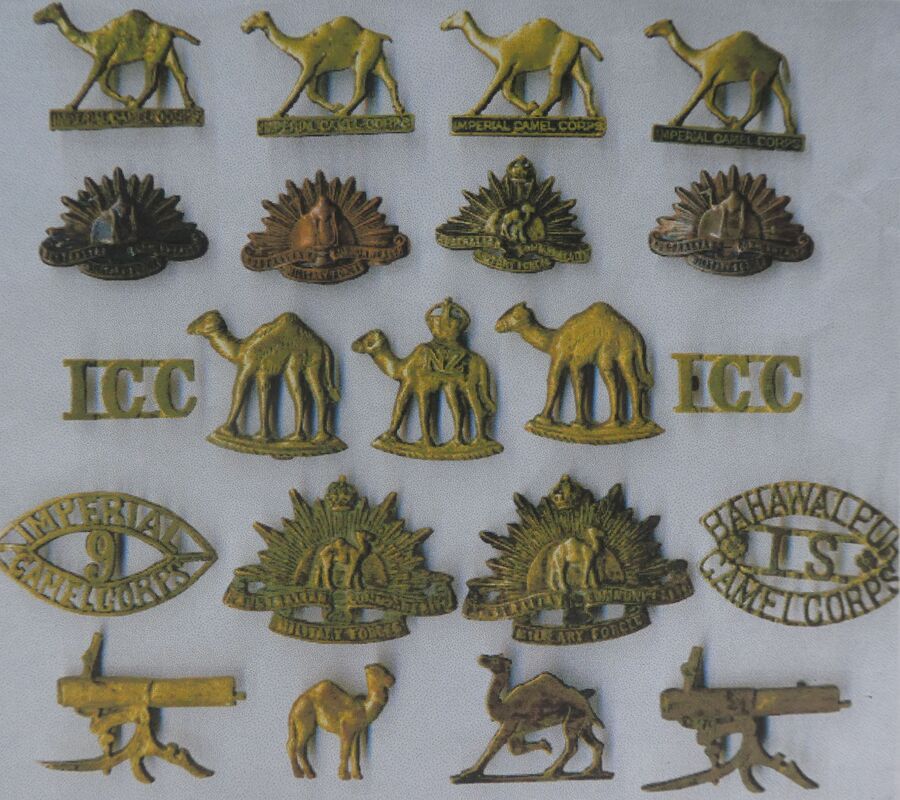
- Above: A picture of a old collection to the Camel Corps (via Ian Hamilton). It shows badges from Britain, Australian, New Zealand and India.
Shoulder Titles.
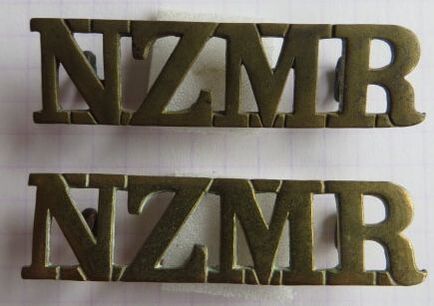
- Above: An early straight pair of gilt brass shoulder titles to the New Zealand Mounted Rifles. Copper looped lugs to back, with no maker mark. These sometimes have the foot of the "R" removed, to make the NZMP or New Zealand Military Police title.
|
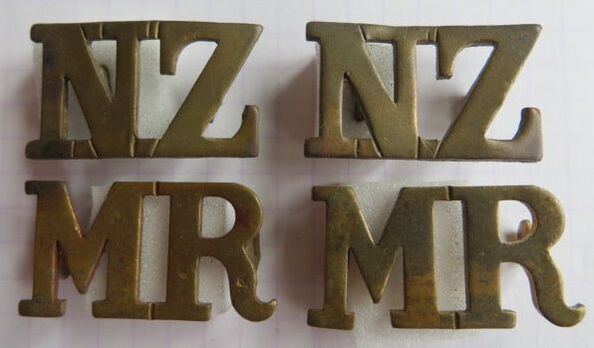
- Above Right: An early large two piece New Zealand Mounted Rifle Pair. All have hex type lugs to back. No maker mark.
|
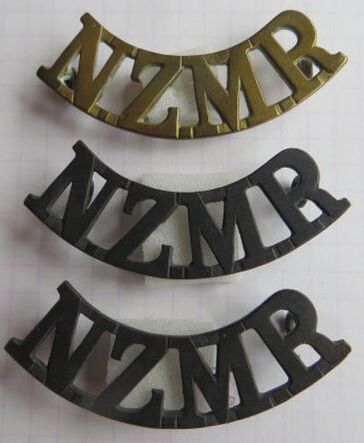
|
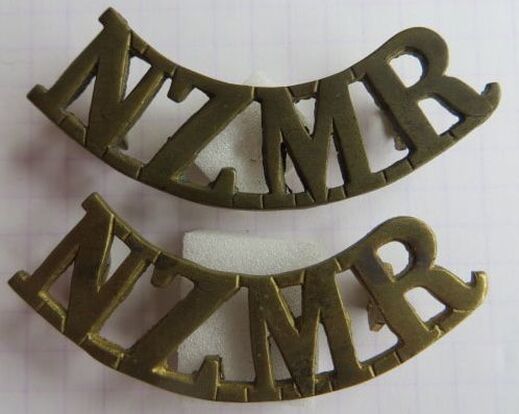
|
- Above Left: WW1 style New Zealand Mounted Rifle Shoulder titles. With the top in gilt brass maker marked to "Stokes & Sons, Melb", which has been stamped to back. The middle and bottom title are also "Stokes & Sons, Melb" but are in darkened brass, and have the mark mark in raised letters at back base of title.
- Above Right: WW1 style New Zealand Mounted Rifle Shoulder titles by "J R Gaunt, London". Both have D shaped copper looped lugs and are stamped with the maker mark.
- Above Right: WW1 style New Zealand Mounted Rifle Shoulder titles by "J R Gaunt, London". Both have D shaped copper looped lugs and are stamped with the maker mark.